1. Introducción e información de seguridad
This manual provides instructions for the assembly, operation, and maintenance of your HOOBRO Kitchen Island with Storage and Power Outlet. Please read all instructions carefully before assembly and use to ensure safe and proper functionality.
Instrucciones de seguridad importantes:
- Monte siempre la unidad sobre una superficie suave y limpia para evitar rayones.
- Asegúrese de que todos los tornillos y fijaciones estén bien apretados antes de usar. Revíselos periódicamente y ajústelos según sea necesario.
- Do not exceed the maximum weight capacity of 66 lb (30 kg) per shelf.
- Use the adjustable feet to level the island on uneven surfaces to prevent tipping.
- Mantenga a los niños y las mascotas alejados del área de reunión.
- No coloque objetos calientes directamente sobre la superficie sin protección.
- Asegúrese de que el cable de alimentación no quede pellizcado ni dañado durante el montaje o el uso.
- Only use the integrated power outlets for small kitchen appliances within their specified voltage y límites de corriente (120 V/12 A para CA, 5 V/2 A para USB).
2. Contenido del paquete
Verifique que todos los componentes estén presentes antes de comenzar el ensamblaje. Si alguna pieza falta o está dañada, contacte con atención al cliente.
Note: The exact number of small parts may vary slightly. Refer to the included parts list in your product packaging for precise quantities.

Imagen: Una imagen completa view de la isla de cocina HOOBRO, mostradaasing its three tiers, integrated power outlet on the side, and S-shaped hooks. The power cord is visible extending from the unit.
3. Instrucciones de montaje
Assembly typically requires an Allen key and a screwdriver (not included, but often provided with the product). Follow the numbered steps below.
- Paso 1: Desembale e identifique las piezas. Carefully remove all components from the packaging. Lay them out on a clean, soft surface. Identify each part by comparing it to the parts list in your product packaging.
- Paso 2: Ensamblar el marco. Attach the side frames to the main support bars using the provided screws. Do not fully tighten screws until all parts are loosely assembled.
- Paso 3: Instalar estantes. Slide the engineered wood shelves into their designated slots on the frame. Secure them with screws. The top shelf is the main countertop, the middle shelf is for appliances, and the bottom slatted shelf is for storage or wine bottles.
- Step 4: Attach Power Outlet. Secure the power outlet unit to the designated side panel of the island using the provided screws. Ensure the power cord is routed safely and not pinched.
- Step 5: Install S-shaped Hooks. Attach the S-shaped hooks to the side rail as desired for hanging utensils.
- Paso 6: Apriete todos los tornillos. Once all components are in place, systematically tighten all screws using the Allen key and screwdriver. Ensure the structure is stable.
- Paso 7: Ajuste los pies. Turn the adjustable feet at the bottom of the island to level the unit on your floor. This prevents wobbling and ensures stability.

Image: A detailed diagram illustrating the dimensions of the HOOBRO Kitchen Island in both centimeters and inches, highlighting the length, width, and height of the unit and its shelves.

Image: A collage showing four key features: protective rails to prevent items from falling, S-shaped hooks for hanging utensils, a slatted bottom shelf designed as a wine rack, and adjustable feet for leveling the unit.
4. Instrucciones de funcionamiento
Your HOOBRO Kitchen Island is designed for versatile use in various home environments.
Uso de la toma de corriente:
- Plug the island's main power cord into a standard 120V wall outlet.
- The integrated power strip provides two AC outlets (120V/12A) and two USB ports (5V/2A).
- Connect small kitchen appliances such as coffee makers, toasters, or blenders to the AC outlets.
- Use the USB ports to charge compatible electronic devices.
- No sobrecargue la regleta. Asegúrese de que el voltaje totaltagEl número de dispositivos conectados no supera el límite especificado.
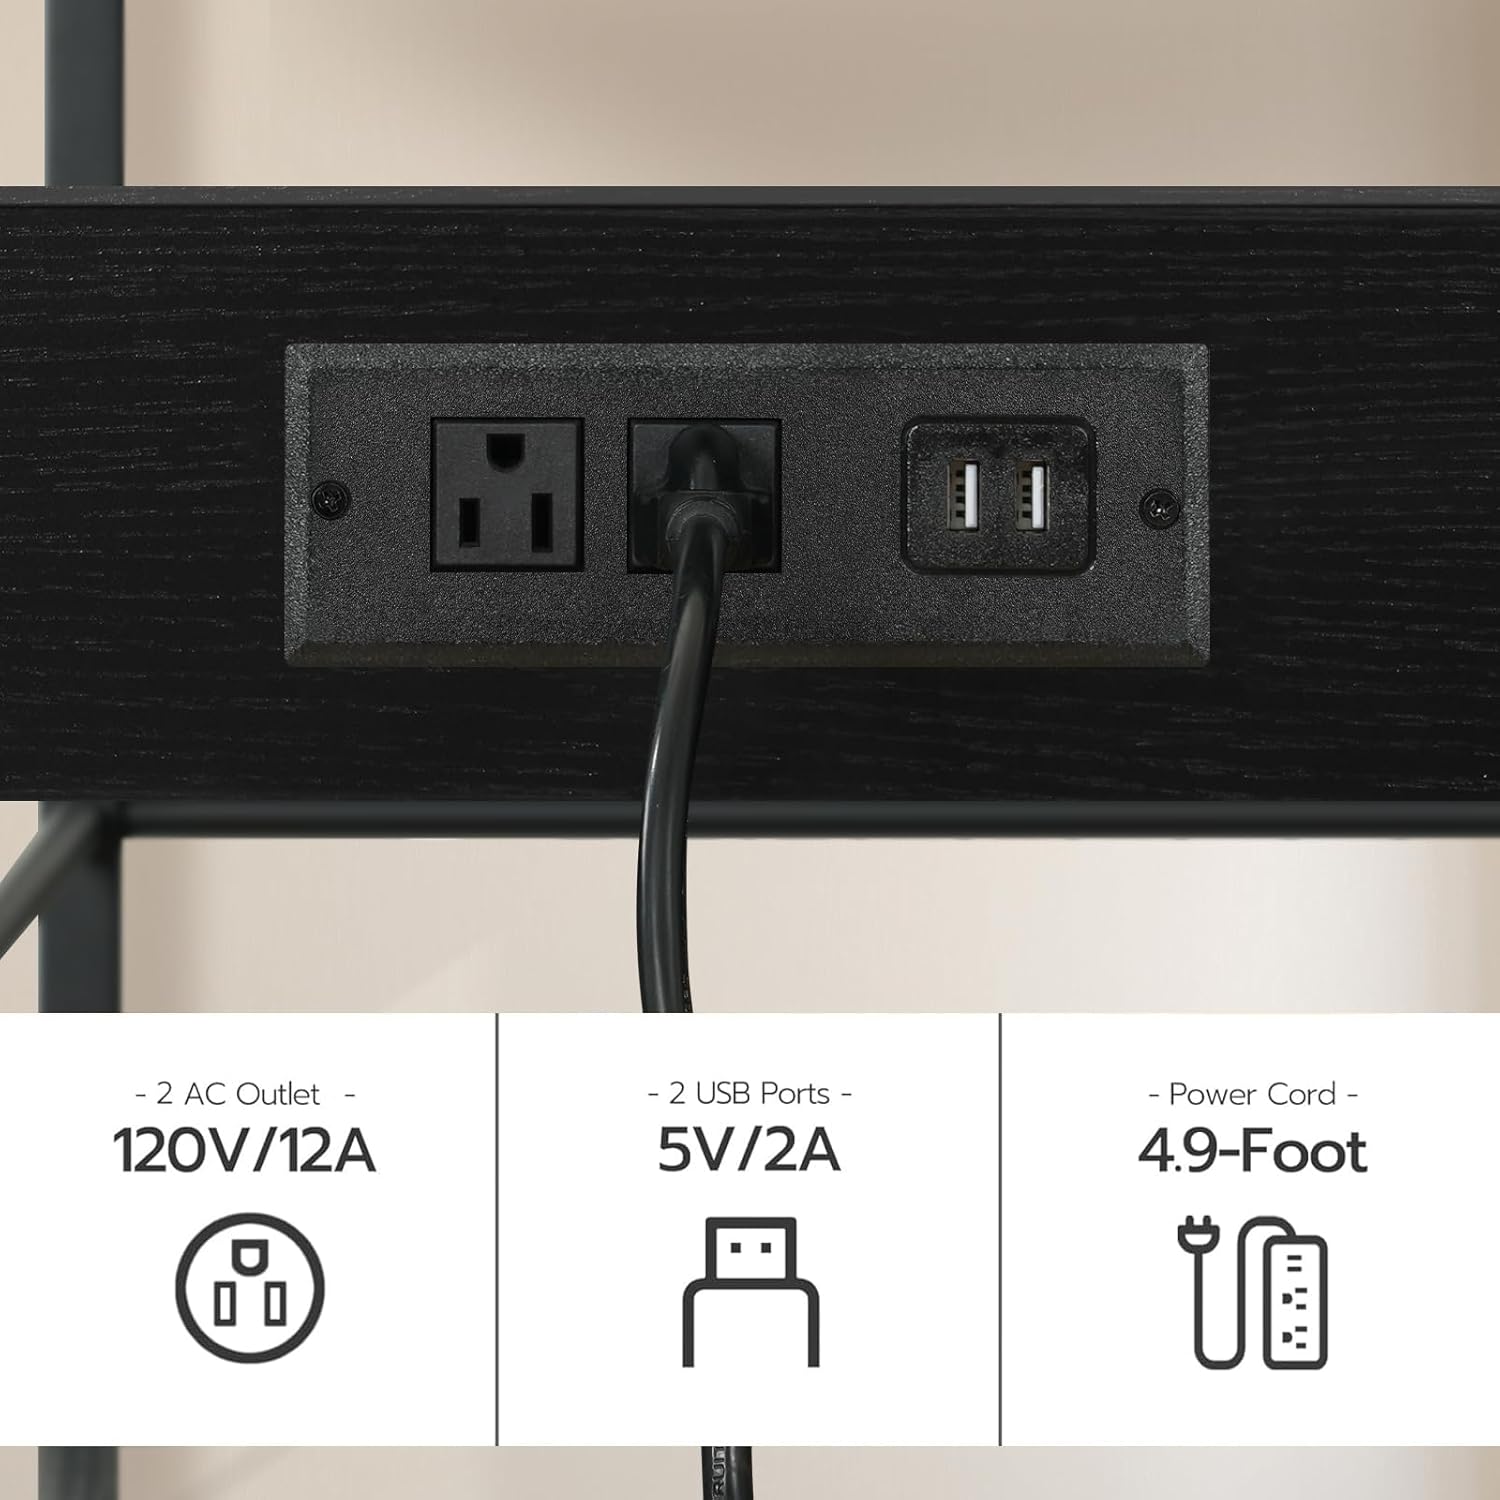
Imagen: Un primer plano view of the integrated power outlet on the side of the kitchen island, clearly showing two standard AC outlets and two USB charging ports, along with the attached power cord.
Utilizando almacenamiento y funciones:
- The top surface serves as a countertop for food preparation or serving.
- The middle shelf is suitable for microwaves, coffee machines, or other small appliances.
- The bottom slatted shelf can store pots, pans, dishes, or function as a wine rack.
- Use the S-shaped hooks to hang kitchen utensils, towels, or other accessories for easy access.
- The protective rails on the middle shelf help prevent items from falling off.

Image: The HOOBRO Kitchen Island positioned in a dining room, serving as a coffee station with a coffee maker, mugs, and decorative items on the top shelf, and a microwave on the middle shelf.

Image: The HOOBRO Kitchen Island in a kitchen setting, showcasing a microwave, various bottles, and kitchenware stored on its shelves, demonstrating its practical storage capabilities.
5. Mantenimiento
Proper maintenance will extend the lifespan of your kitchen island.
- Limpieza: Wipe surfaces with a dry cloth. For spills, use a damp cloth immediately and dry thoroughly. Avoid harsh chemicals or abrasive cleaners.
- Inspección: Revise periódicamente todos los tornillos y conexiones para asegurarse de que estén bien apretados. Vuelva a apretarlos si es necesario.
- Cable de alimentación: Inspect the power cord and plug for any signs of damage. If damaged, discontinue use and contact customer support.
6. Solución de problemas
Consulte esta sección para conocer problemas comunes y sus soluciones.
| Problema | Posible causa | Solución |
|---|---|---|
| Island is wobbly/unstable. | Piso irregular; tornillos sueltos. | Adjust the leveling feet at the bottom of the island. Tighten all assembly screws. |
| Las tomas de corriente no funcionan. | Island not plugged in; wall outlet not working; overloaded circuit; damaged cord. | Ensure the island's power cord is securely plugged into a functional wall outlet. Check your home's circuit breaker. Do not exceed the power strip's capacity. If the cord is damaged, discontinue use. |
| Las piezas no encajan durante el montaje. | Orientación incorrecta; piezas incorrectas utilizadas. | Review the assembly instructions and diagrams carefully. Ensure parts are oriented correctly and that you are using the right components for each step. Do not force parts together. |
7. Especificaciones
| Característica | Detalle |
|---|---|
| Número de modelo | BB021ZD01 |
| Dimensiones (L x An x Al) | 35.4" x 18.9" x 35.8" (90 cm x 48 cm x 91 cm) |
| Color | Negro |
| Material | Madera de ingeniería, estructura de metal |
| Número de niveles | 3 |
| Capacidad de peso (por estante) | 66 libras (30 kg) |
| Toma de corriente | 2 tomas de CA (120 V/12 A), 2 puertos USB (5 V/2 A) |
| Longitud del cable de alimentación | 4.9 pies (1.5 metros) |
| Características especiales | Protective rails, S-shaped hooks, adjustable feet |
8. Garantía y soporte
HOOBRO products are designed for quality and durability. For warranty information, product support, or to report missing/damaged parts, please refer to the contact information provided in your product packaging or visit the official HOOBRO webSitio web. Conserve su comprobante de compra para reclamaciones de garantía.