1. Introducción
Thank you for choosing the IMAGE HL420 Rechargeable Ultra-Bright Barbecue Grill Light. This versatile and durable light is designed to provide optimal illumination for your grilling, outdoor cooking, and various other tasks. Featuring a flexible gooseneck, magnetic base, and dual power options, it ensures convenience and reliability.
2. Contenido del paquete
Verifique que todos los artículos enumerados a continuación estén incluidos en su paquete:
- 2 x IMAGE HL420 Barbecue Grill Lights
- 2 x Rechargeable 18650 Batteries (pre-installed or separate)
- 2 x USB Charging Cables (pin connector)
- 2 x Metal Plates with Adhesive Backing

Image: Contents of the HL420 Grill Light package.
3. Características del producto
- Ultra-Bright LED Illumination: Provides powerful and clear lighting for various tasks.
- Cuello de cisne flexible: Allows for 360° adjustment of the light angle and precise positioning.
- Distancia focal ajustable: Easily customize the light beam from wide flood to focused spot.
- Base magnética: Securely attaches to most ferrous metal surfaces for hands-free operation.
- Opciones de energía dual: Operates with the included rechargeable 18650 battery or 3 AAA batteries (not included).
- Recargable por USB: Convenient charging via USB cable with an indicator light.
- Construcción duradera de aleación de aluminio: Built to withstand high temperatures and outdoor conditions.
- Metal Plates Included: For attaching the light to non-magnetic surfaces.
4. Configuración
4.1 Instalación de la batería
The grill light can be powered by either one 18650 rechargeable battery (included) or three AAA batteries (not included).
- Unscrew the bottom cap of the light to access the battery compartment.
- Insert one 18650 rechargeable battery with the positive (+) end facing towards the gooseneck, or insert three AAA batteries into the provided adapter, then place the adapter into the compartment.
- Securely screw the bottom cap back on.
4.2 Charging the 18650 Battery
To charge the included 18650 rechargeable battery:
- Locate the charging port on the side of the light's body, usually protected by a rubber cover.
- Gently lift the rubber cover and insert the small pin connector of the USB charging cable into the port.
- Connect the USB-A end of the cable to a standard USB power source (e.g., wall adapter, power bank, computer USB port).
- The LED indicator on the light will show rojo Durante la carga y el giro verde Cuando esté completamente cargado.
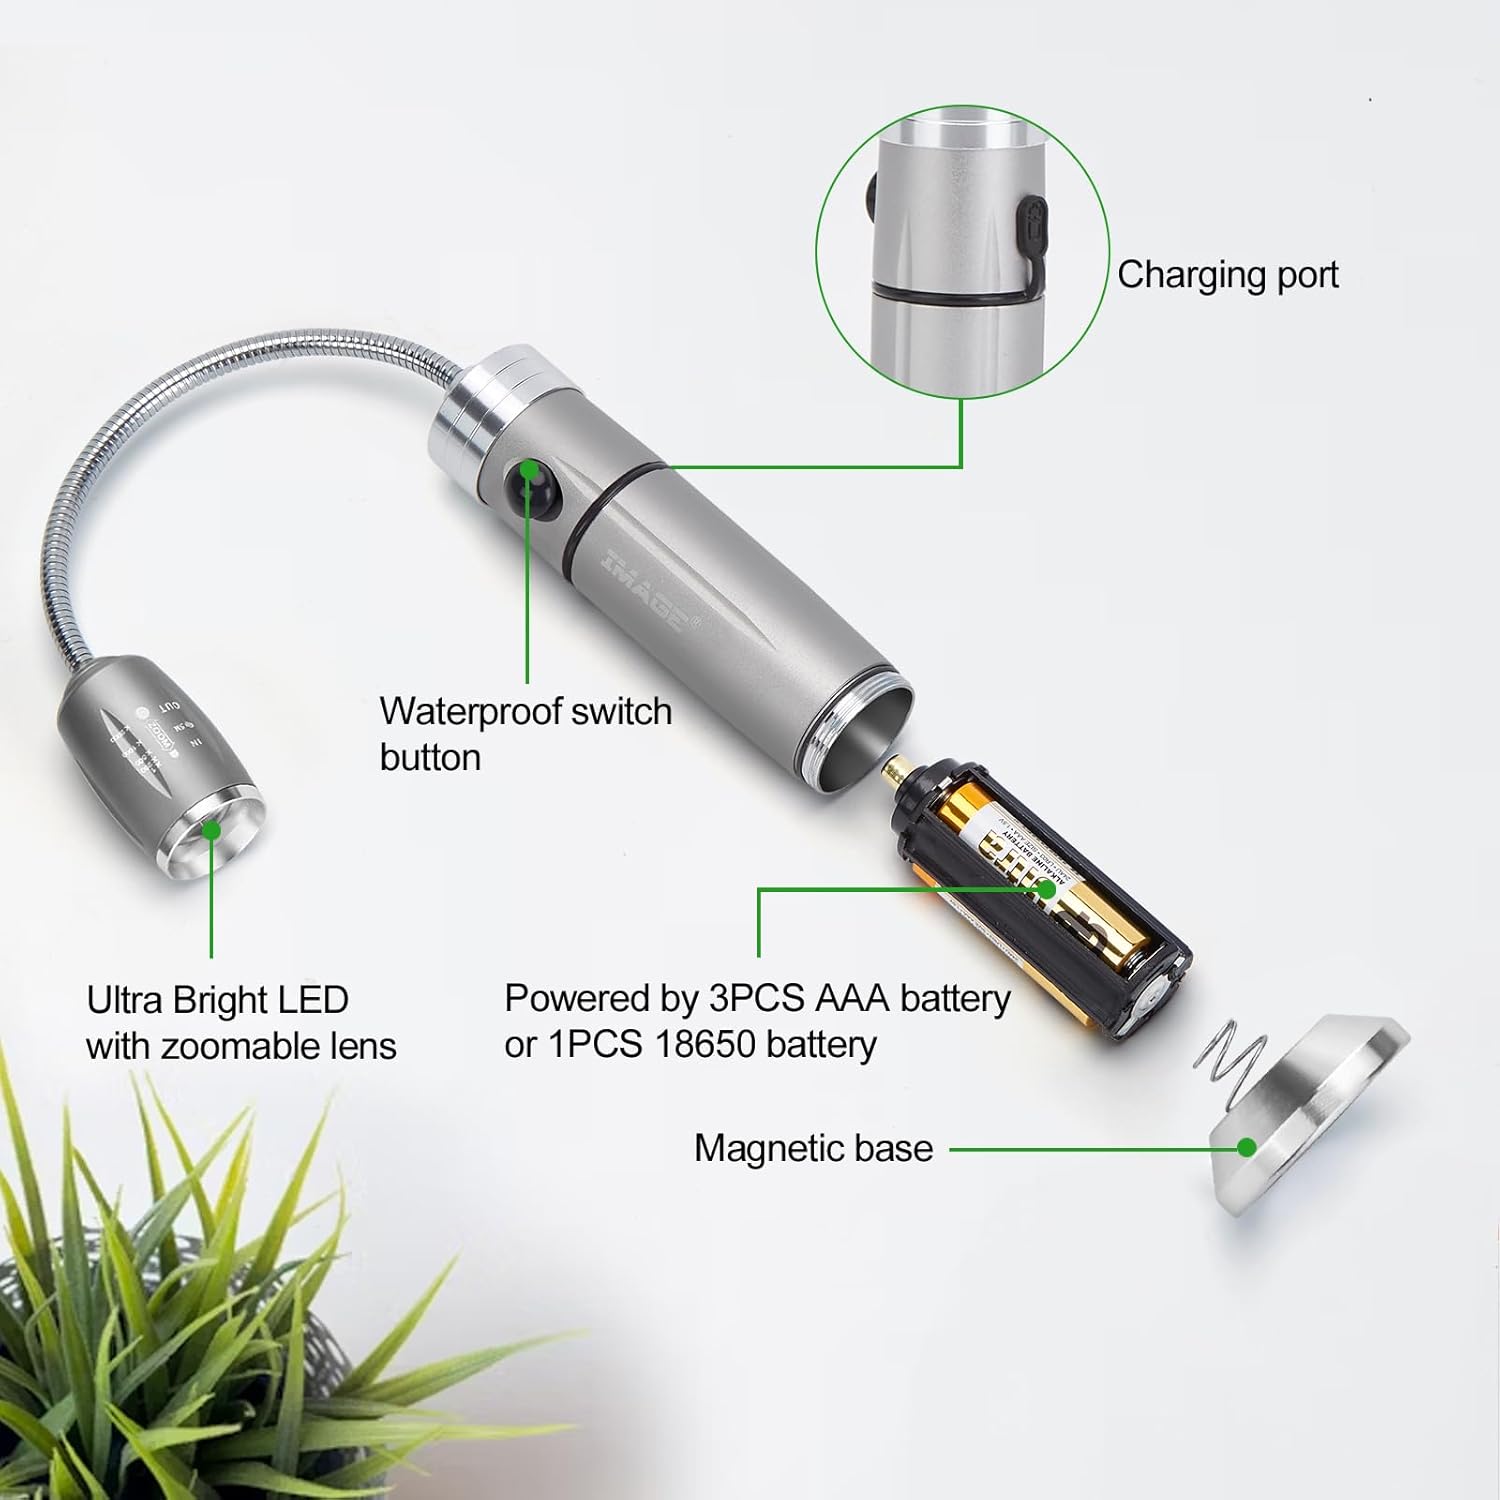
Image: Internal components and power options.

Image: USB charging with LED indicator.
4.3 Colocación de la luz
The light features a strong magnetic base for easy attachment to metal surfaces.
- Para superficies metálicas: Simply place the magnetic base directly onto any ferrous metal surface, such as a grill lid, car hood, or metal shelf.
- Para superficies no metálicas: Use the included metal plates. Peel off the adhesive backing from a metal plate and firmly press it onto the desired non-magnetic surface. Once the plate is secured, you can attach the light's magnetic base to the metal plate.

Image: Magnetic base attachment to steel surfaces.

Image: Using metal plates for non-magnetic surfaces.
5. Instrucciones de funcionamiento
5.1 Encendido/Apagado
Press the power button located on the body of the light once to turn it on. Press the button again to turn it off.
5.2 Ajuste del cuello de cisne
The flexible gooseneck allows you to direct the light exactly where it's needed. Simply bend and twist the gooseneck to achieve your desired angle and position.

Image: Flexible gooseneck adjustment.
5.3 Adjusting Focal Distance and Lighting Range
The head of the light features an adjustable lens. Gently slide the head of the light forward or backward to change the focal distance and adjust the lighting range from a wide floodlight to a concentrated spotlight.

Image: Adjustable focal distance and lighting range.
5.4 Aplicaciones versátiles
Beyond grilling, the HL420 light is ideal for various tasks requiring focused illumination:
- Automotive repairs (under the hood)
- Workshop tasks
- CampActividades al aire libre y de ocio
- Luz para leer
- Iluminación de emergencia

Image: Grill lights in use during a barbecue.

Image: Versatile applications in various settings.
5.5 Vídeo de demostración del producto
Video: A comprehensive demonstration of the Rechargeable Ultra-Bright Barbecue Grill Light's features and functionality, including its flexible gooseneck, adjustable focus, magnetic base, and charging process.
6. Mantenimiento
- Limpieza: Limpie la luz con un paño suave yamp Paño. No utilice limpiadores abrasivos ni sumerja la luz en agua.
- Cuidado de la batería: If storing the light for an extended period, remove the 18650 battery to prevent potential leakage. Recharge the battery periodically to maintain its lifespan.
- Almacenamiento: Guarde la luz en un lugar fresco y seco, alejado de la luz solar directa y de temperaturas extremas.
7. Solución de problemas
| Problema | Posible causa | Solución |
|---|---|---|
| La luz no se enciende. | La batería está muerta o instalada incorrectamente. | Recharge the 18650 battery or replace AAA batteries. Ensure batteries are inserted with correct polarity. |
| La luz es tenue. | Batería baja. | Recharge the 18650 battery or replace AAA batteries. |
| Magnetic base not sticking. | Surface is non-ferrous metal or non-magnetic. | Use the included adhesive metal plates on non-magnetic surfaces. |
| El indicador de carga no funciona. | Cable not properly connected or battery already full. | Ensure the charging cable is securely connected to both the light and the power source. Check if the battery is already fully charged (green light). |
8. Especificaciones
| Número de modelo | HL420 |
| Marca | IMAGEN |
| Fuente de luz | CONDUJO |
| Material | Aleación de aluminio |
| Fuente de poder | 1 x 18650 Rechargeable Battery (included) or 3 x AAA Batteries (not included) |
| Volumentage | 3 voltios |
| Tipo de montaje | Base Magnética |
| Longitud de cuello de cisne | Aprox. 5 pulgadas (13 cm) |
| Altura base | Aprox. 3.9 pulgadas (10 cm) |
| Item Weight (per light) | Aprox. 0.5 libras (0.23 kg) |
| Cantidad del paquete | 2 luces |
| Fabricante | Brainytrade |
| País natal | Porcelana |
9. Garantía y soporte
For warranty information or technical support, please refer to the product packaging or contact the seller directly through your purchase platform. Keep your purchase receipt as proof of purchase.