VT-5 ACÉMICO
ACEMIC UHF Wireless Violin Microphone System VT-5 Instruction Manual
Model: VT-5 | Brand: ACEMIC
Introducción
This manual provides detailed instructions for the setup, operation, maintenance, and troubleshooting of your ACEMIC VT-5 UHF Wireless Violin Microphone System. Please read this manual thoroughly before using the product to ensure optimal performance and longevity.
Contenido del paquete
Verifique que todos los artículos enumerados a continuación estén incluidos en su paquete:
- 1 x Transmisor
- 1 x Receiving Antenna
- 1 x Charging Cable (2-in-1)
- 1 adaptador de 6.35 mm a 3.5 mm
- 1 x Manual de usuario
- 1 x Caja de transporte
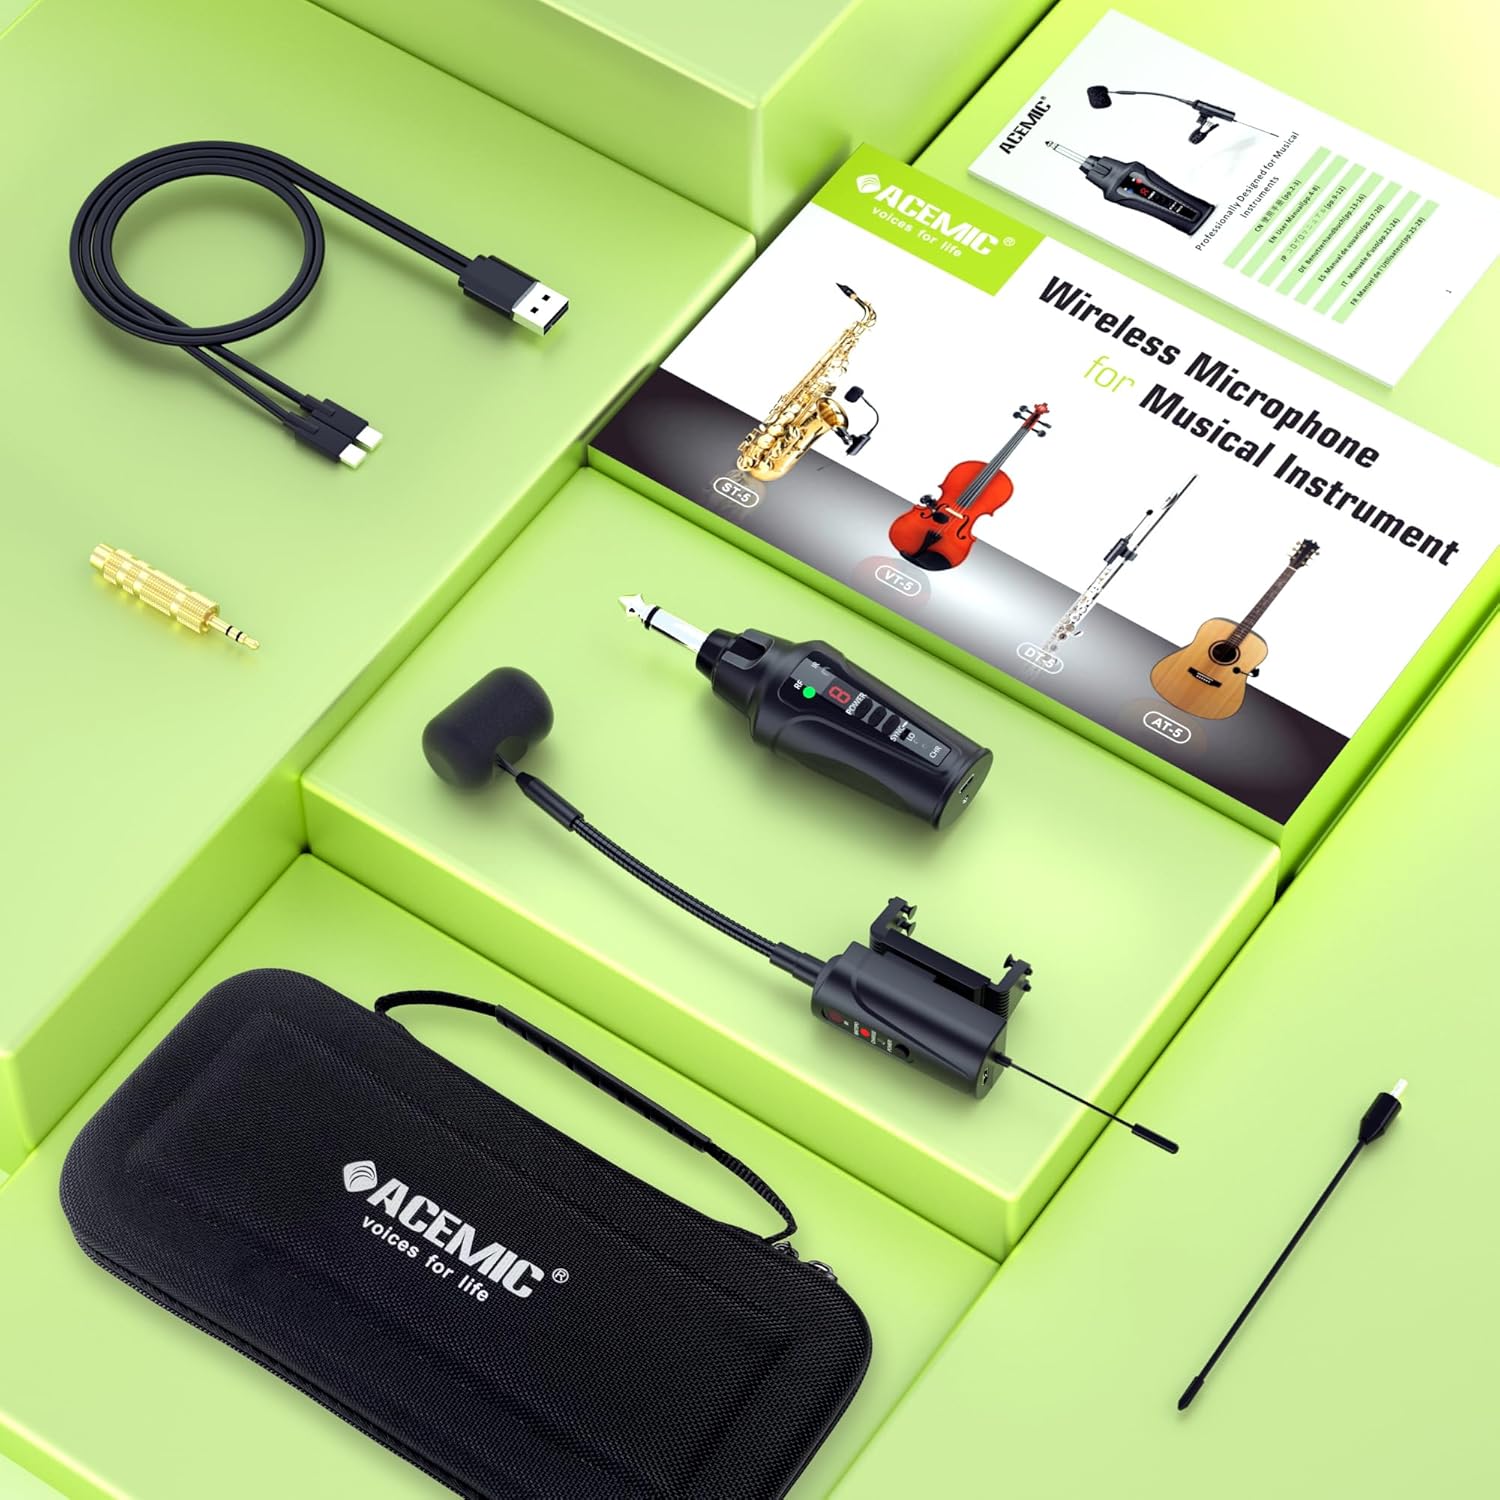
Image: All components included in the ACEMIC VT-5 package, neatly arranged in its carrying case.
Instrucciones de instalación
1. Carga de los dispositivos
Before initial use, fully charge both the transmitter and receiver using the provided 2-in-1 charging cable. A full charge typically takes 2.5 to 3 hours and provides approximately 6 hours of continuous use.

Image: Illustration of the transmitter and receiver being charged simultaneously with the included dual-port USB-C cable.
2. Attaching the Microphone to the Violin
The VT-5 features a gooseneck adjustable clip-on design. Carefully attach the spring clip with silicone pads onto the side of your violin. The silicone ensures a firm grip without causing damage to the instrument. Adjust the flexible gooseneck to position the microphone optimally for sound capture.

Image: Close-up of the microphone's clip mechanism, demonstrating how it attaches to the violin with silicone pads for protection.
3. Conexión del receptor
Install the receiving antenna onto the bottom of the receiver. Plug the receiver into your active PA system, active speaker, amplifier, or audio mixer. Use the provided 6.35mm to 3.5mm adapter if your input requires a 3.5mm jack.

Image: Visual guide for connecting the receiver to an audio system.
4. Frequency Pairing
The system uses infrared automatic pairing. Follow these steps to pair the transmitter and receiver:
- Long press the 'plus' button on the transmitter until the numbers on the display start flashing.
- Use the 'plus' or 'minus' buttons to select your desired frequency channel.
- Once the channel is selected, push the 'SYNC' key on the transmitter to the right.
- Align the IR sensor of the microphone (transmitter) with the RF sensor of the receiver.
- The RF green light on the receiver will illuminate, indicating successful frequency pairing.
- Push the 'SYNC' key on the transmitter to the left to lock the frequency.
For a visual guide on frequency pairing, please refer to the video below:
Video: A detailed tutorial demonstrating the frequency pairing process for the ACEMIC 5 series wireless microphone system.
Instrucciones de funcionamiento
1. Encendido y apagado
Press and hold the power button on both the transmitter and receiver to turn them on or off. Ensure both devices are powered on for operation.
2. Channel Selection and Multiple Set Usage
The VT-5 offers 16 preset adjustable channels to prevent interference. Up to 4 systems can be used simultaneously in the same location.
- To pair the first transmitter with the first receiver, set them to the same channel using the frequency pairing method described above.
- When pairing a second set, select a channel number that is at least 3 channels apart from the first set's channel to avoid interference.
- Repeat this method for subsequent systems until all four are matched.

Image: Explanation of how to utilize the 16 adjustable channels for simultaneous use of multiple microphone systems.
3. Sound Reproduction
The built-in highly sensitive condenser microphone captures the instrument's sound, delivering clear and realistic audio. The UHF frequency and digital audio transmission technology ensure stable transmission up to 130 feet in open areas with an ultra-short audio delay.

Image: Visual representation of the microphone's high-quality sound capture and output.
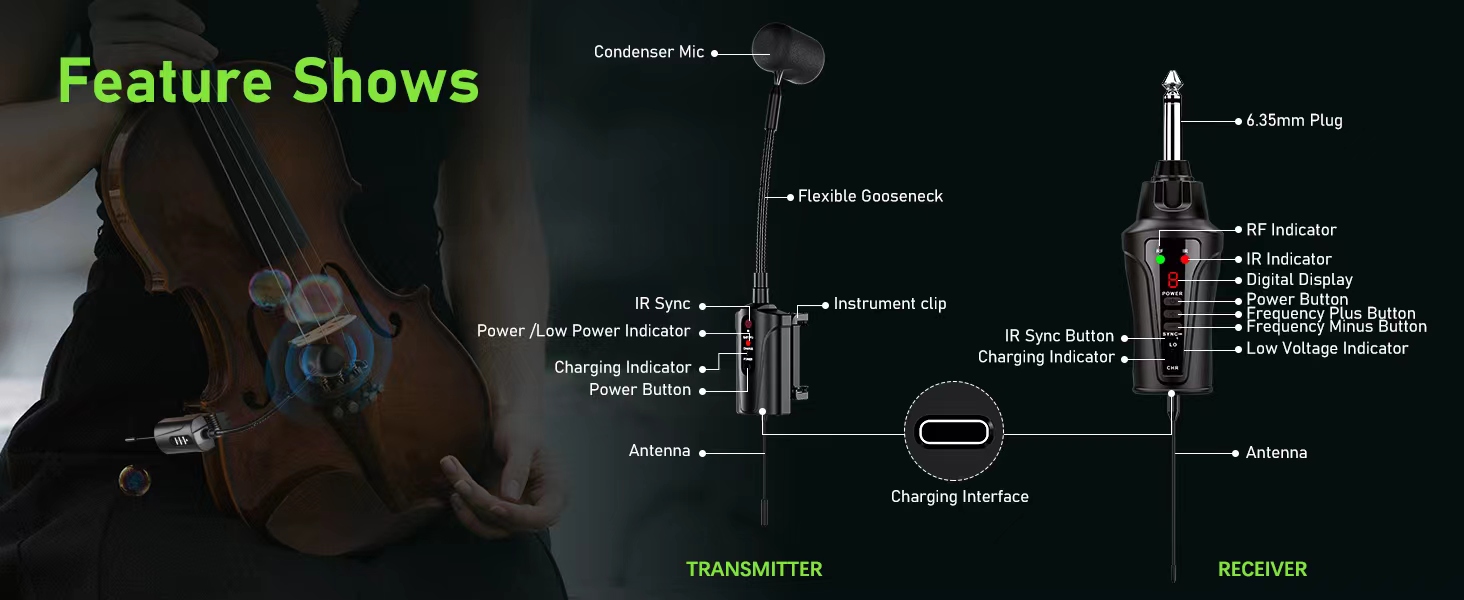
Image: Illustration of the wireless transmission range, showing a musician freely moving while connected to an audio mixer.
Mantenimiento
To ensure the longevity and optimal performance of your ACEMIC VT-5 system, follow these maintenance guidelines:
- Limpieza: Use a soft, dry cloth to clean the transmitter, receiver, and microphone. Avoid using harsh chemicals or abrasive materials.
- Almacenamiento: Store the system in its provided carrying case when not in use to protect it from dust, moisture, and physical damage.
- Cuidado de la batería: Recharge the built-in lithium polymer batteries regularly, even if the system is not used frequently, to maintain battery health. Avoid fully discharging the batteries for extended periods.
- Antena: Ensure the receiving antenna is properly installed before use and removed carefully when storing to prevent bending or damage.
Solución de problemas
If you encounter issues with your ACEMIC VT-5 system, refer to the following common problems and solutions:
| Problema | Posible causa | Solución |
|---|---|---|
| No hay salida de sonido | Devices not powered on; Incorrect pairing; Low battery; Receiver not connected to audio system. | Ensure both transmitter and receiver are powered on. Re-perform frequency pairing. Charge both devices. Verify receiver is securely plugged into the audio system. |
| Interferencia o mala calidad de sonido | Nearby electronic devices; Other wireless systems on the same channel; Obstructions between transmitter and receiver. | Change the operating channel on the transmitter and receiver. Ensure there are at least 3 channels difference if using multiple systems. Move away from potential sources of interference. Ensure clear line of sight between devices. |
| Dificultad para emparejar | IR sensors not aligned; Incorrect pairing procedure. | Ensure the IR sensors on the transmitter and receiver are directly facing and touching each other during the sync process. Follow the frequency pairing steps precisely. |
| Duración corta de la batería | Carga incompleta; Batería vieja. | Ensure devices are charged for the full 2.5-3 hours. If battery life significantly degrades over time, contact customer support for potential battery replacement. |
Presupuesto
| Característica | Especificación |
|---|---|
| Factor de forma del micrófono | Cuello de cisne |
| Fuente de poder | Funciona con pilas (2 pilas de polímero de litio incluidas) |
| Material | Metal, Plástico |
| Número de canales | 16 |
| Peso del artículo | 1.06 libras (0.48 kilogramos) |
| Dimensiones del paquete | 10.24 x 5.31 x 2.32 pulgadas |
| Nombre del modelo | VT-5 |
| Tecnología de conectividad | Infrarrojo |
| Tipo de conector | conector de 3.5 mm, conector de 6.35 mm |
| Característica especial | Luz indicadora de batería |
| Dispositivos compatibles | Sistema PA, Ampmezclador, mezclador de audio |
| Patrón polar | Unidireccional |
| Tipo de batería | Polímero |
| Fabricante | ACÉMICO |
Garantía y soporte
For warranty information or technical support, please refer to the documentation included with your purchase or contact ACEMIC customer service directly. Keep your purchase receipt as proof of purchase for any warranty claims.
Ask a question about this manual
Ask about setup, troubleshooting, compatibility, parts, safety, or missing instructions. Manuals+ will review the question and use this page’s manual context to help answer it.