
SecuFirst CWL401S
Manual del usuario del kit de cámara de vigilancia para exteriores SecuFirst 2K con monitor interior
Model: CWL401S
1. Introducción
This manual provides detailed instructions for the installation, operation, and maintenance of your SecuFirst 2K Outdoor Surveillance Camera Kit. This system includes a 7-inch touchscreen monitor and an outdoor camera, designed for reliable security monitoring without requiring an internet connection for basic functions. It can also be used as a baby monitor, pet camera, or for elderly care.
2. Información de seguridad
- Asegúrese de que todas las conexiones de alimentación estén seguras y cumplan con el volumen especificado.tage (12 voltios).
- Do not place the camera near metal objects as this may reduce wireless range.
- Evite exponer el monitor a temperaturas extremas o luz solar directa.
- The outdoor camera is IP66 waterproof, but avoid submerging it in water.
- Mantener el producto fuera del alcance de los niños.
- Utilice únicamente los adaptadores de corriente proporcionados.
3. Contenido del paquete
Revise cuidadosamente el contenido del paquete. Si falta algún artículo o está dañado, contacte con atención al cliente.
- 1x 7-inch Touchscreen Monitor
- 1x Outdoor Camera with Multi-position Mounts
- 2x AC Power Adapters (1.8m cable)
- 1x Power Extension Cable (1.8m)
- 1x 64GB MicroSD Card (pre-installed in monitor)

Image: SecuFirst 2K Outdoor Surveillance Camera Kit showing the monitor and camera.
4. Producto terminadoview
4.1. 7-inch Touchscreen Monitor

Image: Diagram of the 7-inch touchscreen monitor, highlighting its components and ports.
- Pantalla táctil: 7-inch interface for live view, reproducción y configuración.
- Botón de encendido: Mantenga presionado durante 3 segundos para encender/apagar.
- Puerto de antena: For connecting the monitor's antenna to ensure stable wireless connection.
- Puerto USB: For connecting external storage (up to 2TB HDD/USB drive).
- Vocero: Para salida de audio.
- Ranura para tarjeta SD: For the included 64GB MicroSD card (supports up to 128GB).
- Puerto de alimentación: For connecting the monitor's power adapter.
- Puerto Ethernet: For optional wired internet connection.
- Botón de reinicio: Para restablecer de fábrica (use un PIN).
- Indicador de grabación: Lights up when recording.
- Indicador de encendido: Muestra el estado de energía.
- Micrófono: Para comunicación de audio bidireccional.
4.2. Cámara exterior

Image: Diagram of the outdoor camera, showing its features and connection points.
- Antena: For wireless signal transmission to the monitor.
- Adjustable Camera Mount: Allows for flexible positioning.
- Cable de alimentación de CA: For connecting the camera to power.
- Indicador de estado de energía: Shows camera's operational status.
- Sensor de luz: Detecta la luz ambiental para la activación automática de la visión nocturna.
- LED IR: Infrared lights for clear night vision up to 300 meters.
- PIR Sensor de movimiento: Passive Infrared sensor for accurate thermal motion detection.
- Altavoz de audio: Para comunicación de audio bidireccional.
- Micrófono: Located behind the camera's swivel support for audio input.
- Conector de antena: For attaching the camera's antenna.
5. Configuración
5.1. Encendido inicial y emparejamiento
- Conecte la alimentación al monitor: Plug one AC power adapter into the monitor's power port and then into a power outlet.
- Conecte la alimentación a la cámara: Plug the second AC power adapter into the camera's power cable and then into a power outlet. If needed, use the included power extension cable.
- Emparejamiento automático: The camera and monitor are pre-paired at the factory. Once both are powered on, the live video feed from the camera should appear on the monitor within a few seconds.
- Posicionamiento: Place the monitor in a convenient indoor location. Mount the camera outdoors using the provided mounts. Ensure the camera is not near large metal objects to maintain optimal wireless range (up to 200 meters in open space, reduced by walls/windows).

Image: Illustrates the wireless, internet-free operation of the system, showing a user viewing the monitor and the camera mounted outdoors.
5.2. Expanding the System (Optional)
The system supports up to 4 cameras. Additional cameras can be purchased separately and easily paired with your existing monitor.

Image: Depicts how the system can be expanded to include up to four cameras, showing different monitor views with multiple camera feeds.
6. Instrucciones de funcionamiento
6.1. Vivir View y funciones básicas
Once powered on, the monitor will display the live feed from the connected camera(s). Use the touchscreen to navigate the interface.
- Traspuesta Views: If multiple cameras are connected, tap the channel numbers (CH1, CH2, etc.) at the top of the screen to switch between individual camera views or a multi-camera view.
- Audio bidireccional: Tap the microphone icon on the screen to speak through the camera's speaker. Tap again to end.
- Grabación: The system automatically records motion-triggered events to the installed 64GB MicroSD card. The REC indicator light on the monitor will illuminate during recording.
- Visión nocturna: La cámara cambia automáticamente al modo de visión nocturna en condiciones de poca luz, proporcionando imágenes nítidas en blanco y negro.
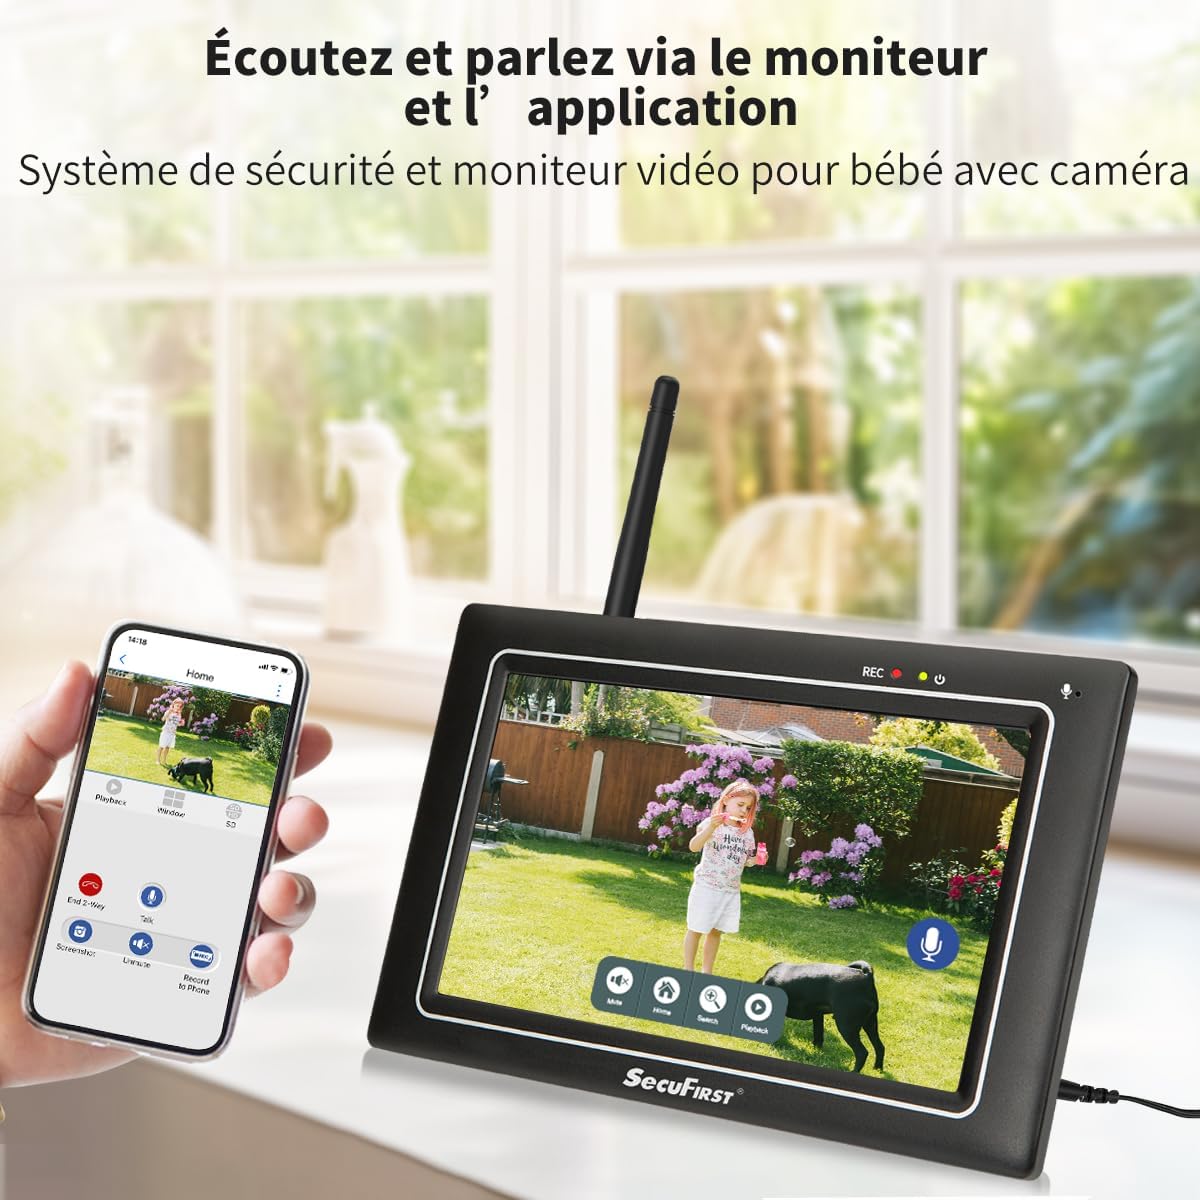
Image: Shows the monitor displaying a live feed, with icons for two-way audio and other functions.
6.2. Reproducción de alimentos grabadostage
Para volverview recorded events:
- De la vida view, tap the playback icon (usually a play symbol or calendar icon) on the monitor's touchscreen.
- Select the desired date and time from the interface.
- The monitor will display a list of recorded events. Tap on an event to play it back.
- Use the on-screen controls (play, pause, fast forward, rewind) to navigate the footage.

Image: The monitor's interface showing recorded events and playback controls.
6.3. Advanced Settings (via Monitor)
The monitor allows for various personal settings adjustments:
- Zonas de detección de movimiento: Define áreas específicas dentro de la cámara. view donde la detección de movimiento debe estar activa.
- Enmascaramiento de privacidad: Block out specific areas in the camera's view para la privacidad.
- Volumen de alarma: Adjust the volume of alarms triggered by motion.
- Modo de sueño: Activate "sleep mode" to save energy, turning the screen into a digital clock.
- Administración de almacenamiento: The included 64GB MicroSD card can be replaced with up to a 128GB MicroSD card, or an external HDD/USB drive up to 2TB can be connected via the USB port for extended storage.
6.4. Smartphone App Connectivity (Optional)
For remote access and advanced features, connect the monitor to the internet via Ethernet cable or Wi-Fi. Then download the "Observer HD+" app.
- Connect Monitor to Internet: Plug an Ethernet cable into the monitor's Ethernet port or configure Wi-Fi settings on the monitor.
- Descargar aplicación: Buscar "Observer HD+" in your smartphone's app store and install it.
- Emparejar dispositivo: Follow the in-app instructions to add your SecuFirst system. This typically involves scanning a QR code displayed on the monitor.
- Acceso remoto: Una vez emparejado, puede view live video, listen and speak through the camera, and play back recordings from your smartphone or tablet anywhere.

Image: Shows the monitor and a smartphone displaying the "Observer HD+" app interface for remote viewing y control.
7. Mantenimiento
- Limpieza: Use a soft, dry cloth to clean the monitor screen and camera lens. Do not use liquid cleaners or aerosols directly on the devices.
- Actualizaciones de firmware: Check the SecuFirst websitio o aplicación periódicamente para obtener actualizaciones de firmware para garantizar un rendimiento y una seguridad óptimos.
- Administración de almacenamiento: Regularly back up important recordings from the MicroSD card or external storage to prevent data loss. The system will overwrite the oldest recordings when storage is full.
- Inspección de cables: Periodically inspect all power cables for any signs of wear or damage. Replace immediately if damage is found.
8. Solución de problemas
| Problema | Posible causa | Solución |
|---|---|---|
| No hay imagen en el monitor. | Monitor or camera not powered on; camera out of range; pairing lost. | Ensure both monitor and camera are plugged in and powered. Move camera closer to monitor. If still no image, try re-pairing the camera (refer to advanced settings in monitor menu). |
| Poor image quality or signal interference. | Obstructions (walls, metal objects); too far from monitor; interference from other wireless devices. | Relocate camera or monitor to minimize obstructions. Ensure antennas are properly attached. Reduce interference by moving other wireless devices away. |
| La detección de movimiento no funciona o es demasiado sensible. | Incorrect sensitivity settings; detection zone not configured; environmental factors (e.g., swaying trees). | Adjust motion detection sensitivity and configure detection zones via the monitor settings. Ensure camera lens is clean. |
| No se puede conectar a la aplicación del teléfono inteligente. | Monitor not connected to internet; incorrect app settings; network issues. | Ensure monitor is connected to Wi-Fi or Ethernet. Verify app settings and device pairing. Check your internet connection. |
| El audio bidireccional no es claro o no funciona. | Microphone/speaker blocked; volume too low; signal interference. | Ensure nothing is obstructing the microphone or speaker on both devices. Adjust volume settings on the monitor. Check for signal interference. |
9. Especificaciones
| Característica | Detalle |
|---|---|
| Número de modelo | CWL401S |
| Resolución de grabación de vídeo | 2K (3 MP) |
| Tamaño de la pantalla del monitor | 7 pulgadas (pantalla táctil) |
| Tecnología de comunicación inalámbrica | Wi-Fi (for optional app connectivity) |
| Wireless Range (Open Space) | Hasta 200 metros |
| Rango de visión nocturna | Hasta 300 metros |
| Material de la cámara | Metal Casing |
| Material del monitor | Matte Black Plastic Casing |
| Waterproof Rating (Camera) | IP66 |
| Entrada de potencia | 12 voltios |
| Consumo de energía | 12 vatios |
| Dimensiones (L x An x Al) | 20 x 14.2 x 7.8 cm |
| Peso | 1.58 kilogramos |
| Almacenamiento incluido | Tarjeta Micro SD de 64 GB |
| Capacidad máxima de almacenamiento | 128GB MicroSD / 2TB External HDD/USB |
| Características especiales | Local Recording, Night Vision, App Control, Motion Detector (AI + PIR), Plug and Play, Pre-paired, Two-way Audio |
10. Garantía y soporte
SecuFirst products are designed for reliability and performance. For warranty information and technical support, please refer to the contact details provided with your purchase or visit the official SecuFirst websitio.
Fabricante: ALC Electrónica BV
For further assistance, please contact SecuFirst customer service.
Ask a question about this manual
Ask about setup, troubleshooting, compatibility, parts, safety, or missing instructions. Manuals+ will review the question and use this page’s manual context to help answer it.