Introducción
This manual provides detailed instructions for the installation, operation, and maintenance of your Desktronic Dual Monitor Support. Please read this manual thoroughly before installation to ensure correct setup and safe use of the product. Keep this manual for future reference.
Información de seguridad
- Asegúrese de que todos los componentes estén presentes y sin daños antes del montaje.
- Do not exceed the maximum weight capacity of 8 kg (17.6 lbs) per monitor.
- Do not exceed the maximum monitor size of 34 inches.
- Ensure the desk surface is stable and strong enough to support the combined weight of the monitor arm and monitors.
- Apriete todos los tornillos firmemente, pero no los apriete demasiado.
- Mantenga a los niños y a las mascotas alejados durante la instalación.
- Always use two people for lifting and positioning heavy monitors.
- Ajuste cuidadosamente la tensión del resorte de gas para que coincida con el peso de su monitor.
Contenido del paquete
Por favor verifique que todas las piezas estén incluidas en su paquete:
- Monitor Arm Assembly (2 arms, 1 base)
- Escritorio Clamp
- Base con ojal
- Placas VESA (2)
- Kit de hardware (tornillos, arandelas, llaves Allen)
- Clips de gestión de cables

Image: All components of the Desktronic Dual Monitor Support, including the base, two arms, VESA plates, desk clamp, grommet mount, and various screws and tools.
Instrucciones de instalación
The Desktronic Dual Monitor Support offers two installation methods: Desk Clamp and Grommet Mount.
1. Elija su método de montaje
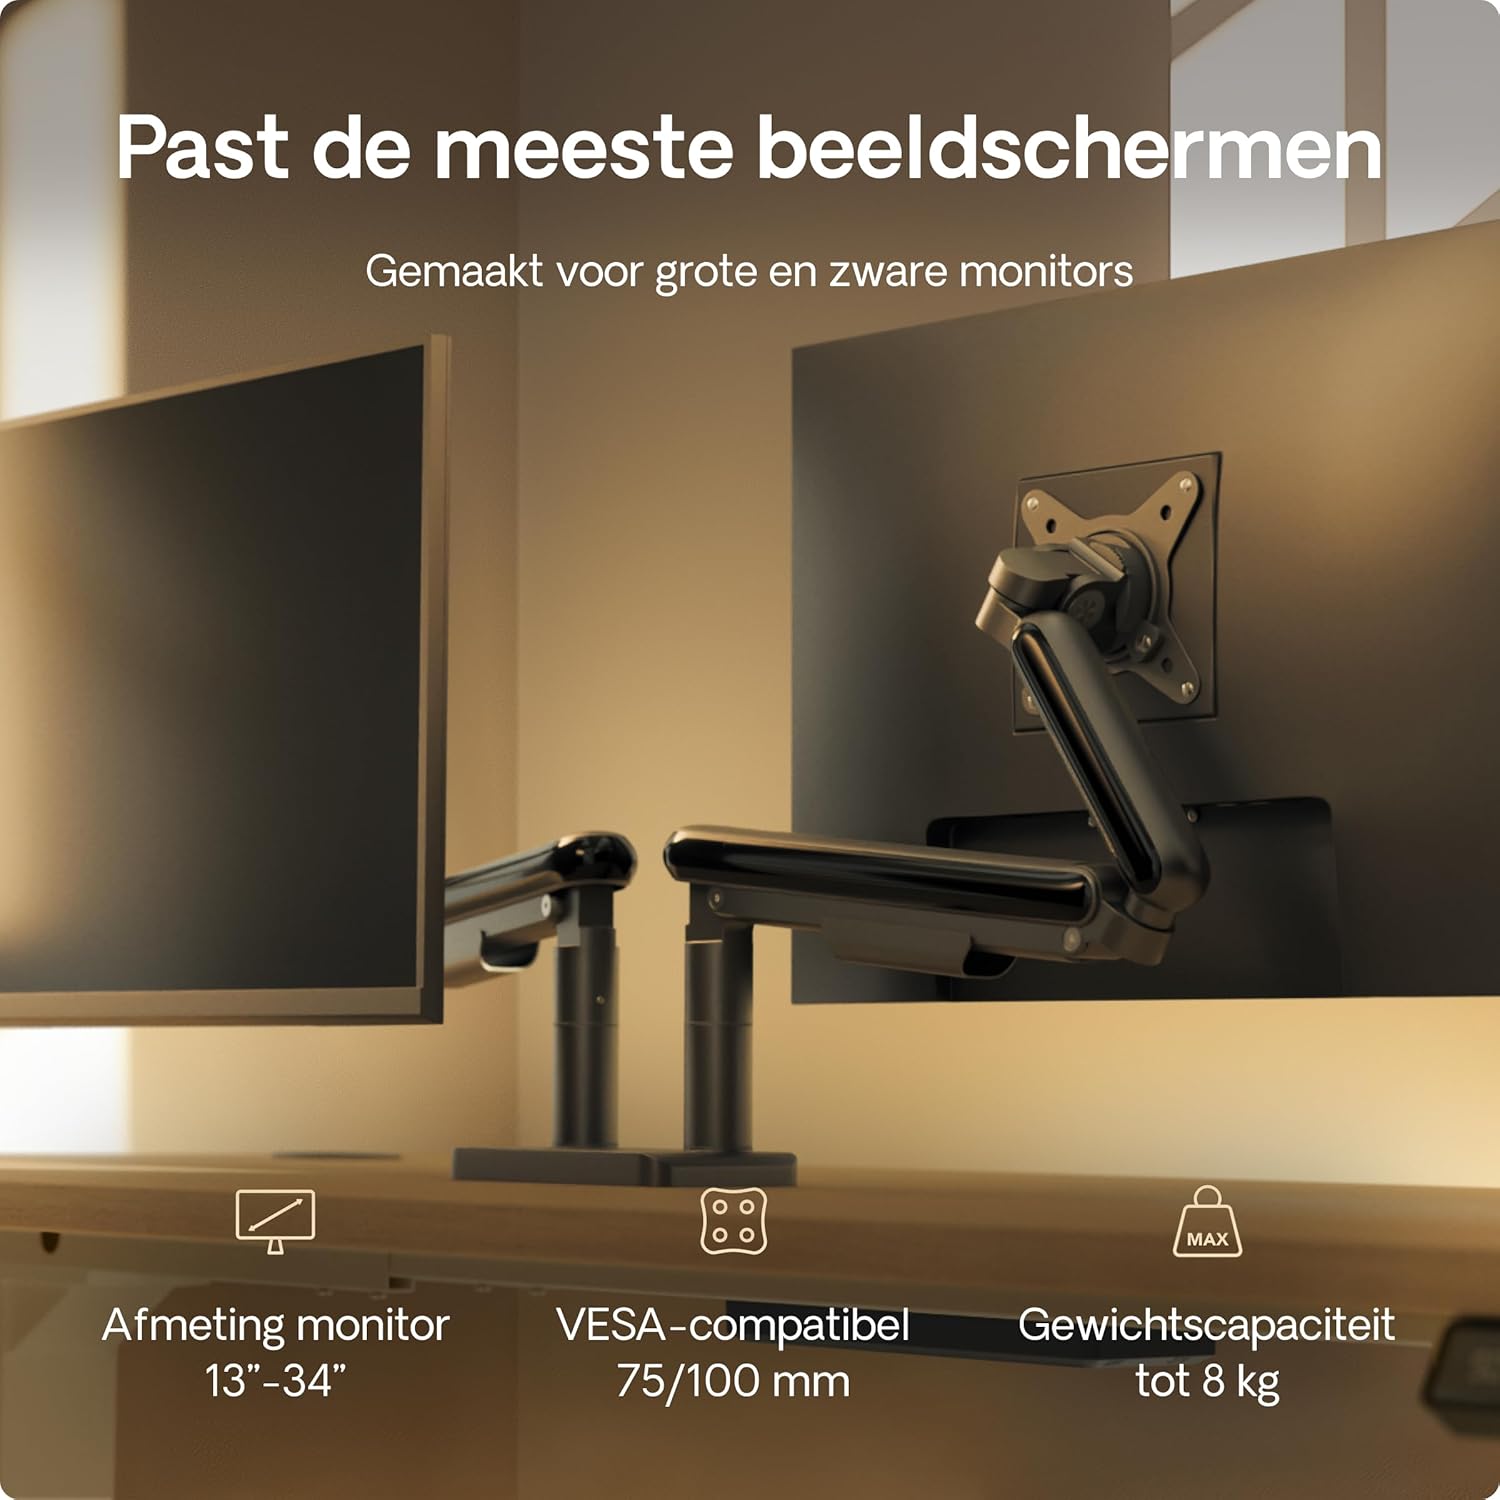
Image: Illustration showing the two installation options: a desk clamp for the edge of a desk and a grommet mount for desks with a pre-drilled hole. The desk thickness range of 10-40mm is indicated.
Escritorio Clamp Installation (for desk edges 10-40mm thick)
- Fije el escritorio clamp to the main pole using the provided screws.
- Position the monitor arm base on the edge of your desk.
- Apriete el clamp screw until the arm is securely fastened to the desk.
Grommet Mount Installation (for desks with a hole)
- Si su escritorio tiene un orificio para ojales, inserte la base con ojales a través del orificio.
- Secure the grommet base from underneath the desk using the provided plate and screw.
- Attach the monitor arm base to the grommet base.
2. Conecte los brazos del monitor a la base
Slide the monitor arms onto the central pole of the base. Ensure they are at the desired height before tightening the locking mechanism.
3. Fije las placas VESA a los monitores
- Locate the VESA mounting holes on the back of your monitors (75x75mm or 100x100mm).
- Attach the VESA plates to the back of each monitor using the appropriate screws from the hardware kit. Do not overtighten.

Image: A VESA plate being attached to the back of a monitor using screws, demonstrating the connection point for the monitor arm.
4. Montar los monitores en los brazos
- Carefully lift each monitor (preferably with assistance) and slide the VESA plate attached to the monitor onto the VESA head of the monitor arm.
- Asegúrese de que el monitor esté bloqueado de forma segura en su lugar.
5. Gestión de cables
Route your monitor cables through the integrated cable management channels on the arms and central pole to maintain a tidy workspace.
Instrucciones de funcionamiento y ajustes
The Desktronic Dual Monitor Support offers extensive adjustability for an ergonomic setup.

Image: A diagram illustrating the range of motion for the monitor arm, including 360-degree rotation at the base and VESA plate, 180-degree swivel, and 90-degree tilt for optimal positioning.
Ajuste de altura
The gas spring mechanism allows for smooth vertical adjustment. Gently push or pull the monitor to the desired height. If the monitor sags or springs up, adjust the gas spring tension using the provided Allen key (refer to the tension adjustment screw on the arm).
Ajuste de inclinación
Tilt your monitor up or down to reduce glare and optimize viewing angles. Loosen the tilt screw, adjust the monitor, and then retighten the screw.
Ajuste de giro
Swivel your monitor left or right to share your screen with others or to find your preferred viewángulo de ing.
Rotation (Landscape/Portrait)
Rotate your monitor 360 degrees to switch between landscape and portrait orientations as needed for different tasks.
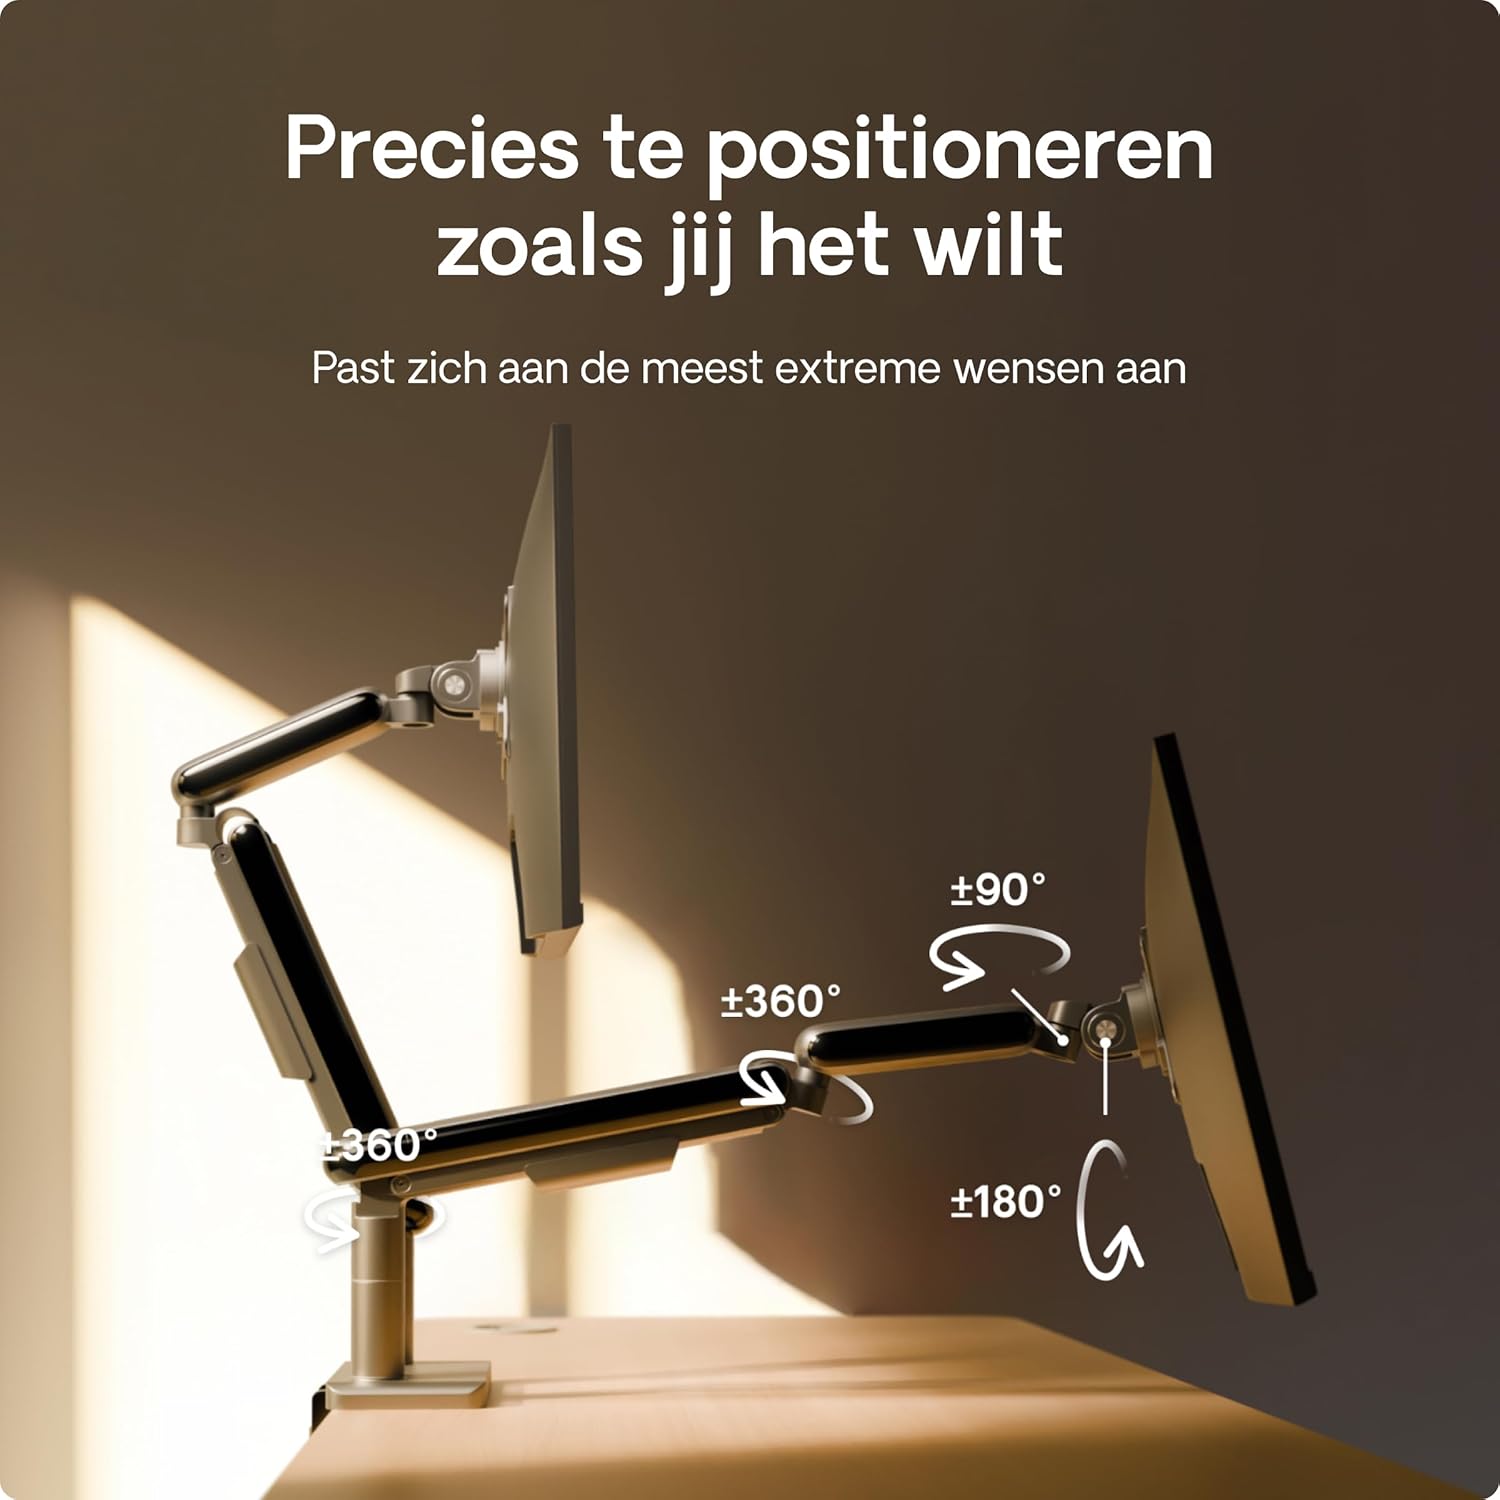
Image: A user effortlessly switching a monitor from a horizontal (landscape) orientation to a vertical (portrait) orientation, highlighting the flexibility of the monitor arm.
Posicionamiento ergonómico
Position your monitors so that the top of the screen is at or slightly below eye level, and your arms are comfortable when typing. This helps reduce neck and eye strain.

Image: A person working comfortably at a desk with two monitors mounted on the Desktronic arm, illustrating the ergonomic benefits of proper monitor positioning.
Mantenimiento
To ensure the longevity and optimal performance of your Desktronic Dual Monitor Support:
- Limpieza: Limpie la superficie con un paño suave, damp Paño. Evite limpiadores abrasivos o disolventes.
- Controles periódicos: Revise periódicamente todos los tornillos y conexiones para asegurarse de que permanezcan firmes y seguros.
- Ajuste del resorte de gas: If your monitor's weight changes, or if the arm starts to sag or rise unexpectedly, re-adjust the gas spring tension.
Solución de problemas
- Monitor Sags or Does Not Stay at Desired Height:
- The gas spring tension may be too low for your monitor's weight. Use the provided Allen key to increase the tension (turn clockwise). Test the adjustment until the monitor stays in place.
- Monitor Springs Upwards:
- The gas spring tension may be too high. Use the provided Allen key to decrease the tension (turn counter-clockwise). Test the adjustment until the monitor stays in place.
- El monitor no está nivelado:
- Check the VESA plate attachment to the monitor and the arm. Ensure all screws are tightened evenly. Some VESA heads allow for minor leveling adjustments.
- El brazo se siente inestable:
- Asegúrese de que el escritorio esté limpioamp or grommet mount is securely tightened to the desk. Verify that the desk itself is stable and not wobbling.

Image: A visual comparison highlighting the stability of the Desktronic monitor arm against a less stable competitor, emphasizing the robust design.
Presupuesto
| Característica | Detalle |
|---|---|
| Marca | Desktronic |
| Número de modelo | DUAL |
| Color | Negro |
| Dispositivos compatibles | Monitores |
| Material | Metal (High-strength steel, Aircraft-grade aluminum) |
| Tipo de montaje | Table Mount (Clamp o ojal) |
| Tipo de movimiento | Rotational, Tilt, Swivel, Height Adjustable (Gas Spring) |
| Ángulo de inclinación máximo | 90 grados |
| Compatibilidad VESA | 75 x 75 mm, 100 x 100 mm |
| Compatibilidad del tamaño del monitor | 13 - 34 pulgadas |
| Capacidad de peso (por brazo) | Hasta 8 kg (17.6 lbs) |

Image: A visual summary of the monitor arm's compatibility, indicating support for monitors between 13 and 34 inches, VESA standards of 75/100mm, and a maximum weight capacity of 8 kg per arm.
Garantía y soporte
For warranty information or technical support, please contact Desktronic directly through their official website or the retailer where the product was purchased. Please have your purchase receipt and product model number (DUAL) ready when contacting support.