
1. Introducción
This manual provides detailed instructions for the installation, operation, and maintenance of your suptek PC Monitor Arm MD01A. Please read this manual thoroughly before installation and keep it for future reference. This gas spring display arm is designed to support a single LCD monitor, enhancing your workspace ergonomics and efficiency.

Figure 1: suptek PC Monitor Arm MD01A Overview con dimensiones y especificaciones.
2. Características del producto
- Monitores compatibles: This gas spring display arm supports a single LCD monitor. It has a load capacity of 2-9kg and is compatible with monitor sizes ranging from 13 to 32 inches.
- Estándares VESA: Admite patrones de montaje VESA de 75 x 75 mm y 100 x 100 mm.
- Ajuste multiángulo: The gas spring mechanism allows for smooth vertical and horizontal screen adjustments with minimal effort. The multi-axis design enables tilt up 90°, down 90°, swivel left/right 180°, and 360° rotation. This wide range of motion helps reduce eye strain and improve work efficiency.
- Ahorro de espacio: Replaces traditional monitor stands, freeing up significant desk space.
- Sistema de organización de cables: Integrated cable clips help organize and protect cables, maintaining a tidy workspace.

Figure 2: Optimized workspace with the monitor arm.
3. Instrucciones de configuración
3.1 Comprobación previa a la instalación
Before proceeding with installation, ensure your desk and monitor meet the following requirements:
- Tamaño del monitor: 13-32 pulgadas
- Peso del monitor: 2-9 kilogramos
- Compatibilidad VESA: 75x75 mm o 100x100 mm
- Desk Thickness (for Clamp Montar): 10-70 mm
- Desk Hole Diameter (for Grommet Mount): Mínimo 10 mm

Figure 3: Pre-installation compatibility checks.
3.2 Elección de un método de montaje
The monitor arm offers two installation methods:
- Escritorio Clamp: For desks with an edge, the robust C-clamp securely fastens the monitor, providing maximum stability. Suitable for desks 10-70mm thick.
- Montaje con ojal: For desks with a pre-drilled hole, this method provides a flush and stable installation. Suitable for desks with a bolt-through hole (minimum hole diameter 10mm).
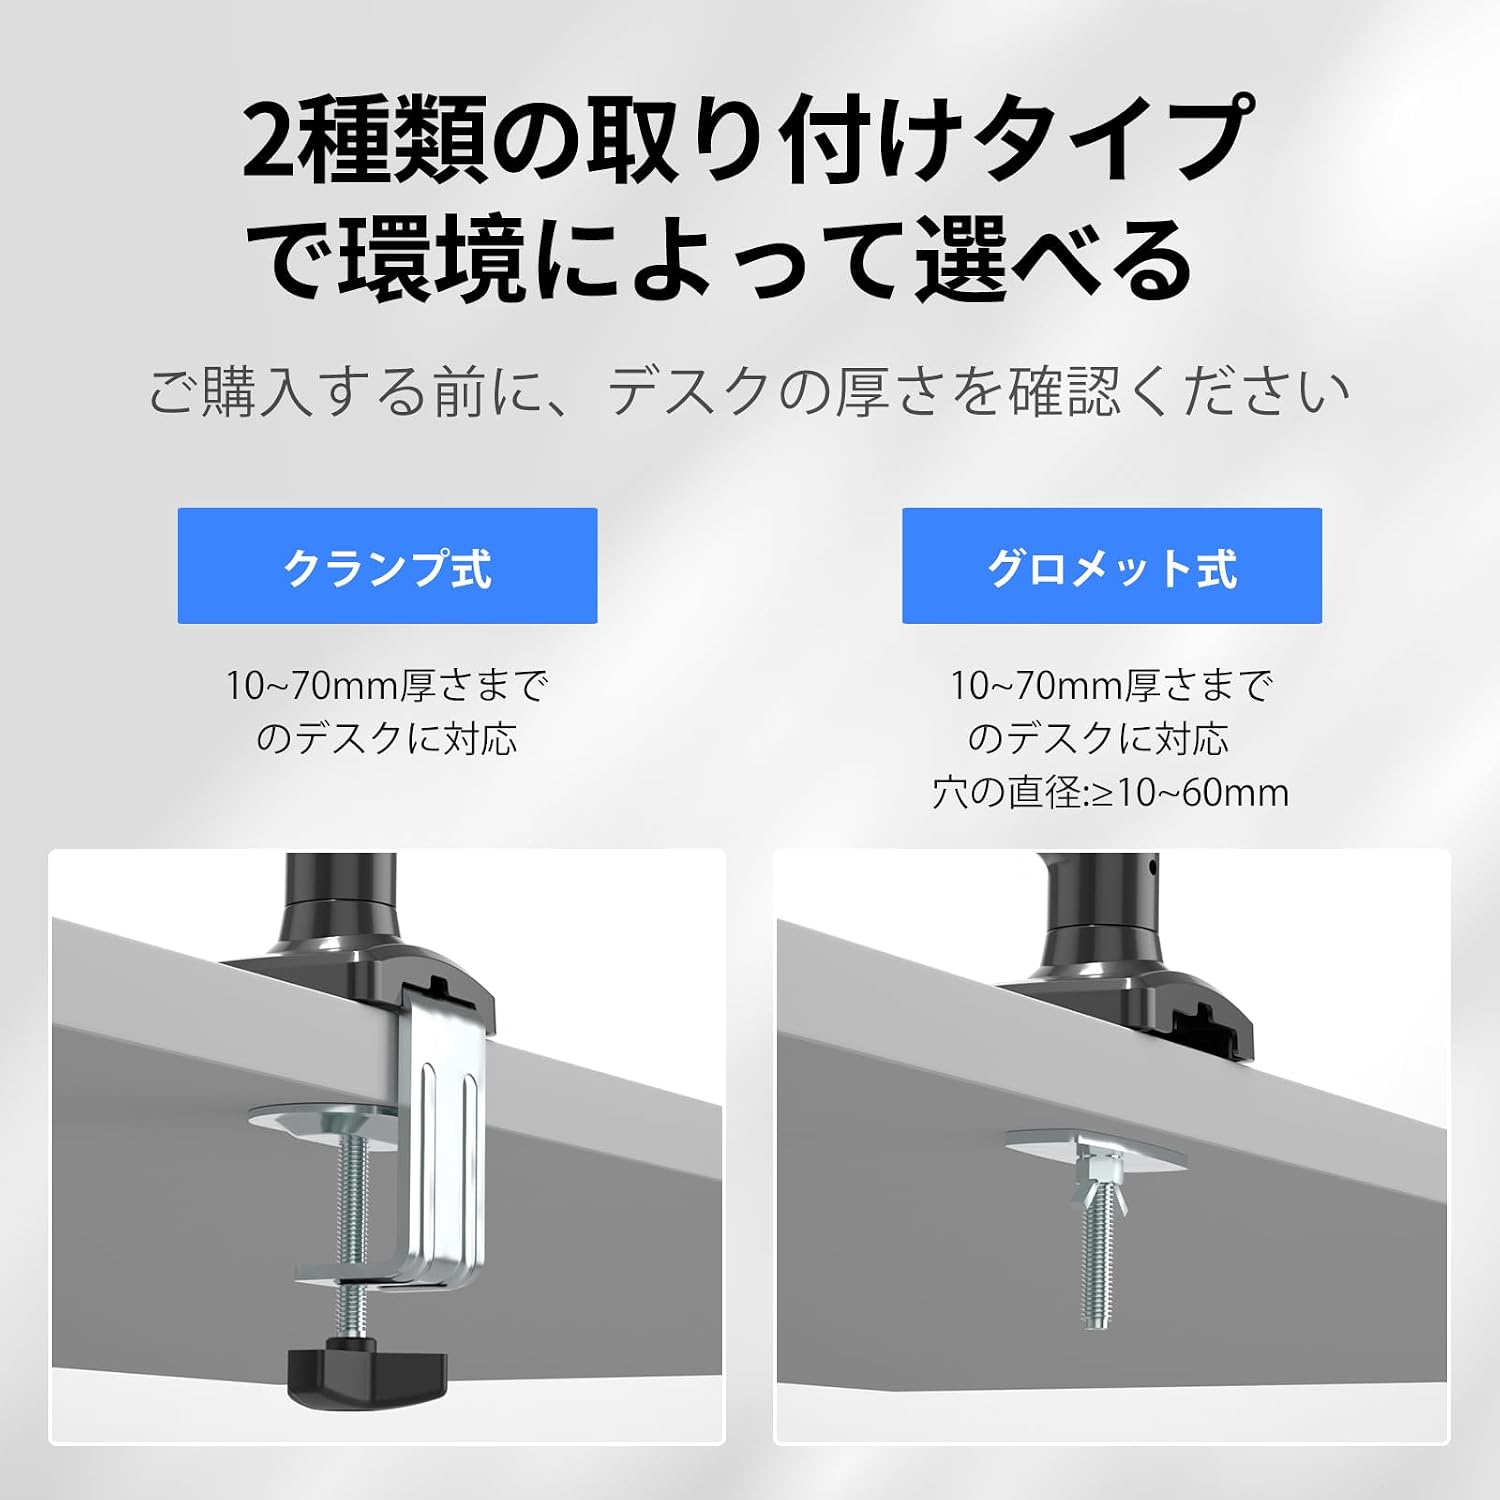
Figura 4: Clamp y opciones de montaje con ojales.
3.3 pasos de instalación
Follow these steps to install your monitor arm:
- Adjuntar el Clamp/Grommet to the Desk: Securely fasten the chosen mounting base (C-clamp or grommet) to your desk according to the selected method. Ensure it is tightened firmly.
- Coloque el brazo: Slide the monitor arm onto the pole of the mounting base.
- Conecte el monitor: Align your VESA-compatible monitor with the VESA plate on the arm. Secure the monitor using the provided screws.

Figure 5: Monitor arm installation steps.
4. Instrucciones de funcionamiento
4.1 Ajuste multiángulo
The monitor arm allows for flexible positioning to achieve optimal viewángulos de inclinación:
- Inclinación: Adjust the screen vertically up to 90° and down to 90°.
- Girar: Rotate the screen horizontally left or right up to 180°.
- Rotación: Gire la pantalla 360° para orientación vertical u horizontal.

Figure 6: Multi-angle adjustment options.
4.2 Ajuste de la tensión del resorte de gas
The gas spring tension must be adjusted to match your monitor's weight for smooth movement and stable positioning. Importante: To prevent damage to the monitor or mount, always keep the arm in a horizontal position during adjustment. The gas pressure cannot be adjusted without a monitor attached.
- If the arm drops: Turn the internal bolt counter-clockwise (towards '+') to increase the gas spring tension until the arm stays in the desired position.
- If the arm rises or cannot be pushed down: Turn the internal bolt clockwise (towards '-') to decrease the gas spring tension until the arm stays in the desired position.

Figure 7: Gas spring tension adjustment.
4.3 Height and Length Adjustment
The arm allows for flexible height adjustment from 140mm to 450mm and a maximum extension length of 534mm to suit your ergonomic needs.

Figure 8: Adjusting arm height and length.
5. Mantenimiento
To ensure the longevity and proper functioning of your suptek PC Monitor Arm, follow these maintenance guidelines:
- Limpieza regular: Wipe the arm and base with a soft, damp Paño para eliminar el polvo y la suciedad. Evite limpiadores abrasivos o disolventes que puedan dañar el acabado.
- Comprobar conexiones: Revise periódicamente todos los tornillos y pernos para asegurarse de que estén bien apretados. Vuelva a apretarlos si es necesario para mantener la estabilidad.
- Ajuste del resorte de gas: If you change monitors or notice the arm is not holding its position correctly, re-adjust the gas spring tension as described in Section 4.2.
- Sistema de organización de cables: Ensure cables are routed properly through the cable clips and are not pinched or under excessive tension.

Figure 9: Cable management routing.
6. Solución de problemas
| Problema | Posible causa | Solución |
|---|---|---|
| Monitor arm drops or cannot hold position. | La tensión del resorte de gas es demasiado baja para el peso del monitor. | Increase gas spring tension by turning the internal bolt counter-clockwise (towards '+'). Refer to Section 4.2. |
| Monitor arm rises or cannot be pushed down. | La tensión del resorte de gas es demasiado alta para el peso del monitor. | Decrease gas spring tension by turning the internal bolt clockwise (towards '-'). Refer to Section 4.2. |
| El monitor está inestable o inestable. | Tornillos de montaje o clamp/grommet are not tight enough. | Check and tighten all mounting screws and the desk clamp/grommet. Ensure the monitor is securely attached to the VESA plate. |
| Rango de movimiento limitado. | Obstructions or incorrect assembly. | Ensure there are no physical obstructions. Review assembly steps in Section 3.3 to confirm correct installation. |
7. Especificaciones
- Modelo: MD01A
- Marca: Suptek
- Tipo de montaje: Montaje de sobremesa (C-clamp o ojal)
- Tipo de movimiento: Tilt, Swivel, Rotation, Height Adjustment
- Material: Acero aleado
- Color: Negro
- Tamaño de monitor compatible: 13-32 pulgadas
- Capacidad de carga: 2-9 kg (4.4-19.8 libras)
- Compatibilidad VESA: 75 x 75 mm, 100 x 100 mm
- Grosor del escritorio (Clamp): 10-70 mm (0.39-2.76 pulgadas)
- Desk Hole Diameter (Grommet): Mínimo 10 mm (0.39 pulgadas)
- Rango de inclinación: De +90° a -90°
- Rango de giro: ±180°
- Rotación: 360°
- Rango de ajuste de altura: 140-450 mm (5.5-17.7 pulgadas)
- Extensión máxima del brazo: 534 mm (21 pulgadas)
8. Garantía y soporte
suptek provides a one-year warranty from the date of purchase for this product. In case of any malfunction or defect, please contact us through your Amazon account. To expedite the support process, please include your order number when contacting us.
Método de contacto:
- Inicie sesión en su cuenta de Amazon.
- Navigate to 'Account Service'.
- Vaya a 'Historial de pedidos'.
- Find your order for the suptek PC Monitor Arm MD01A.
- Haga clic en “Vendedor” y luego en “Hacer una pregunta”.
We are committed to resolving your issues promptly and sincerely.