
Introducción
This manual provides detailed instructions for the installation, operation, maintenance, and troubleshooting of your new Los Flexi KBT21 21-Inch Tall Toilet. Please read this manual thoroughly before installation and use to ensure proper function and longevity of your product. Keep this manual for future reference.
Descripción del vídeo: Un video introductorio muestraasing the Los Flexi Tall Toilet Collection, highlighting various heights including the 21-inch model. This video provides a general overview of the product line's design and comfort features.
Descripción del vídeo: A detailed video providing more information about the Los Flexi 21-inch tall toilet, focusing on its specific features and benefits for users seeking enhanced comfort and accessibility.
Información de seguridad
- Cierre siempre el suministro principal de agua antes de comenzar cualquier instalación o mantenimiento.
- Utilice equipo de protección personal (EPP) adecuado, como guantes y protección para los ojos, durante la instalación.
- Manipule los componentes cerámicos con cuidado para evitar que se astillan o se rompan.
- Ensure all connections are tightened properly to prevent leaks, but do not overtighten.
- Si no está seguro de algún paso, consulte con un plomero calificado.
Contenido del paquete
Verifique que todos los componentes enumerados a continuación estén incluidos en su paquete antes de comenzar la instalación.

Descripción de la imagen: A visual breakdown of the Los Flexi KBT21 toilet package contents, including the toilet bowl, pre-assembled tank, soft-close seat, wax ring, bolt kit, and seat installation kit.
- 21" Two-Piece Toilet Bowl
- Tanque de inodoro preensamblado
- Asiento de inodoro con cierre suave
- Kit de pernos y anillos de cera
- Kit de instalación de asiento de inodoro
Herramientas y materiales necesarios (no suministrados)
The following tools and materials are necessary for installation but are not included in the package:

Descripción de la imagen: A visual guide to the tools and materials required for toilet installation, such as wrenches, screwdrivers, a hacksaw, level, and a water supply line.
- 10" (254mm) Adjustable Wrench
- 12" (305mm) Pipe Wrench
- Sierra
- Destornillador
- Metal File (corte fino)
- Cinta métrica
- Cortador de tubos
- Nivel
- Espátula
- Water Supply Line (if not reusing existing)
Configuración e instalación
Follow these steps carefully for a successful installation of your Los Flexi KBT21 toilet.
Descripción del vídeo: A comprehensive installation guide for the Los Flexi Two-Piece Tall Toilet, demonstrating each step from preparation to final assembly and water connection.
Part 1: Preparation Before Starting
- Cierre el suministro principal de agua al baño.
- Retire el inodoro viejo (si corresponde) y limpie completamente el área de la brida.
- Ensure the floor is clean and level where the new toilet will be installed.
Part 2: Install the Flange
- Apply waterproof primer to the drain pipe and the flange.
- Apply PVC cement to the drain pipe and the flange.
- Insert the flange into the drain pipe.
- Mark screw positions with a pencil and secure the flange with screws.
- Measure and mark installation positions for T-bolts.
- Insert T-bolts onto the flange and cover with metal washers.
- Mark the position of T-bolts with tapes on both sides for alignment.
Part 3: Install the Toilet Bowl
- Place the toilet bowl on a soft surface to prevent any damage.
- Attach a wax ring to the toilet outlet.
- Lift the bowl, align the two mounting holes with the flange bolts, and attach it to the flange.
- Gently press to tightly connect the bowl to the flange.
- Remove positioning tape on both sides.
- Set a level on the toilet bowl to ensure it is level.
- Place the plastic washer, metal washer, and nut onto the T-bolt, then tighten them.
- If the T-bolt is too long, cut it to the appropriate length and cover with a cap.
Part 4: Install the Tank to the Bowl
- Insert the cone washer and bolt through the tank hole.
- Secure them with a washer and nut.
- Screw the rubber gasket onto the flush valve nut.
- Attach the toilet tank onto the bowl.
- From the bottom, place the rubber washer, metal washer, and wing nut, then hand-tighten them.
- Set a level on top of the tank to ensure it's level.
- For the pre-assembled water tank, install the flush lever by inserting it through the tank hole, attaching a rubber fitting, and tightening by hand.
- Attach the chain to the flush lever.
- Finally, press the lever to confirm it flushes normally.
Part 5: Connect to the Water Supply
- Connect the water supply line to the tank's fill valve nut. (Fits 7/8" water supply line).
- If necessary, use the included 1/2" fill valve adapter for 1/2" water supply lines.
- Connect to the water supply valve on the wall.
- Tighten the water supply line with a wrench.
- Turn on the water supply and let the tank fill with water.
- Check if the tank gasket is leaking.
- Confirm there is no leakage, then cover the tank lid.
- Check for leaks with the water supply line and at the toilet-floor connection.
- After ensuring no leaks, apply sealant where the toilet base meets the floor.
Part 6: Install the Toilet Seat
- Insert the hinge bolt into the mounting hole and tighten with a power drill. Repeat for the other side.
- Align the toilet seat with the hinge bolts.
- Insert the seat and make final adjustments.
- Fully tighten the bolts on both sides.
- Remove the seat and cover the bolt caps first.
- Then reinsert the seat to complete the toilet seat installation.
Operación
Mecanismo de descarga
The Los Flexi KBT21 toilet features an efficient 1.28 GPF siphonic flush system. To flush, simply press down on the chrome flush lever located on the side of the tank. The powerful 360° jet siphonic action ensures a clean bowl with minimal water usage.

Descripción de la imagen: A visual representation of the 360° jet siphonic powerful flushing system in action, demonstrating its efficiency and water-saving capabilities (1.28 GPF).
Asiento de cierre suave
The toilet is equipped with a soft-close seat and lid. This feature prevents slamming, reducing noise and potential damage. To close, simply push the seat or lid down gently, and it will lower slowly and quietly on its own.

Descripción de la imagen: The soft-close and high-quality seat feature, illustrating how the seat gently lowers without slamming, ensuring a quiet bathroom experience.
Mantenimiento y cuidado
Regular cleaning and maintenance will keep your Los Flexi KBT21 toilet in optimal condition.
Instrucciones de limpieza
- Use a soft cloth and mild, non-abrasive cleaners for all surfaces.
- Avoid using harsh chemicals, abrasive pads, or cleaners containing bleach, as these can damage the ceramic glaze and seat material.
- For the soft-close seat, use the quick-release mechanism for easy removal and thorough cleaning.
- Clean the exterior of the toilet, including the base and tank, regularly.

Descripción de la imagen: De cerca views highlighting the premium flush lever, elegant design, and smooth, high-gloss surface of the toilet, which facilitates easy cleaning and maintenance.
Solución de problemas
| Problema | Posible causa | Solución |
|---|---|---|
| El inodoro no descarga correctamente | Low water level in tank, clogged siphon jet, flush lever chain too loose/tight. | Adjust water level, clear siphon jet, adjust flush lever chain. |
| Agua corriente continua | Flapper not sealing, fill valve malfunction, flush lever stuck. | Check flapper for debris/wear, inspect fill valve, ensure flush lever moves freely. |
| Leaks at base of toilet | Loose T-bolts, damaged wax ring, cracked toilet base. | Tighten T-bolts, replace wax ring, consult plumber for cracks. |
| Recarga lenta del tanque | Válvula de suministro de agua parcialmente cerrada, válvula de llenado obstruida. | Fully open water supply valve, clean or replace fill valve. |
Presupuesto
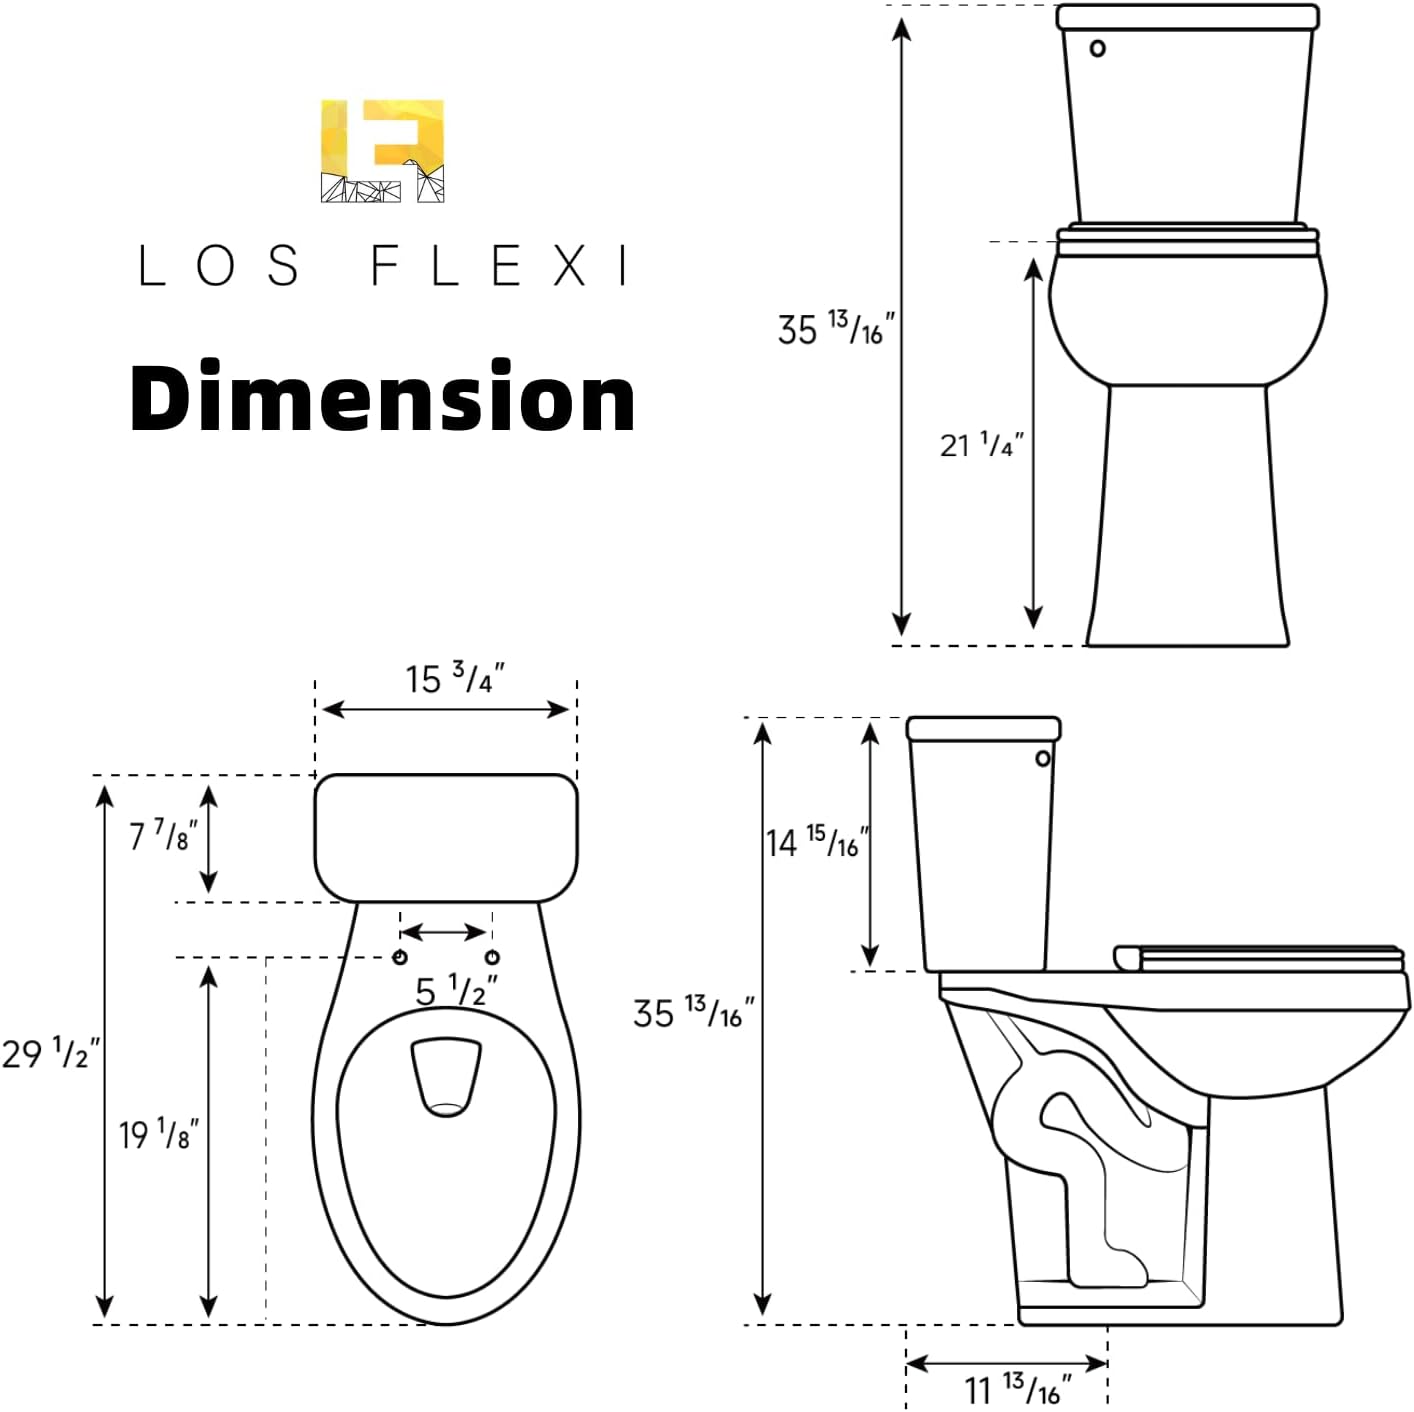
Descripción de la imagen: A comprehensive diagram illustrating the dimensions of the Los Flexi KBT21 toilet from multiple angles, including height, depth, width, and rough-in measurements.
| Característica | Detalle |
|---|---|
| Número de modelo | KBT21 |
| Color | Blanco |
| Dimensiones del producto (Pr. x An. x Al.) | 29.13" x 15.75" x 36.22" |
| Material | Cerámica, polipropileno (PP) |
| Peso del artículo | 88.5 libras |
| Tipo de instalación | Montado en el piso |
| Forma | Óvalo alargado |
| Tipo de material del asiento | Polipropileno (PP) |
| Tipo de descarga | Siphonic Flush (1.28 GPF) |
| Instalación preliminar | 12 pulgadas |
| Altura del asiento | 21 pulgadas |
| Water Supply Line Compatibility | 1/2" & 7/8" (adapter included for 1/2") |

Descripción de la imagen: This image displays the various certifications for the Los Flexi KBT21 toilet, including ADA Compliant, WaterSense Certified, MaP Premium Certified, Uniform Plumbing Code Certified, and HET (High Efficiency Toilet), ensuring quality and compliance.
Garantía y soporte
Información de garantía
Your Los Flexi KBT21 toilet is backed by a 2 año de garantía from the date of purchase. This warranty covers manufacturing defects in materials and workmanship under normal use and service. Please retain your proof of purchase for warranty claims.
Atención al cliente
For any questions, assistance with installation, or warranty claims, please contact our dedicated customer support team. We are committed to ensuring your satisfaction and providing long-lasting comfort with every use.
La información de contacto se puede encontrar en nuestro sitio web oficial. websitio o a través de su minorista.