1. Introducción
This manual provides detailed instructions for the installation, setup, and operation of your XFOX Tuya Zigbee Door and Window Sensor. This wireless mini contact sensor is designed to monitor the open/closed status of doors and windows. It requires a compatible Tuya Zigbee hub for functionality and integrates with the Tuya Smart Life ecosystem, as well as voice assistants like Alexa and Google Assistant.
Lea este manual detenidamente antes de utilizar el dispositivo para garantizar una configuración adecuada y un rendimiento óptimo.
2. Producto terminadoview
2.1 Contenido del paquete
- XFOX Tuya Zigbee Door and Window Sensor (Main Unit)
- Componente de imán
- Adhesive Pads / Mounting Screws (may vary by package)
- Manual de usuario (este documento)
Nota: Se requieren 2 pilas AAA que no están incluidas en el paquete.
2.2 Características principales
- Wireless Intelligent Connection: Utilizes Tuya Zigbee 3.0 technology for easy integration with a Tuya smart home system (requires Tuya Zigbee gateway).
- Real-time Alarm Push: Monitors door/window status and sends instant notifications to your mobile application upon detecting abnormal movement.
- Compatibilidad con control por voz: Supports status queries via Alexa and Google Assistant, enabling automated security scenes with other smart devices.
- Bajo mantenimiento: Designed for low power consumption, offering extended battery life with 2x AAA batteries.
- Invisible and Slim Design: Compact form factor with dual mounting options (3M adhesive sticker/screws) for discreet placement.

Figure 1: XFOX Tuya Zigbee Door and Window Sensors with App Interface
3. Configuración
3.1 Instalación de la batería
- Locate the main unit of the sensor.
- Gently slide the back cover of the main unit downwards to open the battery compartment.
- Inserte dos (2) pilas AAA, asegurándose de la polaridad correcta (+/-).
- Slide the back cover upwards until it clicks into place, securing the battery compartment.
Importante: Ensure batteries are inserted correctly. Incorrect insertion may damage the device.
3.2 Emparejamiento con Tuya Zigbee Hub
This sensor requires a Tuya Zigbee hub (sold separately) to function. Ensure your hub is powered on and connected to your network.
- Descargar el Tuya Vida Inteligente aplicación desde la tienda de aplicaciones de tu teléfono inteligente (iOS o Android).
- Regístrese o inicie sesión en su cuenta Tuya Smart Life.
- Add your Tuya Zigbee hub to the app if you haven't already.
- In the Tuya Smart Life app, navigate to your Zigbee hub and select "Add sub-device" or "Add device".
- Follow the on-screen instructions in the app to put the hub into pairing mode.
- On the sensor, press and hold the reset button (usually a small pinhole button) for approximately 5 seconds until the indicator light flashes rapidly, indicating it is in pairing mode.
- The app should detect the sensor. Once detected, confirm the addition and assign it a name and location.
Nota: For optimal pairing, ensure the sensor is within close proximity (approximately 3-5 feet) of the Zigbee hub during the pairing process. Once paired, the sensor can operate at a greater distance within the Zigbee network range.

Figure 2: Tuya Zigbee Hub Requirement for Sensor Operation
4. Instalación
The sensor consists of two parts: a main unit and a magnet component. These two parts must be installed on a door or window and its frame, ensuring they are aligned and within the specified gap when the door/window is closed.
4.1 Ubicación de montaje
- Choose a clean, dry, and flat surface on your door/window frame and the corresponding moving part (door/window).
- The main unit should be installed on the fixed frame, and the magnet component on the moving part.
- Ensure the alignment marks on both parts face each other when the door/window is closed.
4.2 Métodos de montaje
The sensor supports two mounting methods: adhesive pads or screws.
- Montaje adhesivo:
- Limpie minuciosamente la superficie de instalación.
- Peel off the protective film from the adhesive pads and firmly attach one pad to the back of the main unit and the other to the back of the magnet component.
- Press the sensor parts onto the desired locations for at least 30 seconds.
- Tornillo de montaje:
- Open the back covers of both the main unit and the magnet component.
- Use the provided screws to secure the back covers to the door/window frame and the moving part.
- Snap the main unit and magnet component onto their respective secured back covers.
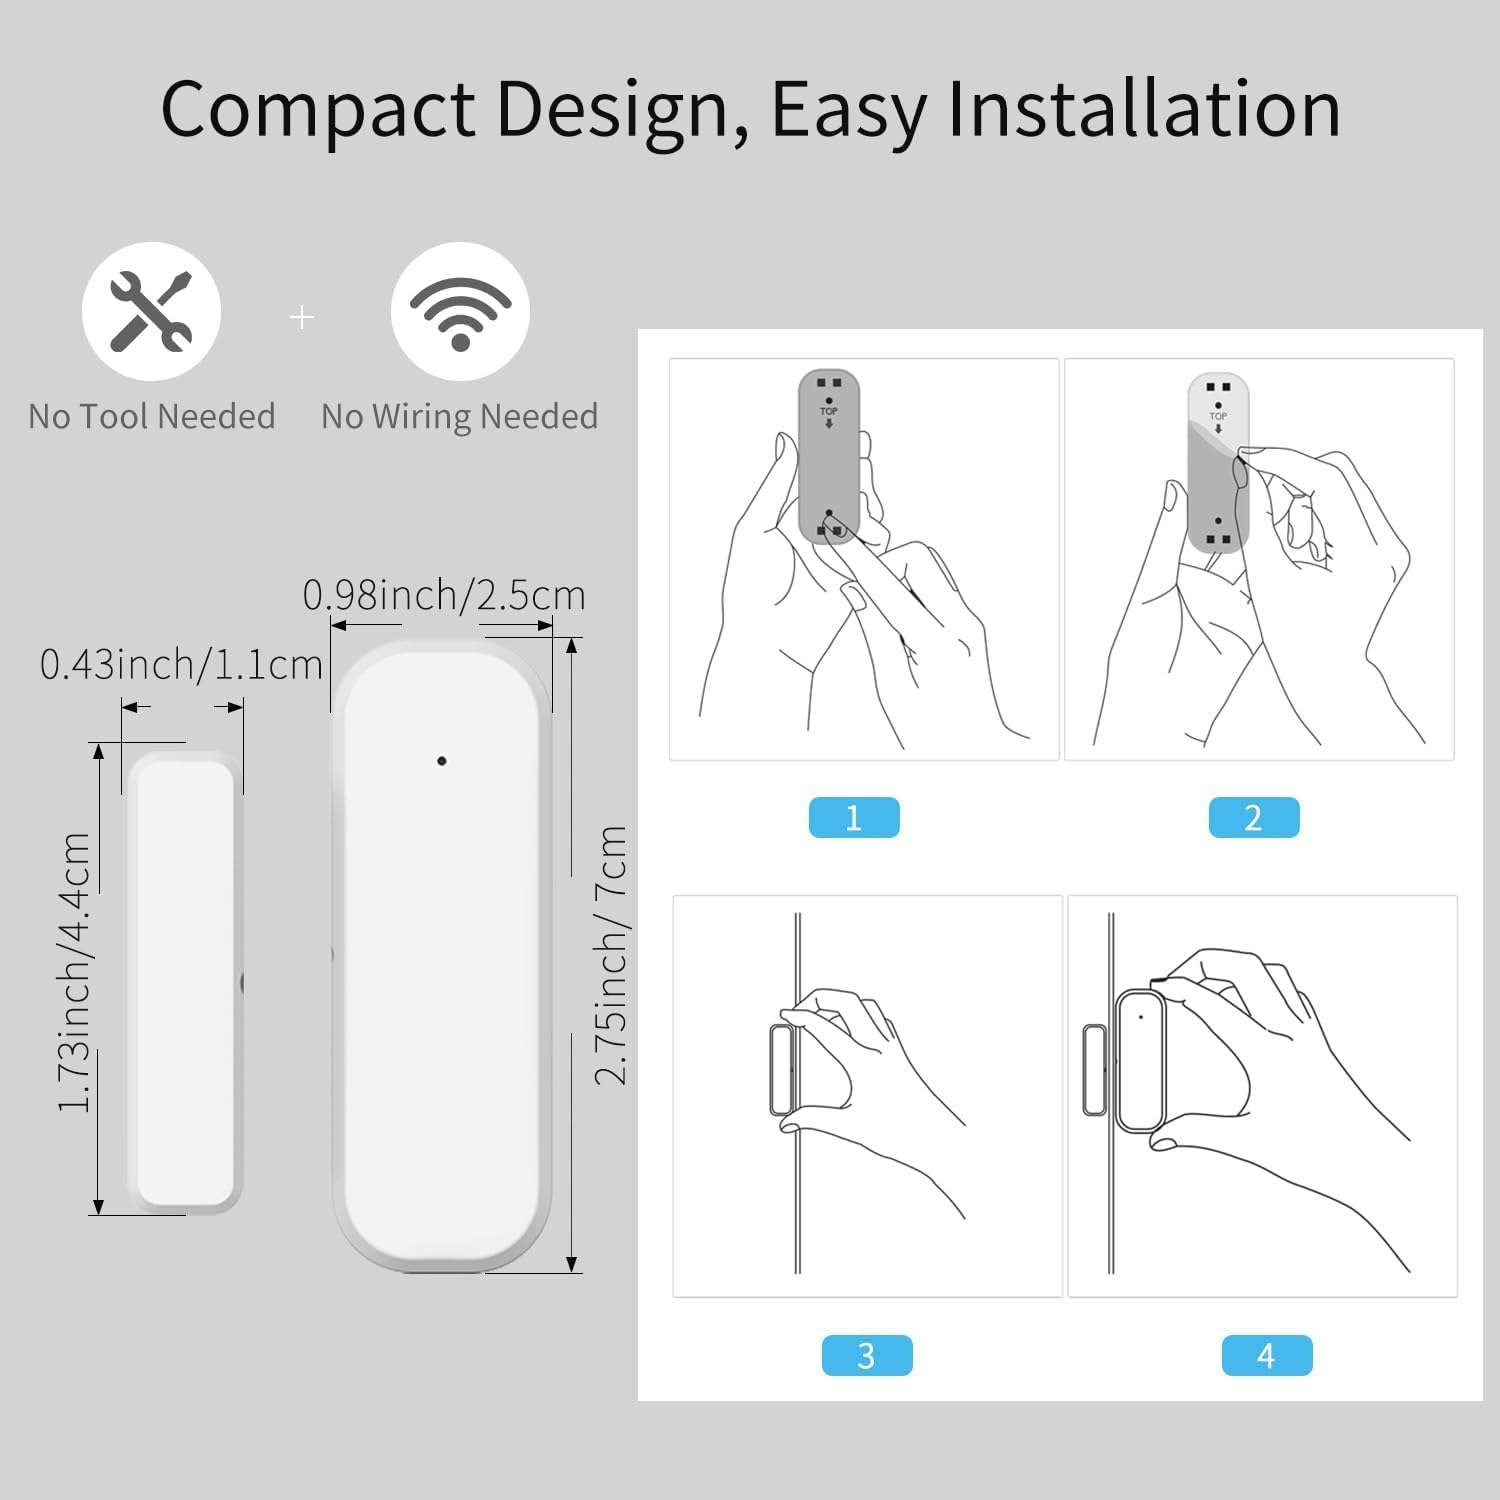
Figure 3: Sensor Dimensions and Installation Steps
4.3 Gap Requirement
For accurate detection, the gap between the main unit and the magnet component must be no more than 0.86 inches (approximately 2.2 cm) when the door or window is closed.
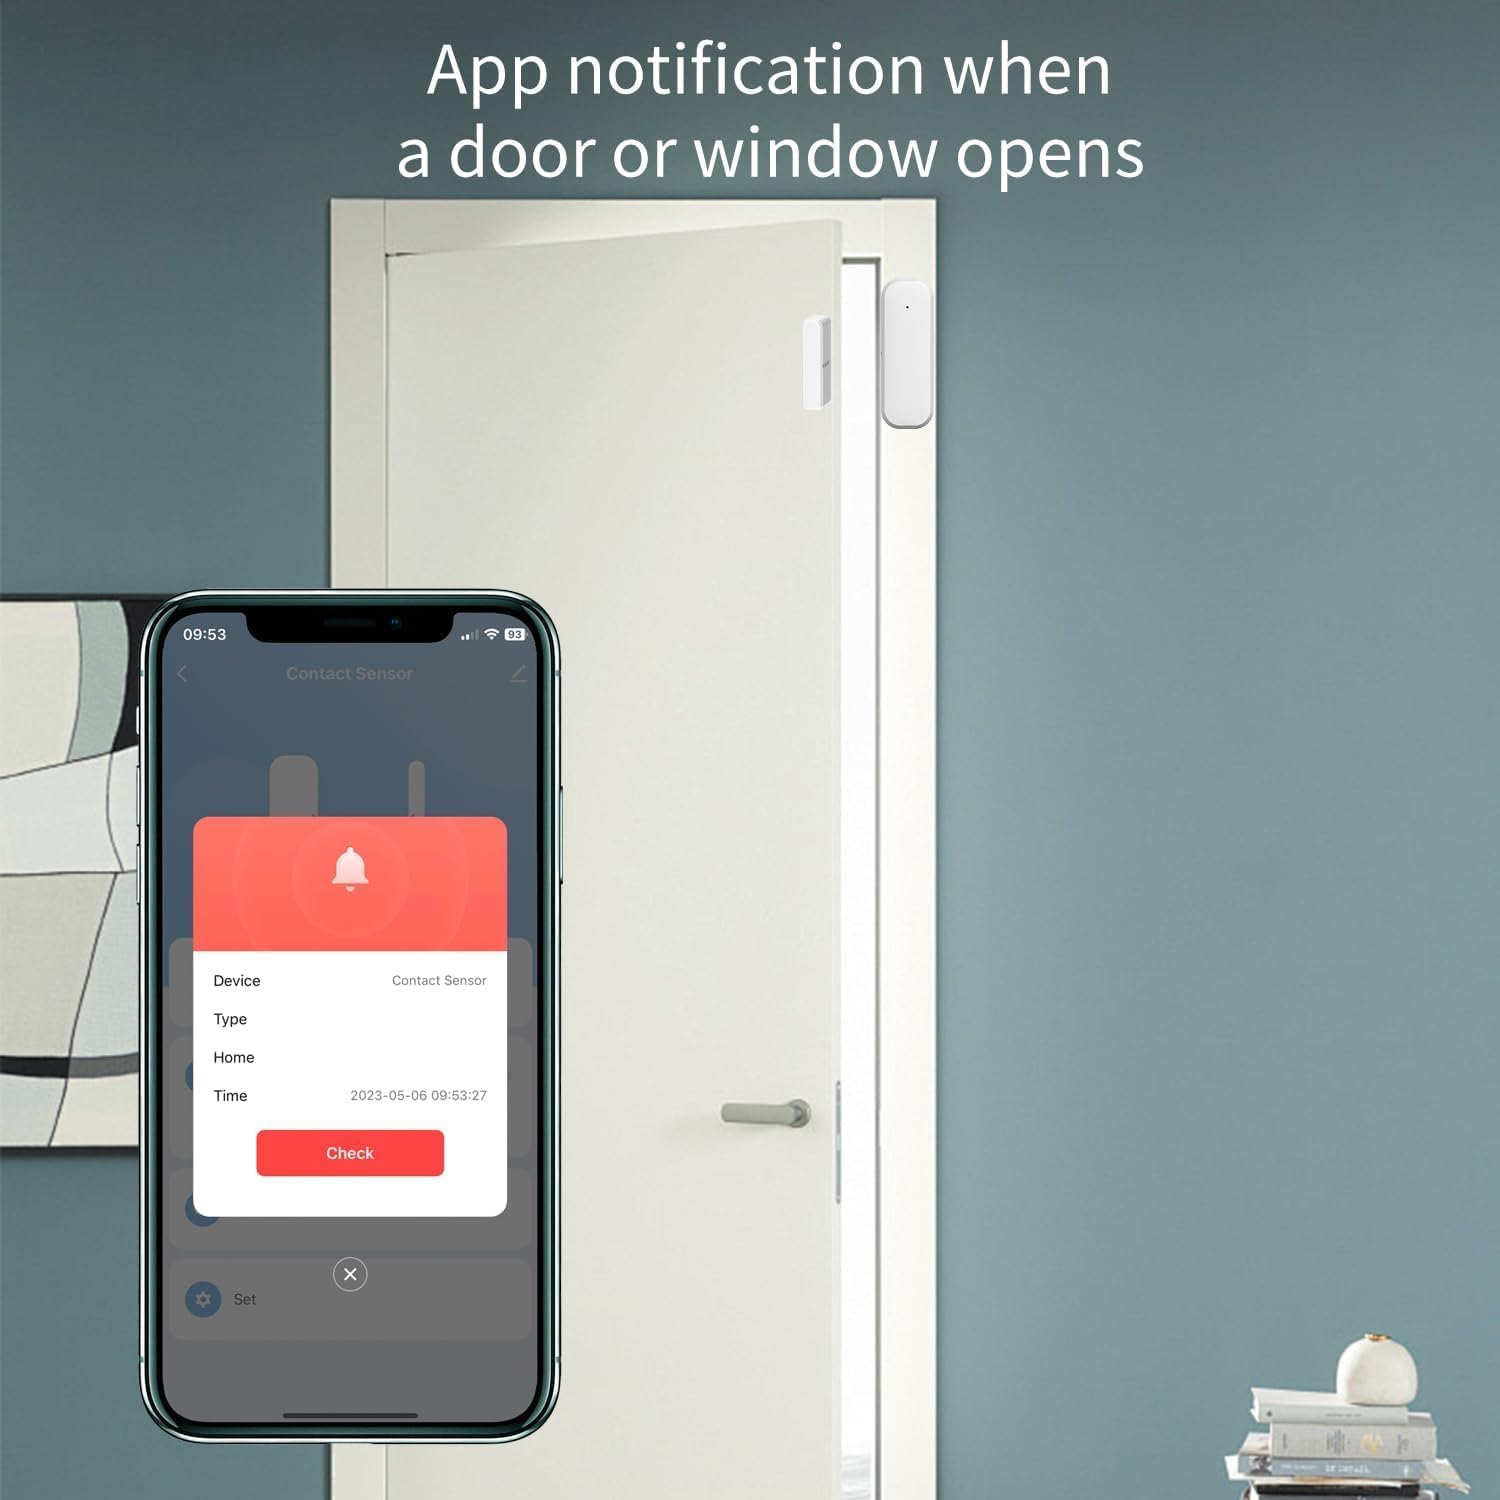
Figure 4: Maximum Allowed Gap for Sensor Operation
5. Instrucciones de funcionamiento
5.1 Monitoring with Tuya Smart Life App
Once the sensor is successfully paired and installed, you can monitor its status through the Tuya Smart Life application:
- Abra la aplicación Tuya Smart Life en su teléfono inteligente.
- Navigate to the specific sensor device.
- The app will display the current status (open or closed) of the door or window.
- You will receive real-time push notifications on your phone if the door or window opens unexpectedly, based on your configured settings.

Figure 5: App Notification for Door/Window Opening
5.2 Control por voz con Alexa y Google Assistant
The XFOX Tuya Zigbee Door and Window Sensor is compatible with Amazon Alexa and Google Assistant. To enable voice control:
- Ensure your Tuya Smart Life account is linked to your Alexa or Google Home account through their respective applications.
- Once linked, you can use voice commands to check the status of your sensor.
Examplos comandos:
- "Alexa, ¿está abierta la puerta principal?"
- "Ok Google, ¿cuál es el estado de la ventana de la sala de estar?"

Figure 6: Voice Control Integration with Alexa and Google Assistant
6. Mantenimiento
6.1 Reemplazo de batería
The sensor is designed for low power consumption, providing extended battery life. When the battery level is low, you may receive a notification through the Tuya Smart Life app. Replace the batteries as follows:
- Gently slide the back cover of the main unit downwards to open the battery compartment.
- Retire las pilas AAA viejas.
- Inserte dos pilas AAA nuevas, asegurándose de la polaridad correcta (+/-).
- Slide the back cover upwards until it clicks into place.
Deseche las baterías usadas de acuerdo con las normas locales.
7. Solución de problemas
- El sensor no se empareja con el concentrador:
- Ensure the sensor is within 3-5 feet of the Tuya Zigbee hub during the pairing process.
- Verify that the hub is powered on and connected to your network.
- Check if the sensor's indicator light is flashing rapidly, indicating pairing mode. If not, re-initiate pairing mode.
- Confirm that you are using a compatible Tuya Zigbee hub.
- Sensor not detecting open/closed status reliably:
- Check the gap between the main unit and the magnet component. It must be no more than 0.86 inches when closed.
- Ensure both parts are securely mounted and aligned correctly.
- Reemplace las baterías si están bajas.
- Verify the sensor's connection to the Zigbee hub in the Tuya Smart Life app.
- No se recibieron notificaciones:
- Verifique la configuración de notificaciones de su teléfono inteligente para la aplicación Tuya Smart Life.
- Ensure the sensor is online and communicating with the hub.
- Verify that notification rules are correctly set up within the Tuya Smart Life app.
8. Especificaciones
| Número de modelo | F-SD01Z |
| Marca | XFOX |
| Conectividad | Tuya Zigbee 3.0 |
| Fuente de poder | 2 pilas AAA (no incluidas) |
| Volumentage | 3 voltios |
| Método de control | Aplicación, control remoto, voz |
| Tipo de montaje | Montaje en puerta |
| La tecnología de sensores | Contacto |
| Dimensiones del producto | 0.96 x 0.73 x 2.76 pulgadas (unidad principal) |
| Peso del artículo | 2.39 onzas |
| Dispositivos compatibles | Tuya Smart Life, Amazon Alexa, Google Assistant |
| Código Postal | 704256108403 |
9. Garantía y soporte
Information regarding product warranty is not provided in this manual. For warranty details or technical support, please contact the manufacturer, XFOX, or your point of purchase. Please have your model number (F-SD01Z) and purchase information ready when contacting support.