1. Producto terminadoview
The Fuers H.265+ 8-Channel Security DVR Recorder (Model A1008CH) is a versatile surveillance solution designed for home and business security. This DVR supports various camera types including HD-CVBS, TVI, CVI, XVI, AHD, and IP analog cameras, allowing for flexible system expansion. It features H.265+ video compression for efficient storage and comes with a pre-installed 1TB hard drive for 24/7 recording.
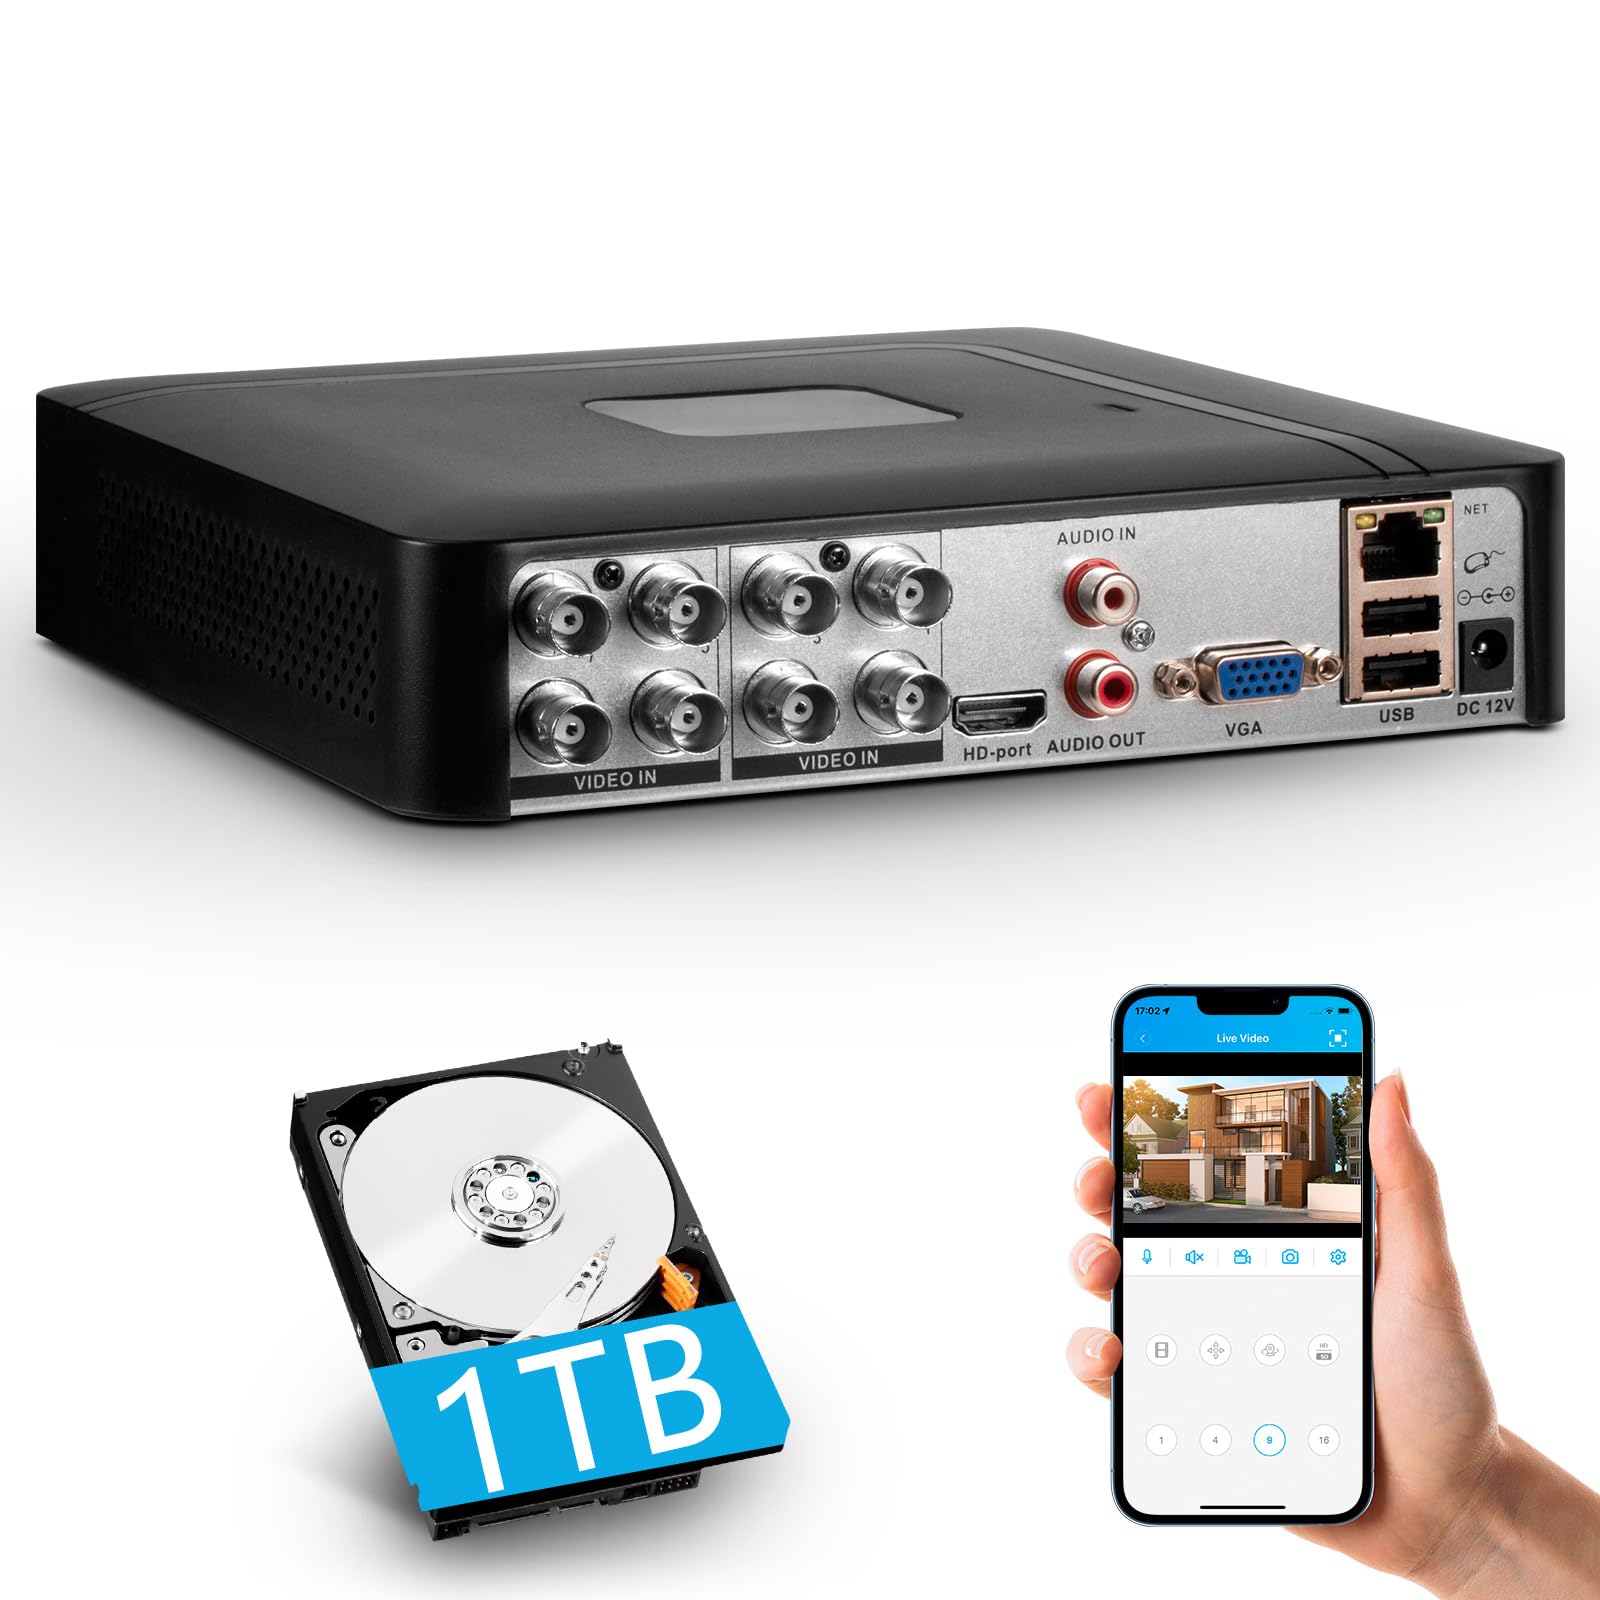
Image 1.1: Fuers H.265+ 8-Channel Security DVR Recorder.
Características principales:
- 8-Channel System: Supports up to 8 cameras simultaneously, compatible with HD-TVI, CVBS, CVI, XVI, AHD, and IP cameras.
- Compresión de vídeo H.265+: Offers extended recording time and saves up to 50% storage space compared to H.265 systems.
- Disco duro de 1 TB preinstalado: Security-grade hard drive for continuous surveillance recording. Expandable up to 14TB via SATA port.
- Acceso remoto: View and manage your system remotely using the free iCSee App (iOS/Android) or VMS Client (Windows/Mac).
- Detección de movimiento inteligente: Receive mobile push notifications for detected motion types, including person and face detection.
- Configuración Plug & Play: Easy connection with simultaneous VGA/HDMI output.
2. Configuración e instalación
2.1 ¿Qué hay en la caja?
Antes de comenzar, asegúrese de que todos los componentes estén presentes:
- 1x A1008 8CH DVR
- 1x 1TB HDD (Pre-installed on DVR)
- 1 adaptador de corriente para DVR
- 1 ratón USB
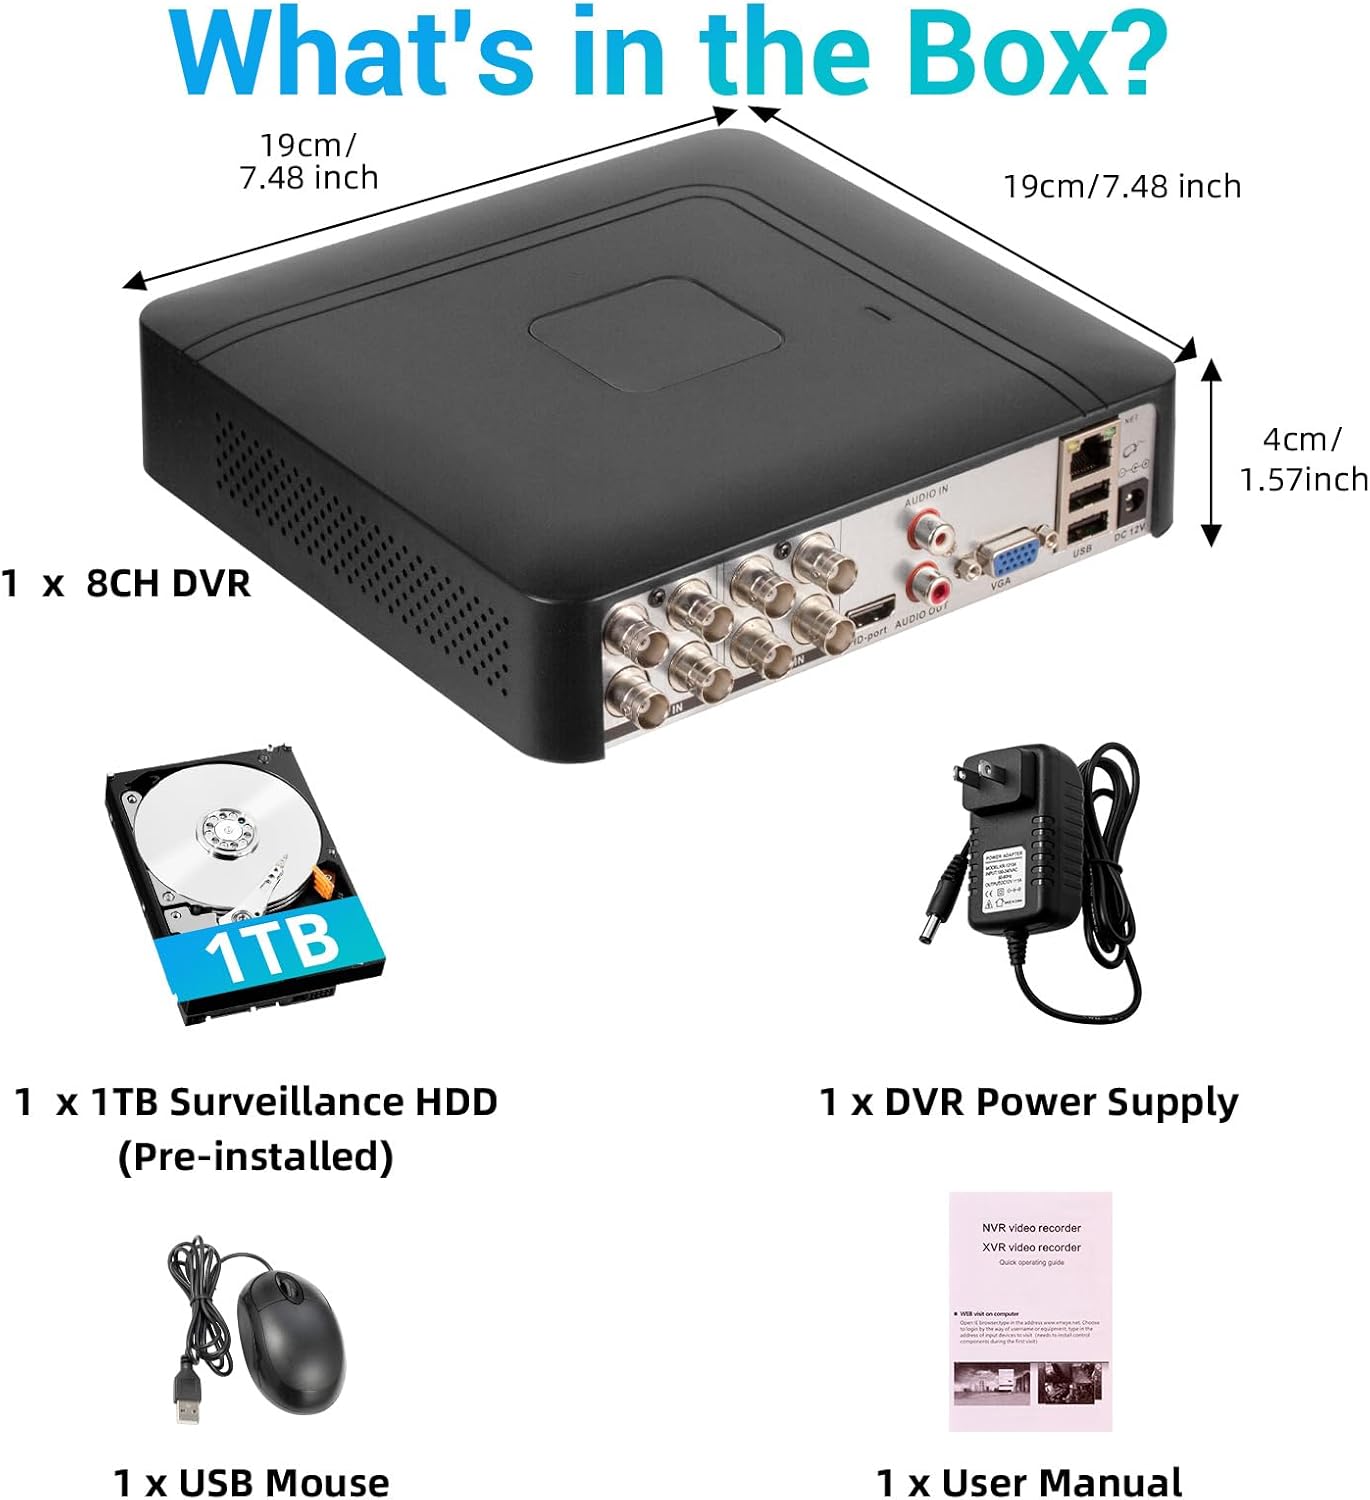
Imagen 2.1: Contenido del paquete del producto.
2.2 Hard Drive Installation (if not pre-installed or for upgrade)
The DVR comes with a pre-installed 1TB HDD. If you need to replace or upgrade the hard drive (up to 14TB), follow these steps:
- Unscrew the bottom cover of the DVR unit.
- Abra con cuidado la casing.
- Connect the SATA data cable and power cable from the DVR to the new hard drive.
- Secure the hard drive within the casing utilizando los tornillos proporcionados.
- Close the DVR casing y asegúrelo con tornillos.

Image 2.2: Hard drive installation and expansion options.
2.3 Connecting the DVR System
Siga estos pasos para conectar su sistema DVR:
- Conectar cámaras: Connect your security cameras to the 'VIDEO IN' ports on the back of the DVR using BNC cables.
- Conectar el monitor: Conecte un monitor al DVR utilizando el puerto HDMI o VGA.
- Conectar el ratón USB: Conecte el mouse USB incluido en uno de los puertos USB del DVR.
- Connect Network (Optional for Remote Access): para control remoto viewing and notifications, connect an Ethernet cable from your router to the 'NET' port on the DVR.
- Encendido: Connect the DVR power adapter to the 'DC 12V' port and then plug it into a power outlet.

Image 2.3: Connecting cameras and network to the DVR.
2.4 Initial Setup and Channel Type Selection
Upon first power-on, the system may prompt for initial setup. You may need to select the appropriate channel type for your cameras.
- Right-click on the screen to access the Main Menu.
- Navegar a Sistema > Digital > Tipo de canal.
- Select the configuration that matches your camera setup:
- First row: Supports 8 XVI, CVBS, AHD, TVI, CVI coaxial cameras.
- Second row: Supports 8 XVI, CVBS, AHD, TVI, CVI coaxial + 4 IP cameras.
- Third row: Supports 16 1080P IP cameras.
- Fourth row: Supports 16 5MP IP cameras.
- Hacer clic OK to apply changes. The system may restart.

Image 2.4: DVR Channel Type selection screen.
3. Instrucciones de funcionamiento
3.1 en vivo View y Grabación
Once the DVR is powered on and cameras are connected, you should see the live feed on your connected monitor. The system is configured for 24/7 recording to the pre-installed 1TB hard drive.

Imagen 3.1: En vivo view de múltiples transmisiones de cámara.
3.2 Acceso remoto a través de la aplicación móvil
To access your DVR remotely, download the free iCSee App (for iOS/Android) or VMS Client (for Windows/Mac).
- Download the iCSee App from your device's app store.
- Abra la aplicación y registre una cuenta si no tiene una.
- In the DVR's main menu, navigate to Información > Versión to find the DVR's QR code.
- Use the iCSee app to scan the QR code to add your device.
- Una vez añadido, puedes view Transmisiones en vivo, reproducción de grabaciones y recepción de alertas desde cualquier lugar con conexión a Internet.

Image 3.2: Steps for remote access via mobile app.
3.3 Playback Recorded Footage
Para volverview vídeo grabado:
- Right-click on the screen to access the Main Menu.
- Seleccionar Registro > Reproducción.
- Choose the desired channel(s) and date/time range for playback.
- Hacer clic Iniciar reproducción a view el footage.

Image 3.3: Playback interface with timeline.
3.4 Alertas de detección de movimiento
The DVR supports intelligent motion detection, including person and face detection. When motion is detected, you can receive instant mobile push notifications.
- Configure motion detection settings in the DVR's Alarma menú.
- Ensure your mobile app is properly linked and notifications are enabled.

Image 3.4: Human and face detection in action.
4. Mantenimiento
4.1 Administración del disco duro
El disco duro de 1 TB preinstalado proporciona ample storage. Due to H.265+ compression, storage is optimized. If more storage is needed, you can replace the internal HDD with a larger one (up to 14TB). Regularly check the hard drive status in the DVR's system settings to ensure optimal performance.
4.2 Cuidados generales
- Keep the DVR in a cool, dry, and well-ventilated area.
- Avoid exposing the unit to direct sunlight, extreme temperatures, or moisture.
- Limpie el exterior del DVR con un paño suave y seco. No utilice limpiadores líquidos.
- Asegúrese de que todas las conexiones de los cables estén seguras.
5. Solución de problemas
5.1 No hay salida de video en el monitor
- Check if the DVR is powered on and the power adapter is securely connected.
- Verify the HDMI or VGA cable connection between the DVR and the monitor.
- Asegúrese de que el monitor esté configurado en la fuente de entrada correcta (HDMI/VGA).
5.2 Las cámaras no se muestran
- Check all camera power and video cable connections.
- Verify that the camera type (AHD, TVI, CVI, etc.) is compatible with the DVR.
- Ensure the correct channel type is selected in the DVR settings (refer to Section 2.4).
- Test cameras individually if possible to isolate the issue.
5.3 El acceso remoto no funciona
- Confirm the DVR is connected to the internet via an Ethernet cable.
- Verifique la conexión a Internet de su enrutador.
- Asegúrese de que la aplicación iCSee esté actualizada a la última versión.
- Verify that the DVR was added correctly to the app by scanning the QR code.
- For some networks, you might need to adjust router settings (e.g., port forwarding), consult your network administrator or ISP.
6. Especificaciones
| Característica | Detalle |
|---|---|
| Marca | Fuers |
| Número de modelo | A1008CH |
| Número de canales | 8 |
| Tecnología de conectividad | HDMI, USB, VGA |
| Dispositivos compatibles | Computadora de escritorio, tableta, cámara, teléfono inteligente |
| Dimensiones del producto | 7.48" de largo x 7.48" de ancho x 1.57" de alto |
| Capacidad de almacenamiento de memoria | 1 TB (preinstalado) |
| Hard-Drive Size | 1 TB (Expandable up to 14 TB) |
| Formato de medios Vídeo digital | H.265 + |
| Entrada de vídeo | AHD, CVI, HDMI, HDTVI, IP Input, VGA |
| Código Postal | 765142240850 |
7. Garantía y soporte
7.1 Garantía del producto
This Fuers DVR Recorder is covered by a standard manufacturer's warranty. Please refer to the warranty card included with your product or visit the official Fuers webConsulte el sitio web para conocer los términos y condiciones detallados de la garantía. Conserve su recibo de compra como comprobante para reclamaciones de garantía.
7.2 Soporte técnico
For technical assistance, troubleshooting, or any questions regarding your Fuers DVR, please contact Fuers customer support. Contact information can typically be found on the product packaging, the official Fuers websitio, o a través de su minorista.
Recursos en línea:
- Visita el Tienda Fuers en Amazon Para obtener información y actualizaciones del producto.