1. Introducción
Thank you for choosing the Sharkoon AK6 RGB ATX PC Case. This manual provides essential information for the proper installation, operation, and maintenance of your new PC case. Please read this guide thoroughly before beginning the assembly process to ensure optimal performance and longevity of your components.
2. Información de seguridad
- Desconecte siempre la fuente de alimentación de la toma de pared antes de instalar o quitar cualquier componente dentro de la carcasa del PC.
- Manipule los paneles de vidrio templado con cuidado. Son frágiles y pueden romperse si se caen o sufren impactos.
- Avoid exposing the case to extreme temperatures, humidity, or direct sunlight.
- Mantenga las piezas pequeñas y los tornillos fuera del alcance de los niños.
- Ensure proper grounding to prevent electrostatic discharge (ESD) damage to sensitive electronic components.
3. Contenido del paquete
Por favor verifique que todos los artículos estén presentes en su paquete:
- Caja para PC Sharkoon AK6 RGB ATX
- Accessory box (containing screws, cable ties, and other small parts)
- Manual de usuario (este documento)
4. Producto terminadoview
The Sharkoon AK6 RGB ATX PC Case is designed with a modern glass aesthetic, featuring seamless integration of tempered glass on the front and side panels. It includes four pre-installed 120mm addressable RGB PWM fans for optimal airflow and visual appeal. The case supports a wide range of components, including BTF motherboards, and offers ample space for high-performance hardware.

Figure 4.1: Front interior view of the Sharkoon AK6 RGB PC case, showcasing the pre-installed addressable RGB fans and the spacious main chamber.

Figura 4.2: Angulado view of the Sharkoon AK6 RGB PC case, highlighting the tempered glass side panel and the top mesh for ventilation.

Figura 4.3: Posterior view of the Sharkoon AK6 RGB PC case, showing the I/O shield cutout, rear exhaust fan mount, and expansion slots.
Panel de E/S frontal
The front I/O panel is located on the side of the case and includes:
- Botón de encendido
- Botón de reinicio
- 2 x USB Ports (Type-A)
- 1 puertos USB tipo C
- Audio Jacks (TRRS)
5. Configuración e instalación
Follow these steps to install your components into the Sharkoon AK6 RGB PC Case.
5.1 Preparación del caso
- Coloque el estuche sobre una superficie plana y estable.
- Carefully remove the tempered glass side panel by unscrewing the thumb screws at the rear and gently pulling the panel away.
- Remove the rear metal side panel by unscrewing the thumb screws.
5.2 Instalación de la placa base
The AK6 RGB supports Mini-ITX, Micro-ATX, ATX, and BTF motherboards.
- Install the I/O shield into the cutout at the rear of the case (if not pre-installed on your motherboard).
- Align your motherboard with the standoffs inside the case. Ensure all standoffs match the motherboard's mounting holes.
- Asegure la placa base con los tornillos apropiados de la caja de accesorios.
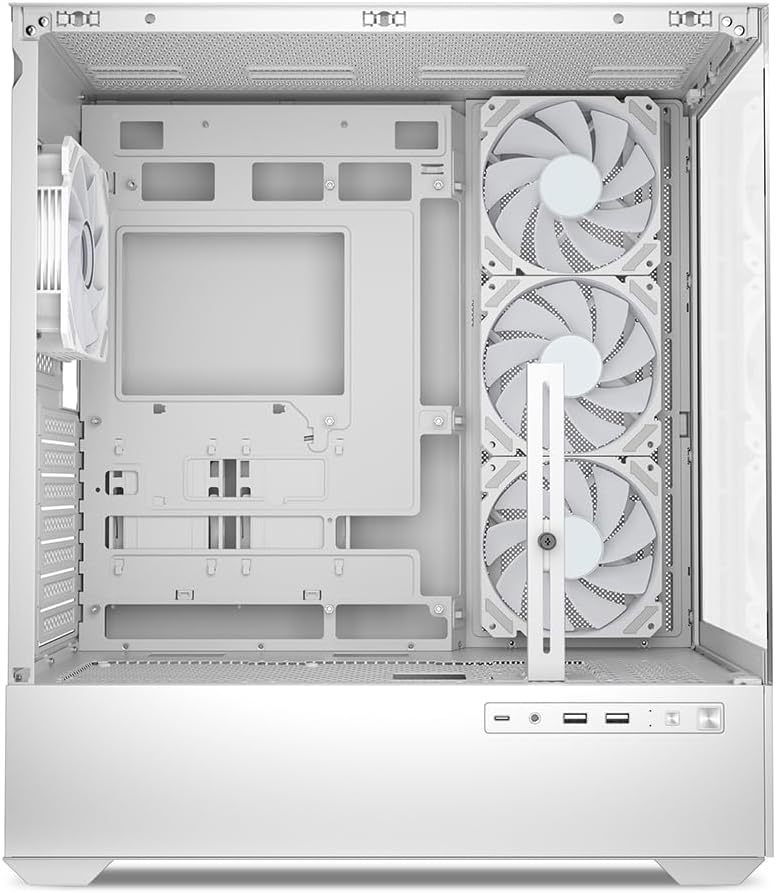
Figura 5.1: Interior view of the Sharkoon AK6 RGB PC case, illustrating the motherboard tray, cable management cutouts, and front fan mounting points.
5.3 Instalación de la fuente de alimentación
The case features a bottom-mount power supply design.
- Slide the power supply unit (PSU) into the dedicated compartment at the bottom rear of the case.
- Alinee la fuente de alimentación con los orificios para tornillos en la parte trasera de la carcasa.
- Secure the PSU with the provided screws.
5.4 Instalación del dispositivo de almacenamiento
The AK6 RGB supports up to two 3.5" HDDs or four 2.5" SSDs.
- Para discos duros de 3.5": Locate the drive cages beneath the PSU shroud. Slide the HDD into a drive tray and secure it with screws.
- Para SSD de 2.5": SSDs can be mounted on the dedicated brackets behind the motherboard tray or on the 3.5" drive trays using adapter screws.
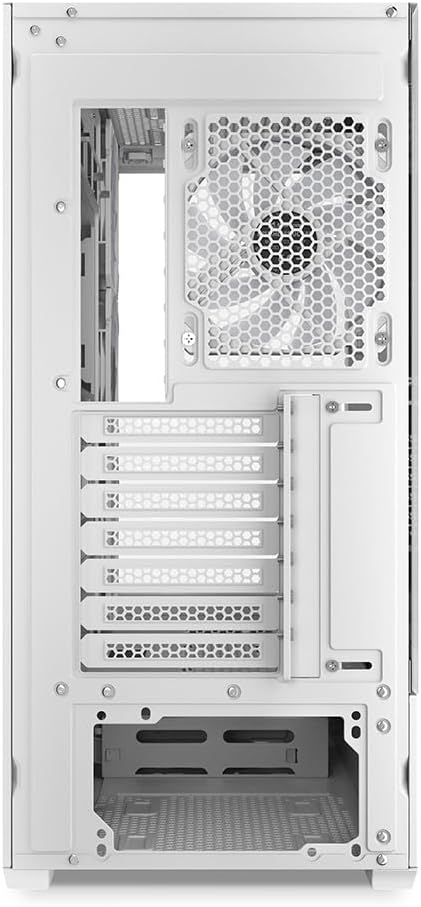
Figura 5.2: Interior trasero view of the Sharkoon AK6 RGB PC case, detailing the drive cages for 3.5-inch HDDs and 2.5-inch SSDs, and the power supply shroud area.
5.5 Instalación de la tarjeta gráfica y la tarjeta de expansión
- Retire las cubiertas de las ranuras de expansión necesarias en la parte trasera de la carcasa.
- Inserte su tarjeta gráfica u otras tarjetas de expansión en las ranuras PCIe correspondientes de su placa base.
- Secure the cards with screws. The case includes a rubberized graphics card support for larger cards.
5.6 CPU Cooler and Radiator Installation
The case supports CPU coolers up to 17 cm in height and allows for extensive liquid cooling setups.
- Instale el disipador de CPU de acuerdo con las instrucciones del fabricante.
- For liquid cooling, the case can accommodate a 360mm radiator at the top and an additional 280mm radiator.
5.7 Gestión de cables
Utilice los recortes y puntos de sujeción para la gestión de cables detrás de la bandeja de la placa base para guiar y asegurar los cables. Esto mejora la ventilación y la estética.
6. Instrucciones de funcionamiento
6.1 Encendido
After all components are installed and cables are connected, replace the side panels. Connect the power cable to your PSU and a wall outlet, then press the power button on the front I/O panel to start your system.
6.2 Control del ventilador RGB
The AK6 RGB comes with four pre-installed addressable RGB PWM fans. These fans are connected to an RGB controller which also provides connections for up to four LED elements and four PWM fans. The RGB lighting can typically be controlled via your motherboard's RGB software (if compatible) or through a dedicated button on the case (if present and connected).
6.3 Optimización del flujo de aire
The case is designed for ideal airflow, with three inverted fans drawing air from the side into the case. The top and rear fan mounts allow for additional exhaust fans. Ensure proper fan orientation for optimal cooling performance.

Figura 6.1: Example of a fully assembled system within the Sharkoon AK6 RGB PC case, featuring various components and active RGB lighting.
7. Mantenimiento
El mantenimiento regular ayuda a garantizar la longevidad y el rendimiento de los componentes de su PC.
- Filtros de polvo: Periodically clean the removable dust filters (e.g., on the top and bottom) to maintain optimal airflow and prevent dust buildup inside the case. Use compressed air or a soft brush.
- Paneles de vidrio: Limpie los paneles de vidrio templado con un paño suave que no deje pelusa y un limpiacristales. Evite materiales abrasivos que puedan rayar la superficie.
- Limpieza interior: Utilice aire comprimido para eliminar el polvo de los componentes internos y los ventiladores. Asegúrese de que el sistema esté apagado y desenchufado antes de limpiarlo.
8. Solución de problemas
If you encounter issues with your PC case, refer to the following common troubleshooting steps:
- Sin energía: Ensure the power supply is properly connected to the wall outlet and the motherboard. Check all internal power cables (24-pin ATX, 8-pin CPU, PCIe power).
- Los ventiladores no giran/el RGB no funciona: Verify that all fan and RGB cables are correctly connected to the motherboard or the included RGB controller. Check your motherboard's BIOS/UEFI settings or RGB software for fan speed and lighting control.
- Los puertos de E/S frontales no funcionan: Confirm that the front panel connectors (USB, audio, power/reset switches) are correctly plugged into the corresponding headers on your motherboard.
- Calentamiento excesivo: Ensure all fans are spinning correctly and oriented for proper airflow. Clean dust filters and internal components. Verify CPU cooler installation.
For further assistance, please contact Sharkoon support.
9. Especificaciones
| Característica | Especificación |
|---|---|
| Marca | Tiburón |
| Nombre del modelo | AK6 RGB |
| Número de modelo | C-AK6W |
| Tipo de caso | Torre ATX |
| Color | Blanco |
| Material | Vidrio templado |
| Compatibilidad de la placa base | Mini ITX, Micro ATX, ATX, BTF |
| Tipo de montaje de la fuente de alimentación | Montaje inferior |
| Método de enfriamiento | Aire |
| Ventiladores preinstalados | 4 x 120mm Addressable RGB PWM Fans |
| Altura máxima del enfriador de CPU | 17 centímetros |
| Longitud máxima de la tarjeta gráfica | 41 cm (with rubberized support) |
| Longitud máxima de la fuente de alimentación | 23.5 centímetros |
| Soporte del radiador | Top: up to 360mm, Additional: up to 280mm |
| Bahías de unidad | 2 discos duros de 3.5" o 4 SSD de 2.5" |
| Puertos de E / S frontales | 2 x USB Type-A, 1 x USB Type-C, Audio (TRRS) |
| Peso del artículo | 6.1 kilogramos |
| Características especiales | RGB Lighting, Unique Glass Appearance, BTF Motherboard Support |
10. Garantía
Los productos Sharkoon se fabrican con altos estándares de calidad. Para obtener información detallada sobre la garantía, consulte la tarjeta de garantía incluida con su producto o visite el sitio web oficial de Sharkoon. webSitio. La garantía generalmente cubre defectos de materiales y mano de obra en condiciones normales de uso.
11. Soporte
If you require technical assistance or have questions regarding your Sharkoon AK6 RGB ATX PC Case, please visit the official Sharkoon website for support resources, FAQs, and contact information. You may also find updated drivers or software for the RGB controller there.
Websitio: www.sharkoon.com


