
1. Introducción
This manual provides detailed instructions for the installation and operation of the AudioControl LC5iPRO 5-Channel Line Output Converter with AccuBass and the Stinger SS600XS 8GA Copper Wiring Kit. This bundle is designed to integrate aftermarket amplifiers into factory audio systems, providing a clean, high-quality signal for enhanced audio performance.
The AudioControl LC5iPRO features advanced OEM integration capabilities, including a Load Matching Circuit for seamless compatibility with various factory head units. It incorporates AccuBass technology to restore low-frequency response often lost in factory systems, along with flexible trigger modes and an ACR-1 level control for precise output adjustment.
The Stinger SS600XS Wiring Kit provides all necessary components for a robust amplifier installation, featuring full copper construction for optimal power delivery and twisted pair interconnects to minimize noise. This kit ensures reliable and efficient power and signal transmission to your audio system.
2. Información de seguridad
- Always disconnect the vehicle's battery negative terminal before beginning any electrical installation to prevent short circuits and damage.
- Ensure all wiring connections are secure and properly insulated to prevent electrical shorts and fire hazards.
- Mount the LC5iPRO and other components in a location that is dry, well-ventilated, and protected from extreme temperatures and physical damage.
- Use the correct fuse rating (2A for LC5iPRO, appropriate for the Stinger kit's AGU fuse holder) to protect the equipment and vehicle's electrical system.
- Consulte con un instalador de audio para automóvil profesional si no está seguro acerca de alguna parte del proceso de instalación.
3. Contenido del paquete
Verifique que todos los elementos estén presentes antes de comenzar la instalación:
- 1x AudioControl LC5iPRO 5-Channel Line Output Converter with AccuBass
- 1x Stinger SS600XS 8GA Copper 600W Complete Wiring Kit, Blue, including:
- 17FT Translucent Blue Power Wire (8GA)
- 3FT Translucent Silver Ground Wire (8GA)
- 17FT Translucent Blue Twisted Pair RCA Interconnects
- 20FT Translucent Speaker Wire
- Cable de encendido remoto
- AGU Fuseholder with Fuse
- Assorted Terminals and Connectors
- ACR-1 Level Control (for LC5iPRO)
- Installation Accessories (e.g., pry tools, if included in bundle)
4. Configuración e instalación
4.1 AudioControl LC5iPRO Installation
The LC5iPRO is designed to convert high-level speaker signals from a factory head unit into low-level RCA signals for aftermarket amplifiers. It features a Load Matching Circuit (LMC) to ensure compatibility with various OEM systems.
- Montaje: Choose a secure, dry location for the LC5iPRO, away from heat sources and moisture. Ensure adequate ventilation.
- Conexiones de energía: Connect the +12V terminal to a constant +12V source (fused, 2A recommended), the Ground terminal to a solid chassis ground, and the Rmt In terminal to the amplifier's remote turn-on output or a switched +12V source. The Rmt Out terminal provides a remote turn-on signal for your ampsalvavidas.
- Conexiones de entrada: Connect the factory speaker wires to the Channel 1 Inputs and Channel 2 Inputs terminals. The LC5iPRO supports up to 5 channels of input.
- Seleccionar carga: Adjust the Load Select switches (20 Ohm, 60 Ohm, 20 kOhm) for each input channel to match the impedance requirements of your factory head unit. This ensures proper signal detection and prevents error codes.
- Signal Bus / Sum Bus: Use the Signal Bus or Sum Bus switches to combine input channels if necessary (e.g., summing front and rear signals for a subwoofer output).
- Aislamiento de tierra: Set the Ground Isolation switch (GND, ISO, 200 Ohm) to eliminate ground loop noise. Start with GND, then try ISO or 200 Ohm if noise persists.
- Conexiones de salida: Connect the LC5iPRO's Channel 1, Channel 2, and Channel 3 Outputs to your aftermarket amplifier's RCA inputs using the provided RCA interconnects.
- ACR-1 Level Control: Connect the ACR-1 remote level control to the LC5iPRO for convenient bass level adjustment from the driver's seat.

Figure 1: AudioControl LC5iPRO with labeled connections and controls.
4.2 Stinger SS600XS Wiring Kit Installation
The Stinger SS600XS kit provides the necessary power, ground, and signal cables for your ampinstalación más duradera.
- Alambre de la energía: Run the 17FT Translucent Blue Power Wire from the vehicle's battery (through the firewall, using a grommet to protect the wire) to the AGU Fuseholder. Connect the other end of the fuse holder to your amplifier's +12V input. Ensure the fuse is installed only after all connections are made.
- Cable a tierra: Connect the 3FT Translucent Silver Ground Wire from your amplifier's ground terminal to a clean, bare metal chassis ground point in the vehicle. Ensure a solid connection for optimal performance.
- Interconexiones RCA: Connect the 17FT Translucent Blue Twisted Pair RCA Interconnects from the LC5iPRO's outputs to your amplifier's inputs. Route these cables away from power wires to minimize noise.
- Cable de encendido remoto: Connect the remote turn-on wire from the LC5iPRO's Rmt Out terminal to your ampEntrada de encendido remoto del lificador.
- Cable de altavoz: Use the 20FT Translucent Speaker Wire to connect your amplifier's speaker outputs to your speakers. Ensure correct polarity.
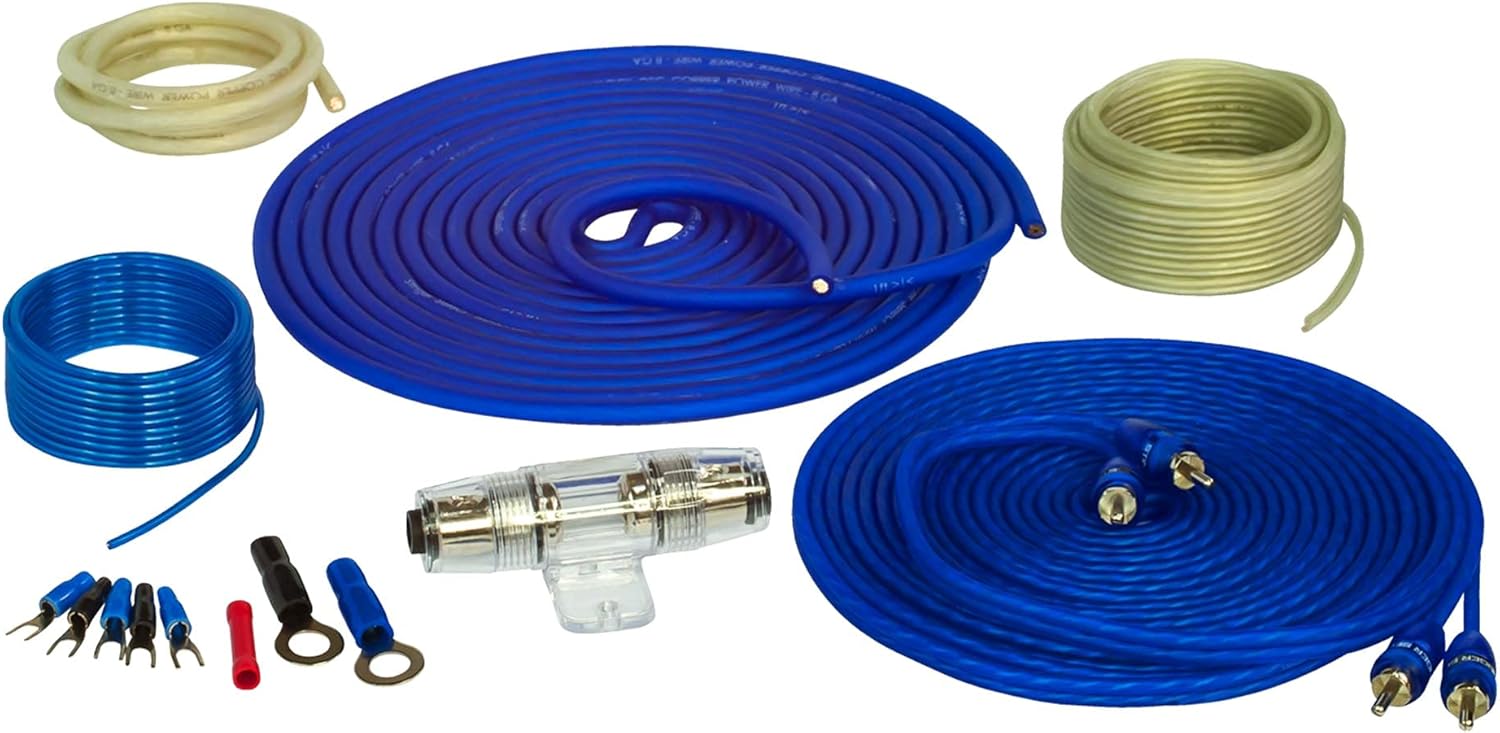
Figure 2: Stinger SS600XS Wiring Kit components.

Figure 3: AGU Fuseholder for power protection.
5. Instrucciones de funcionamiento
5.1 LC5iPRO Controls
The LC5iPRO offers several controls to optimize your audio system's performance.
- Controles de nivel: Each output channel (Channel 1, Channel 2, Channel 3) has a dedicated level control. Adjust these to match the input sensitivity of your aftermarket amplifier. The 'Max' indicator LED will illuminate when the output signal is approaching clipping, indicating the maximum clean output level.
- AccuBass: This feature restores bass response that is often rolled off by factory audio systems at higher volumes. The AccuBass section has two controls:
- Nivel: Adjusts the amount of bass restoration.
- Límite: Sets the point at which AccuBass begins to engage.
- Modo de disparo: This switch determines how the LC5iPRO turns on and off.
- Rmt In: The unit turns on when a +12V signal is applied to the Rmt In terminal.
- GTO (Great Turn-On): The unit senses a DC offset on the input signal from the factory head unit and turns on automatically.
- Audio: The unit senses audio signal on the inputs and turns on automatically.

Figure 4: AccuBass and output level controls on the LC5iPRO.
5.2 Initial System Turn-On and Adjustment
- Después de realizar todas las conexiones, vuelva a conectar la batería del vehículo.
- Turn on your vehicle's audio system. The LC5iPRO's power indicator LED should illuminate.
- Set all LC5iPRO output level controls to their minimum position.
- Reproduzca una pieza musical familiar con un amplio rango dinámico.
- Slowly increase the LC5iPRO's output level controls until the 'Max' indicator LED just begins to flicker, then back off slightly. This sets the maximum clean output.
- Ajuste su amplifier's input gain controls according to its manual.
- Fine-tune the AccuBass Level and Threshold controls to achieve desired bass response.
- Use the ACR-1 remote level control for convenient bass adjustments.
6. Mantenimiento
- Inspeccione periódicamente todas las conexiones del cableado para comprobar su estanqueidad y ausencia de corrosión.
- Keep the LC5iPRO and wiring components clean and free of dust and debris. Use a soft, dry cloth for cleaning.
- Ensure the fuse in the AGU Fuseholder is intact and of the correct rating. Replace only with a fuse of the same type and rating.
7. Solución de problemas
| Problema | Posible causa | Solución |
|---|---|---|
| No power to LC5iPRO | Blown fuse; incorrect power/ground connection; Rmt In not receiving signal. | Check LC5iPRO fuse (2A); verify +12V and ground connections; check Rmt In signal or try different Trigger Mode. |
| Sin salida de audio | Incorrect input/output connections; LC5iPRO level controls too low; amplifier not powered or in protect mode. | Verify all RCA and speaker wire connections; increase LC5iPRO output levels; check amppotencia y estado del salvavidas. |
| Audio distorsionado | LC5iPRO output levels too high (clipping); amplifier gain too high; AccuBass settings incorrect. | Reduce LC5iPRO output levels until 'Max' LED stops flickering; adjust amplifier gain; fine-tune AccuBass Level and Threshold. |
| Engine noise/hiss | Ground loop; RCA cables routed too close to power wires. | Adjust Ground Isolation switch (GND, ISO, 200 Ohm); re-route RCA cables away from power wires. |
| Factory head unit error codes | Incorrect Load Select setting on LC5iPRO. | Adjust Load Select switches to match OEM impedance (e.g., 20 Ohm, 60 Ohm, 20 kOhm). |
8. Especificaciones
8.1 AudioControl LC5iPRO
- Canales: Convertidor de salida de línea de 5 canales
- Características: AccuBass, Load Matching Circuit (LMC), Trigger Modes (Rmt In, GTO, Audio), Ground Isolation
- Preamp Salidas: 5 (Max 9.5Vrms / 13V peak)
- Distorsión armónica total (THD): 0.01%
- Relación señal-ruido (SNR): >124dB
- Clasificación de fusible recomendada: 2A
- Dimensiones: Approximately 17 x 9.75 x 15.25 inches (Product Dimensions for the bundle, LC5iPRO is smaller)
- Número de modelo del artículo: ACBDL241031-02 (for the bundle)
8.2 Stinger SS600XS Wiring Kit
- Indicador: 8GA (Power/Ground)
- Material: Full Copper Construction
- Manejo de potencia: 600 W
- Power Wire Length: 17FT (Translucent Blue)
- Longitud del cable de tierra: 3FT (Translucent Silver)
- Interconexiones RCA: 17FT (Translucent Blue Twisted Pair)
- Longitud del cable del altavoz: 20FT (Translucent)
- Portafusibles: AGU Type, Water-Resistant
9. Garantía y soporte
For warranty information and technical support, please refer to the official AudioControl webSitio web o contacte directamente con el servicio de atención al cliente. Conserve su recibo de compra como comprobante para cualquier reclamación de garantía.
AudioControl Support: www.audiocontrol.es