1. Introducción
This manual provides detailed instructions for the setup, operation, and maintenance of your TONOR POD-2 Podcast Equipment Bundle. This kit is designed for two-person podcasting, streaming, and recording, featuring dynamic microphones, an audio mixer, and adjustable boom arms.
2. Qué incluye
The TONOR POD-2 Podcast Equipment Bundle includes the following components:
- 2 x Dynamic Microphones
- 1 x Audio Interface (Mixer)
- 2 x XLR to XLR Cables
- 1 x USB Type-C to Type-C + USB Cable
- 2 x Boom Arms
- 2 x Reinforced Bases
- 2 x Pop Filters
- 2 x Microphone Sponge Covers
- 1 x Manual de usuario
3. Guía de configuración
3.1 Assembling the Boom Arms and Microphones
- Attach the reinforced base to your desk using the rotatable clampAsegúrese de que esté bien fijado.
- Insert the boom arm into the reinforced base.
- Attach the microphone adapter to the boom arm.
- Mount the dynamic microphone onto the adapter.
- Adjust the boom arm to your desired position. The arm features flexible joints allowing 180-degree adjustment and a microphone adapter with 240-degree rotation.
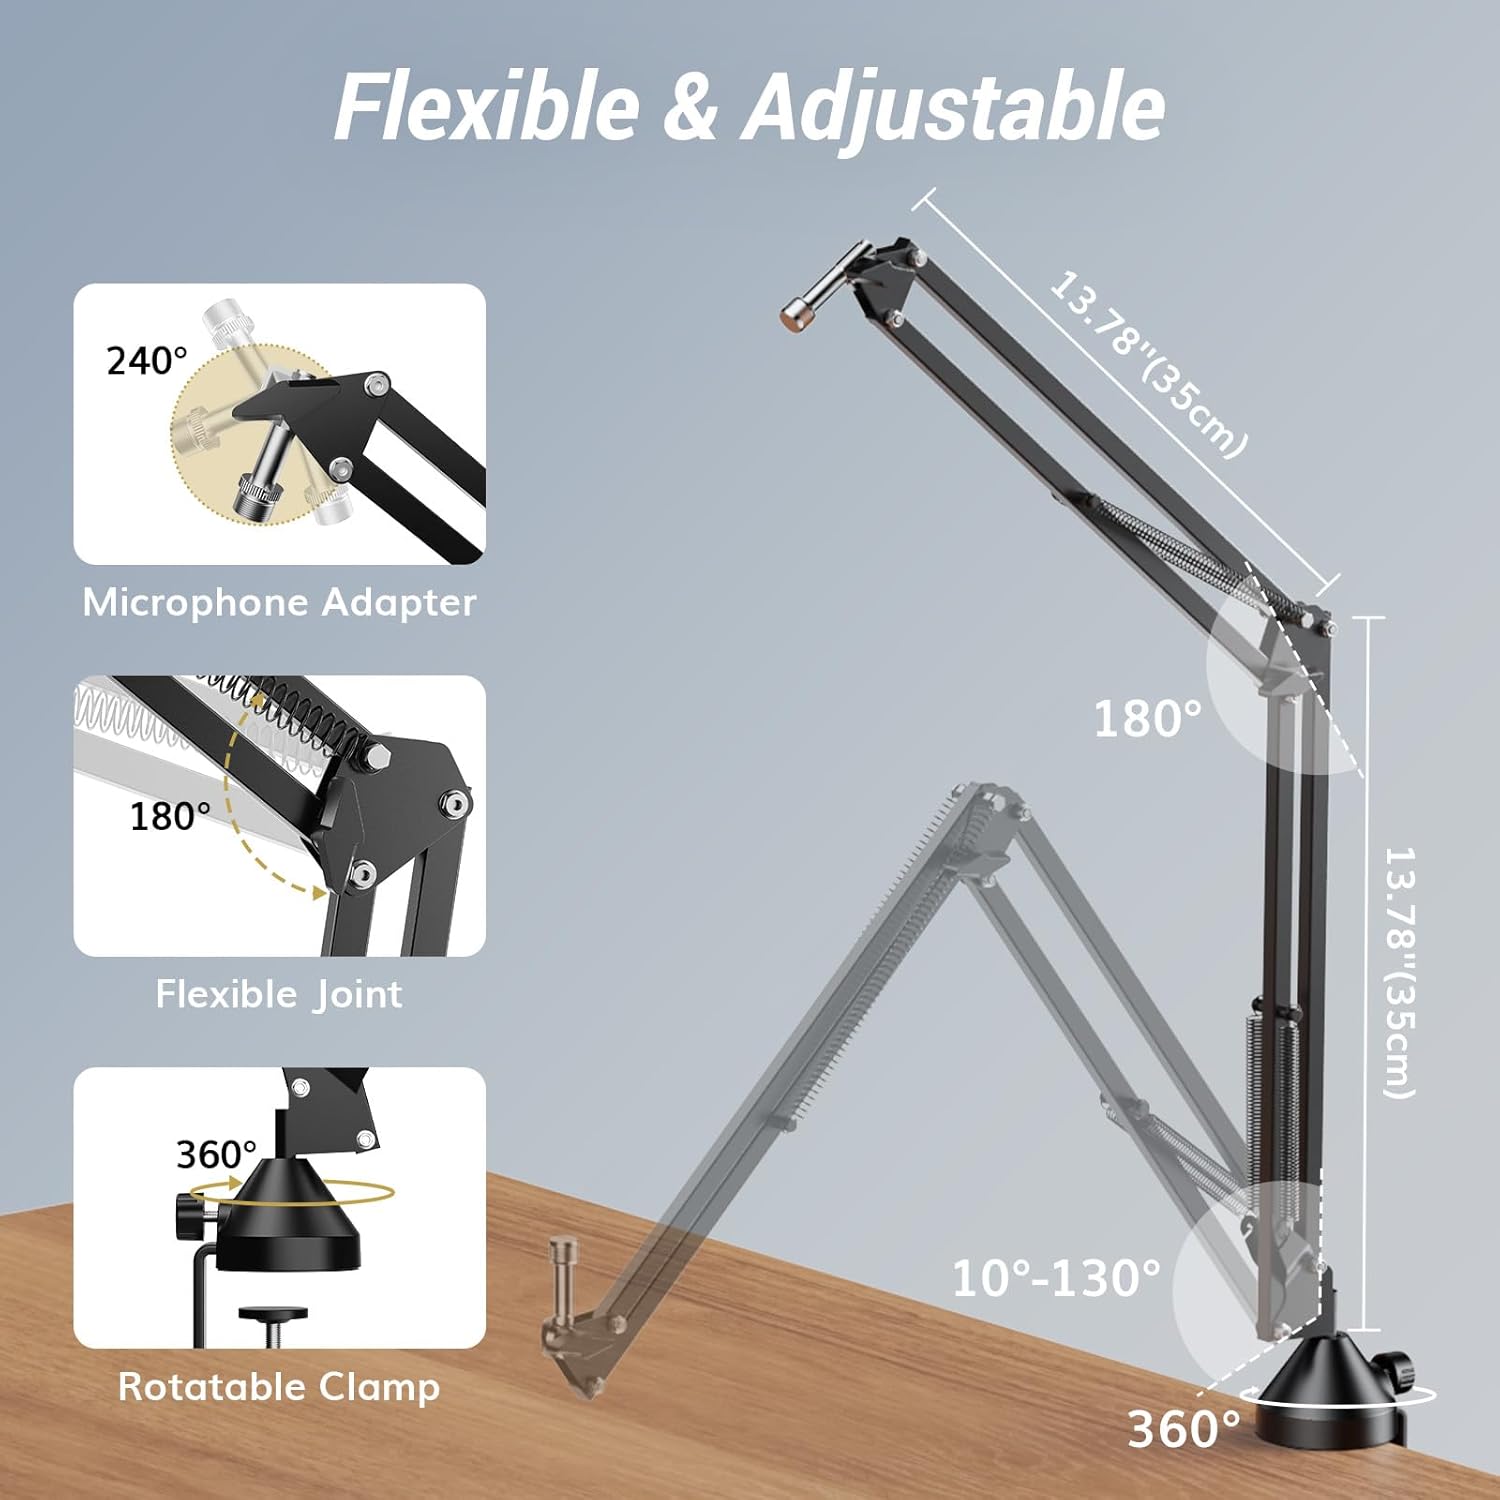
Figure 3.1: Boom arm assembly and adjustment points.
3.2 Conexión de la interfaz de audio
The audio interface serves as the central hub for your microphones and connection to your computer or mobile device.
- Connect the two dynamic microphones to the XLR interfaces on the audio mixer using the provided XLR to XLR cables.
- Connect the audio interface to your computer via the OTG/PC Port using the USB Type-C to Type-C+USB cable. For mobile devices, use the Type-C connection.
- Connect a 5V DC power adapter to the Power Port (DC 5V) of the audio interface. Nota: The mixer does not contain an internal battery and requires external power.
- Connect your headphones to the 3.5mm Headphone Jack for monitoring.
- If connecting to a LINE OUT device, use the LINE OUT Interface.

Figure 3.2: Connection diagram for PC and phone.

Figura 3.3: Posterior view of the audio mixer ports.
3.3 Notas de compatibilidad
- For Lightning-enabled devices (older iPhones/iPads): Use a powered Lightning to USB Camera Adapter. Connect the charger to the adapter (it must be powered), not directly to the audio interface's 5V port, to prevent compatibility issues.
- For iPhone 15 and newer models: If the audio interface does not power on while charging the phone through the audio interface, try reversing the cable connected to the OTG port.

Figure 3.4: Important compatibility and power notes.
4. Instrucciones de funcionamiento
4.1 Audio Mixer Controls
The audio mixer provides individual control over each microphone and overall output.
- Perilla de volumen: Adjusts the listening volume for headphones and the LINE OUT volume simultaneously.
- Mic 1 Gain Fader: Controls the input gain for Microphone 1.
- Mic 2 Gain Fader: Controls the input gain for Microphone 2.
- Mic 1 Mute Button: Short press to mute Microphone 1. Long press to switch to stereo mode.
- Mic 2 Mute Button: Short press to mute Microphone 2.
- Botón de monitorización directa: Activates or deactivates zero-latency monitoring. White light indicates ON, orange light indicates OFF.
- Interruptor de encendido de 48 V: Tap to enable 48V phantom power for microphones that require it.

Figure 4.1: Audio mixer controls overview.
4.2 Monitoreo de latencia cero
The direct monitor function allows you to hear your audio input in real-time without any delay, which is crucial for accurate recording and performance.
- Presione el Monitor directo button to toggle the monitoring function.
- A white light indicates monitoring is active. An orange light indicates monitoring is off.
- The listening volume for both Mic 1 and Mic 2 will be adjusted simultaneously via the main volume knob during monitoring.

Figure 4.2: Zero-latency monitoring setup.
4.3 Microphone Mute and Stereo/Mono Mixing
The mute buttons offer quick control over your microphone audio and allow for stereo mixing.
- Short Press Mute: A quick press of either Mic 1 or Mic 2 mute button will mute the respective microphone.
- Long Press Stereo Mode (Mic 1 Mute Button): A long press on the Mic 1 mute button will activate stereo mixing mode. The default is mono mixing mode.
Figure 4.3: Mute button functions and mixing modes.
4.4 Phone Reverse Charging
The audio interface supports reverse charging for your phone, ensuring power during extended streaming or recording sessions.
- Connect your phone to the OTG/PC port.
- Ensure the audio mixer is powered via a 5V adapter.
- Your phone will begin charging from the mixer.

Figure 4.4: Phone reverse charging via the audio mixer.
5. Mantenimiento
Proper maintenance ensures the longevity and optimal performance of your podcast equipment.
- Limpieza: Use a soft, dry cloth to clean the surfaces of the microphones, mixer, and boom arms. Avoid using liquid cleaners or abrasive materials.
- Almacenamiento: Store the equipment in a dry, dust-free environment when not in use. Protect microphones from moisture and extreme temperatures.
- Cuidado de cables: Evite las curvas o dobleces pronunciados en los cables. Guarde los cables de forma ordenada para evitar daños.
- Boom Arm Joints: Periodically check the tension of the boom arm joints and tighten if necessary to maintain stability.
6. Solución de problemas
If you encounter issues with your TONOR POD-2 bundle, refer to the following common solutions:
- Sin salida de sonido:
- Ensure all cables are securely connected to their respective ports on the microphones, mixer, and computer/phone.
- Verify that the audio mixer is receiving power from a 5V adapter.
- Check the gain faders on the mixer to ensure they are not set to minimum.
- Confirm that the microphone mute buttons are not active (short press to unmute).
- Check your computer's or phone's audio input settings to ensure the TONOR mixer is selected as the input device.
- Sonido distorsionado o de baja calidad:
- Adjust the microphone gain faders on the mixer. Too high gain can cause distortion, too low can result in weak audio.
- Ensure the pop filters are correctly positioned to reduce plosives.
- Verifique si hay conexiones sueltas o cables dañados.
- Minimize ambient noise in your recording environment. The dynamic microphones have a cardioid pickup pattern, which helps reduce background noise.
- Audio Interface Not Powering On (with iPhone 15+):
- If the audio interface does not power on while charging your iPhone 15 or newer model, try reversing the cable connected to the OTG port.
- Compatibility Issues with Lightning Devices:
- For Lightning-enabled devices, use a powered Lightning to USB Camera Adapter. Connect the charger to the adapter, not the audio interface's 5V port, to avoid compatibility issues.
- Inestabilidad del brazo de la pluma:
- Ensure the reinforced base clamp is securely tightened to your desk.
- Check all joints on the boom arm and tighten any loose screws.
7. Especificaciones
| Marca | TONIFICACIÓN |
| Número de modelo | POD-2 |
| Número de canales | 2 |
| Tecnología de conectividad | USB |
| Fuente de poder | DC Powered (5V) |
| Tipo de conector de salida | XLR, USB Type C |
| Entrada de audio | XLR |
| Peso del artículo | 6.6 libras |
| Dimensiones del producto (Pr. x An. x Al.) | 16.54" x 11.77" x 5.43" |
8. Información de garantía
TONOR provides a warranty for two years from the date of purchase for the POD-2 Podcast Equipment Bundle. Please retain your proof of purchase for warranty claims.
9. Atención al cliente
For further assistance, technical support, or warranty inquiries, please visit the official TONOR website or contact their customer service directly. Refer to the contact information provided with your product packaging or on the TONOR brand store page on Amazon.
TONOR Brand Store: https://www.amazon.com/stores/TONOR/page/8A344B8F-0E41-4E4B-9450-3C57C1C788A9