1. Introducción
Thank you for choosing the DreamSky Wooden Digital Alarm Clock, Model DS2208. This clock combines modern design with essential features to enhance your daily routine. With its large, easy-to-read display, adjustable brightness, and customizable alarm volume, it is designed for convenience and reliability. Please read this manual carefully to ensure proper setup and operation.

Figura 1: DreamSky Wooden Digital Alarm Clock (Red)
2. Características del producto
- Pantalla digital grande: Features 1.8-inch bold numbers for easy readability across the room.
- 6 Dimmable Brightness Levels: Adjust the display brightness from off to bright, suitable for day and night use.
- 5 Adjustable Alarm Volume Levels: Customize alarm volume from 70dB to 105dB, catering to both light and heavy sleepers.
- Función de repetición: Provides an extra 9 minutes of rest after the alarm sounds.
- Plug-in Power with Battery Backup: Primarily powered by an included adapter, with battery backup (batteries not included) to maintain time settings and trigger alarms during power outages.
- DST and 12/24 Hour Format: Easy one-click switching for Daylight Saving Time and between 12-hour and 24-hour time formats.
- Modern Wooden Design: An elegant and space-saving design that complements various home and office decors.
3. Contenido del paquete
Por favor revise el paquete para ver los siguientes artículos:
- DreamSky Wooden Digital Alarm Clock (Model DS2208)
- Adaptador de corriente de 5 V/1.2 A
- Manual de usuario (este documento)
4. Instrucciones de configuración
4.1 Encendido del reloj
The DreamSky alarm clock is designed to be continuously powered by the included 5V/1.2A power adapter. For stable operation and continuous display, always keep the clock plugged into a power outlet.

Figura 2: Clock powered by electricity.
4.2 Batería de respaldo
Para respaldo durante un corte de energíatages, insert 2 AAA batteries (not supplied) into the battery compartment located on the back of the clock. The battery backup ensures that alarm settings are saved and the alarm will still function, though the display will not be lit to conserve power.

Figura 3: Battery backup functionality.
4.3 controles sobreview
The control buttons are located on the back panel of the clock. Familiarize yourself with these buttons for easy operation:

Figura 4: Rear panel controls and power input.
4.4 Configuración de la hora
- Mantenga pulsado el TIEMPO ESTABLECIDO Mantenga pulsado el botón durante 2 segundos para acceder al modo de ajuste de la hora. Los dígitos de la hora parpadearán.
- Utilice el + or - Botones para ajustar la hora.
- Prensa TIEMPO ESTABLECIDO De nuevo para confirmar la hora y pasar al ajuste de los minutos. Los dígitos de los minutos parpadearán.
- Utilice el + or - Botones para ajustar los minutos.
- Prensa TIEMPO ESTABLECIDO to save the time and exit setting mode.
4.5 Configuración de la alarma
- Mantenga pulsado el SET DE ALARMAS button for 2 seconds. The alarm hour digits will flash.
- Utilice el + or - Botones para ajustar la hora de la alarma.
- Prensa SET DE ALARMAS again to confirm the alarm hour and move to alarm minute setting. The minute digits will flash.
- Utilice el + or - Botones para ajustar los minutos de la alarma.
- Prensa SET DE ALARMAS to save the alarm time. The alarm icon will appear on the display, indicating the alarm is active.
4.6 formato de 12/24 horas
To switch between 12-hour (AM/PM) and 24-hour (military) time formats, simply press the 12 / 24HR botón.
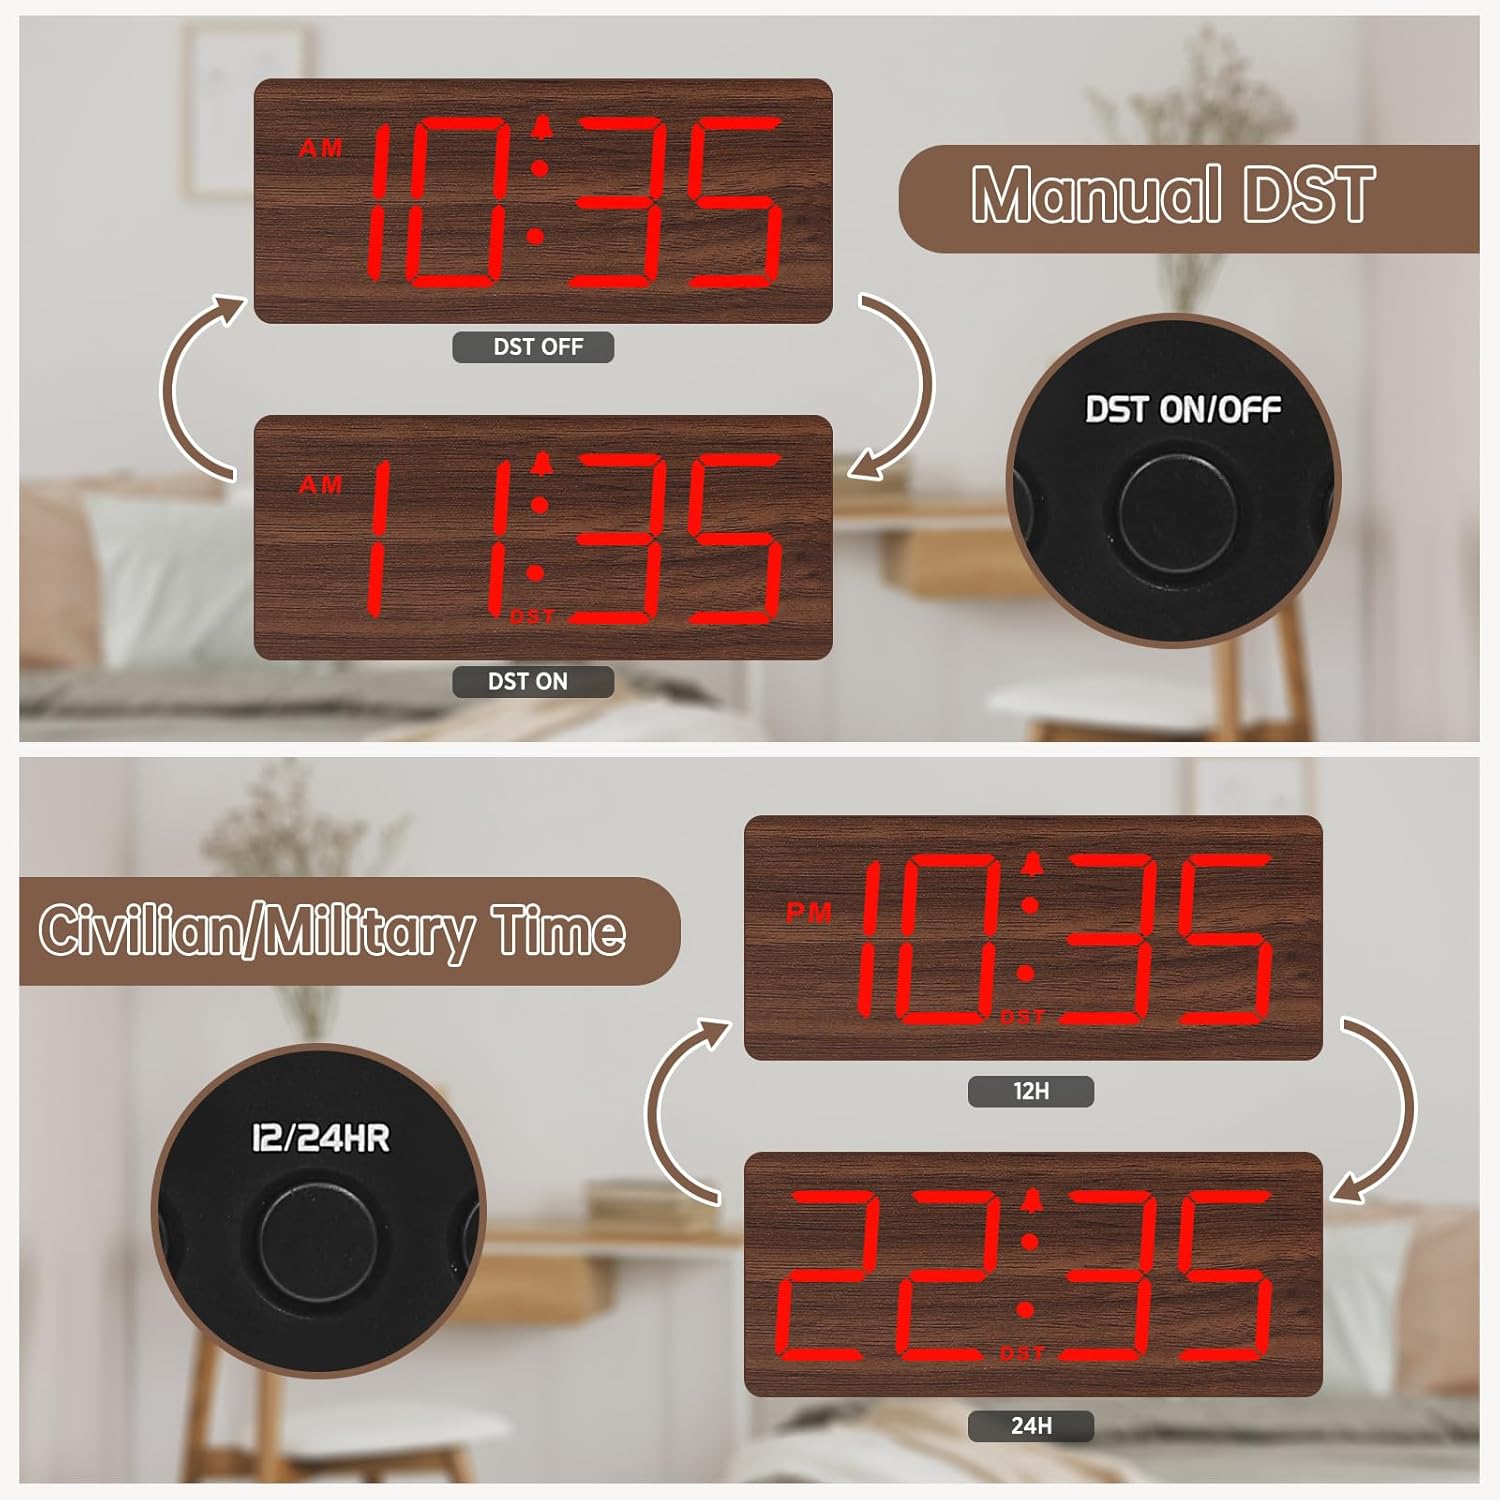
Figura 5: Manual DST and 12/24 Hour Time Switch.
4.7 Horario de verano (DST)
Para activar o desactivar el horario de verano, presione el botón DST ENCENDIDO / APAGADO button. The display will adjust by one hour forward or backward, and a 'DST' indicator will appear or disappear.
4.8 Ajuste del brillo de la pantalla
The clock offers 6 levels of display brightness (L1 to L5, plus OFF). Press the REGULADOR DE INTENSIDAD button repeatedly to cycle through the brightness levels. Select a level that is comfortable for your environment, from bright during the day to dim or off at night.

Figura 6: Adjustable Display Brightness Levels.
4.9 Ajuste del volumen de la alarma
The alarm volume can be adjusted to 5 different levels (V1 to V5). Use the VOL+ y vol- buttons to set your preferred alarm volume. This feature is ideal for heavy sleepers who need a louder alarm or for light sleepers who prefer a softer tone.

Figura 7: 5 Adjustable Alarm Volume Levels.
5. Instrucciones de funcionamiento
5.1 Función de repetición
Cuando suene la alarma, presione el botón grande DORMITAR button on the top of the clock to temporarily silence the alarm for 9 minutes. The alarm will sound again after the snooze period ends.
5.2 Activación y desactivación de la alarma
Para activar o desactivar la alarma, presione el botón ENCENDIDO/APAGADO button. The alarm icon on the display will indicate whether the alarm is currently active.
6. Mantenimiento
To maintain your DreamSky Wooden Digital Alarm Clock:
- Limpie el reloj con un paño suave y seco.
- Evite el uso de limpiadores o disolventes abrasivos.
- Mantenga el reloj alejado de la luz solar directa, temperaturas extremas y humedad.
7. Solución de problemas
- Display not lit: Ensure the power adapter is securely plugged into both the clock and a working power outlet. If using battery backup, the display will not light up to conserve power.
- La alarma no suena: Check if the alarm is set and the alarm icon is visible on the display. Ensure the alarm volume is not set to the lowest level (V1) or muted.
- Hora incorrecta: Re-enter time setting mode and adjust the time as described in Section 4.4. If using battery backup, ensure batteries are fresh.
8. Especificaciones
| Característica | Detalle |
|---|---|
| Marca | SueñoCielo |
| Número de modelo | DS2208 |
| Color | Red (Plug-in) |
| Tipo de pantalla | Digital |
| Dimensiones del producto | 6.1" de ancho x 2.8" de alto |
| Fuente de poder | Corded Electric (5V/1.2A adapter included) |
| Batería de respaldo | 2 pilas AAA (no incluidas) |
| Material | Madera |
| Peso del artículo | 10.2 onzas |
9. Vídeo oficial del producto
Vídeo 1: Un sobreview of the DreamSky Wooden Digital Clock, demonstrating its features and aesthetic appeal. This video is provided by DreamSky Direct.
10. Garantía y soporte
DreamSky products are designed for durability and performance. For any questions, technical support, or warranty inquiries, please contact DreamSky customer support at: info@dreamsky4u.com.