
1. Introducción e información de seguridad
Thank you for choosing the Güde GF 2436.1 Petrol Tiller. This manual provides essential information for the safe and efficient operation, maintenance, and troubleshooting of your new equipment. Please read this manual thoroughly before assembly, operation, or maintenance. Keep it in a safe place for future reference.
Advertencias generales de seguridad
- Utilice siempre el equipo de protección personal (EPP) adecuado, que incluya gafas de seguridad, guantes, calzado resistente y protección auditiva.
- Asegúrese de que el área de trabajo esté libre de personas, especialmente niños y mascotas.
- Never operate the tiller under the influence of alcohol, drugs, or medication that may impair judgment.
- Before starting, inspect the tiller for any damage or loose parts. Do not operate if damaged.
- The tiller is equipped with a dead man's switch for high work safety. Release the lever to stop the engine immediately.
- Reposte en un área bien ventilada, con el motor apagado y frío. Evite derramar combustible.
- Do not modify the tiller in any way. Use only original Güde spare parts.
2. Configuración y montaje
The Güde GF 2436.1 Petrol Tiller may require some assembly before first use. Follow these steps carefully.
2.1 Desembalaje
Carefully remove all components from the packaging. Check against the packing list to ensure all parts are present and undamaged. Dispose of packaging materials responsibly.
2.2 Conjunto del manillar
Attach the handlebar assembly to the main unit using the provided bolts and nuts. Ensure all connections are secure. The handlebar is designed for easy use and comfortable operation.

Image: The handlebar assembly, showing the grips and control levers.
2.3 Depth Guide and Transport Wheel
Install the depth guide and the swivel transport wheel. The transport wheel (Ø 150 mm) facilitates moving the tiller to and from the work area. The depth guide helps control the working depth of the tines.

Imagen: Lateral view of the tiller, highlighting the transport wheel and tines.
2.4 Llenado de combustible y aceite
Before first use, fill the engine with the correct type and amount of fuel and oil.
- Aceite de motor: Fill with 0.5 liters of 15W40 engine oil. Check the oil level using the dipstick.
- Combustible: Fill the fuel tank with unleaded petrol. The tank capacity is 0.9 liters. Do not overfill.
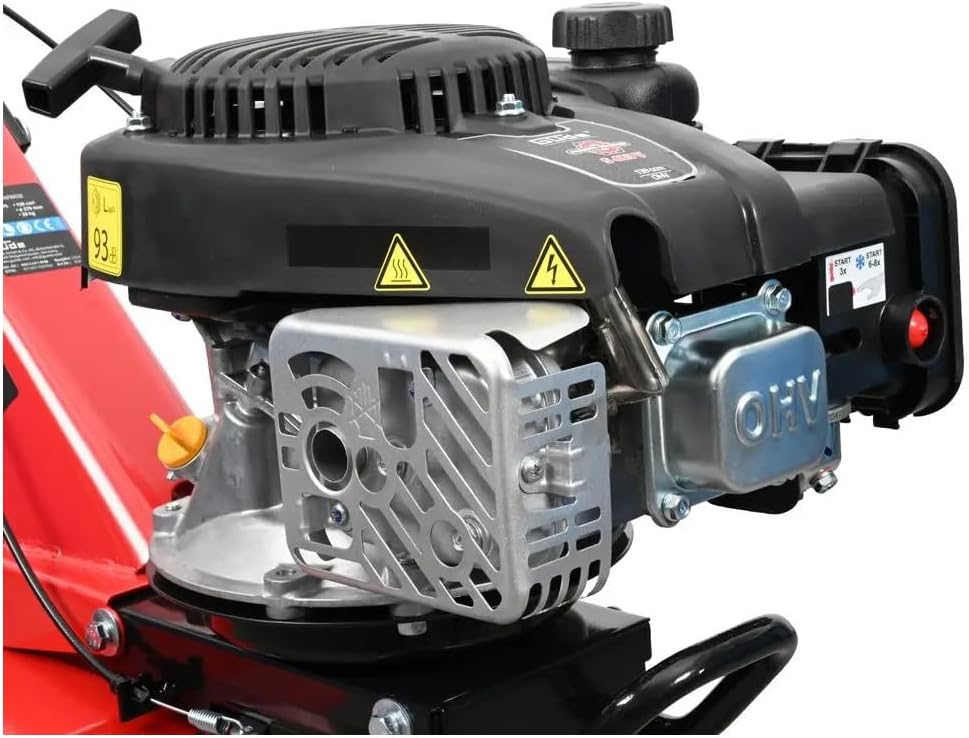
Image: Close-up of the 4-stroke engine, showing the fuel cap and oil fill point.
3. Instrucciones de funcionamiento
Follow these steps for safe and effective operation of your petrol tiller.
3.1 Comprobaciones previas a la operación
- Verifique los niveles de combustible y aceite.
- Asegúrese de que todos los pernos y tuercas estén bien apretados.
- Inspect tines for wear or damage.
- Clear the work area of any obstacles (stones, roots, debris).
3.2 Arranque del motor
- Ensure the dead man's switch lever is engaged (pressed).
- Coloque la palanca del estrangulador en la posición 'START' (si el motor está frío).
- Tire firmemente de la manija de arranque retráctil hasta que el motor arranque.
- Once started, gradually move the choke lever to the 'RUN' position.
- Allow the engine to warm up for a few moments before beginning work.
3.3 Tilling Techniques
The Güde GF 2436.1 is ideal for small to medium-sized areas and for processing mulch, peat, sand, fertilizer, or compost.
- Adjust the working depth using the depth guide. For initial passes on hard soil, start with a shallower depth.
- Hold the handlebar firmly with both hands.
- Guide the tiller slowly and steadily. Do not force it.
- Superponga las pasadas ligeramente para garantizar un cultivo uniforme.
- For deeper cultivation, make multiple passes, increasing la profundidad con cada pasada.

Image: Full side view of the tiller, demonstrating its compact design for maneuverability.
3.4 Parada del motor
To stop the engine, simply release the dead man's switch lever. The engine will shut off automatically.
4. Mantenimiento
El mantenimiento regular garantiza la longevidad y el rendimiento óptimo de su cultivador.
4.1 Limpieza
- After each use, clean soil and debris from the tines and housing.
- Use a brush or cloth. Do not use high-pressure water cleaners directly on the engine.
4.2 Cambio de aceite del motor
Change the engine oil after the first 5 hours of operation, then every 25 hours or annually, whichever comes first. Refer to the engine manual for specific instructions.
4.3 Filtro de aire
Inspect and clean the air filter regularly, especially when working in dusty conditions. Replace if damaged or excessively dirty.
4.4 bujía
Check the spark plug annually. Clean or replace if necessary. Ensure the correct gap is maintained.
4.5 Tine Inspection and Replacement
Regularly inspect the tines for wear, bending, or damage. Worn tines reduce tilling efficiency. Replace damaged tines immediately. The tines are made of wear-resistant steel for a long service life.

Imagen: Primer plano view of the tiller's tines and the adjustable depth guide.
4.6 Almacenamiento
- Before long-term storage, drain the fuel tank or add a fuel stabilizer.
- Limpie bien el timón.
- Conservar en un lugar seco y bien ventilado, alejado de la luz solar directa y de temperaturas extremas.
5. Solución de problemas
This section addresses common issues you might encounter with your Güde GF 2436.1 Petrol Tiller.
5.1 El motor no arranca
- Compruebe el nivel de combustible: Asegúrese de que haya suficiente combustible en el tanque.
- Comprobar el nivel de aceite: Low oil can prevent starting (some engines have low-oil shutdown).
- Posición del estrangulador: Ensure the choke is in the correct position for starting (especially for a cold engine).
- Bujía: Inspect the spark plug. It might be fouled or wet. Clean or replace if necessary.
- Dead Man's Switch: Ensure the dead man's switch lever is fully engaged.
5.2 Poor Tilling Performance
- Worn Tines: Inspect tines for wear. Replace if dull or damaged.
- Profundidad de trabajo: Adjust the working depth. Starting too deep on hard soil can reduce efficiency.
- Potencia del motor: Ensure the engine is running at full power. Check air filter and spark plug.
5.3 Vibración excesiva
- Partes sueltas: Revise todos los pernos y tuercas para ver si están apretados.
- Damaged Tines: Bent or broken tines can cause imbalance and vibration. Replace as needed.
If problems persist after following these steps, please contact Güde customer support or a qualified service technician.
6. Especificaciones técnicas
Below are the technical specifications for the Güde GF 2436.1 Petrol Tiller.
| Característica | Especificación |
|---|---|
| Número de modelo | GF2436.1 |
| Tipo de motor | 4-stroke Power-Engine |
| Potencia del motor | 2.4 kW / 3.2 CV |
| Desplazamiento | 139 cm³ |
| Velocidad nominal | 2850 rpm |
| Ancho de trabajo | 360 milímetros |
| Número de cuchillas | 4 |
| Diámetro de la hoja | 270 milímetros |
| Profundidad de trabajo | 260 milímetros |
| Capacidad del tanque de combustible | 0.9 litros |
| Capacidad de aceite del motor | 0.5 litros |
| Tipo de aceite de motor | 15W40 |
| Sistema de arranque | Inicio de retroceso |
| Nivel de potencia acústica LWA | 93 dB |
| Peso neto | 26 kilogramos |
| Número de pieza | 95465 |
7. Garantía y soporte
For warranty information, please refer to the documentation provided with your purchase or visit the official Güde website. If you require technical assistance, spare parts, or have any questions not covered in this manual, please contact your retailer or Güde customer service.
Always provide the model number (GF 2436.1) and serial number (if applicable) when contacting support to ensure efficient service.