1. Producto terminadoview
The Longer RAY5 Mini is a compact and portable laser engraver and cutter designed for various materials. It features a 3.5W laser module, a 140x130mm engraving area, and multiple connectivity options for ease of use.

Figure 1: Longer RAY5 Mini Laser Engraver (3.5W) - Overall View
2. Información de seguridad
Always prioritize safety when operating the laser engraver. Failure to follow safety guidelines can result in serious injury or damage to the device.
- Protección ocular: Utilice siempre las gafas de protección láser proporcionadas durante el trabajo.
- Laser Shield: Ensure the laser shield is properly installed to reduce laser exposure.
- Parada de emergencia: Familiarize yourself with the emergency stop button and its location. Press it immediately in case of any malfunction or hazard.
- Ventilación: Operate the device in a well-ventilated area to dissipate fumes and smoke generated during engraving/cutting.
- Materiales inflamables: Avoid engraving or cutting highly flammable materials without proper precautions.

Figura 2: Múltiples protecciones de seguridad
3. Guía de configuración
3.1 Desembalaje e inspección inicial
The Longer RAY5 Mini comes pre-assembled for quick setup. Carefully remove all components from the packaging and check for any missing items or damage.
Video 1: LONGER RAY5 Mini Laser Engraver Unboxing. This video demonstrates the unboxing process and initial setup of the laser engraver.
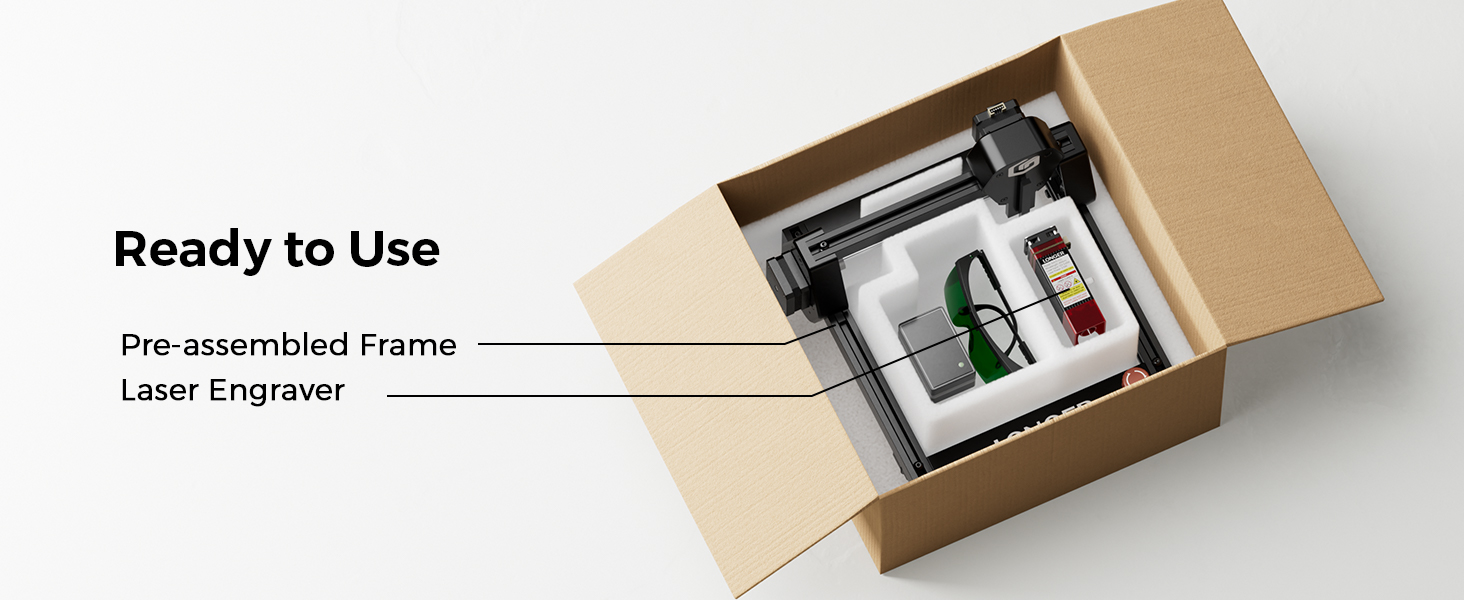
Figure 3: Pre-assembled frame and laser engraver components inside the box.
3.2 Conexión del módulo láser
- Carefully insert the laser module into its designated slot on the machine.
- Secure the laser module using the provided thumb screws.
- Connect all necessary cables from the laser module to the main unit, ensuring they are firmly seated.
3.3 Conexión de alimentación
- Plug the DC power adapter into the machine's power port.
- Conecte el adaptador de corriente a una toma de corriente adecuada.
- Ensure the emergency stop button is disengaged (turned counter-clockwise) and the rocker switch is in the 'ON' position.
4. Instrucciones de funcionamiento
4.1 Instalación y conexión del software
The Longer RAY5 Mini supports various software for design and control, including LaserGRBL (free) and LightBurn (paid). It also offers Wi-Fi and APP connectivity.
- LáserGRBL: Download and install LaserGRBL from the official website. Ensure the CH340 driver is installed for USB connection.
- Quemadura de luz: Download and install LightBurn. Import the device configuration file for RAY5 Mini.
- APP/Wi-Fi: Connect your device to the engraver via Wi-Fi using the dedicated app for mobile control.
Video 2: Ray5 mini Laser GRBL Installation and Usage Guide. This video provides a step-by-step guide on installing and using LaserGRBL software.
Video 3: Ray5 mini LightBurn Installation and Usage Guide. This video demonstrates the installation and usage of LightBurn software.
Video 4: Ray5 mini tutorial by using LaserBurn APP in STA mode. This video guides users through using the LaserBurn app in STA mode.
4.2 Enfoque del láser
Accurate focusing is crucial for optimal engraving and cutting results. Use the provided focus block to set the correct distance between the laser module and the material surface.
- Coloque el material a grabar/cortar en el área de trabajo.
- Position the focus block directly under the laser module.
- Loosen the thumb screw on the laser module.
- Lower the laser module until its bottom edge gently touches the top of the focus block.
- Tighten the thumb screw to secure the laser module in place.
- Remove the focus block. The laser is now focused.
4.3 Proceso de grabado y corte
Once the laser is focused and connected to your chosen software, you can begin your projects.
- Compatibilidad de materiales: The RAY5 Mini can engrave over 300 types of materials, including wood, leather, metal, and acrylic.
- Precisión: Achieve detailed results with a 0.04mm x 0.04mm ultra-fine laser spot and 0.01mm accuracy.
- Velocidad: Engrave at speeds up to 12,000mm/min for efficient project completion.

Figure 4: Key Features of the Longer RAY5 Mini

Figure 5: Comparison of Engraving Precision
Video 5: Ray5 Mini Engraves Wood Panels with Ease & Precision. This short video demonstrates the engraver's ability to create precise designs on wood.
5. Mantenimiento
Regular maintenance ensures the longevity and optimal performance of your Longer RAY5 Mini.
- Limpieza: Regularly clean the laser lens and the working area to prevent debris buildup. Use a soft, lint-free cloth and appropriate cleaning solutions.
- Lubricación: Periodically lubricate the guide rails and moving parts as recommended in the detailed manual to ensure smooth operation.
- Inspección de cables: Revise todos los cables para detectar desgaste o daños. Reemplace inmediatamente cualquier cable dañado.
6. Solución de problemas
If you encounter issues with your Longer RAY5 Mini, refer to the following common problems and solutions:
| Problema | Posible causa | Solución |
|---|---|---|
| El láser no dispara o la salida es débil | Enfoque incorrecto, lente sucia, configuración de potencia baja, cable suelto. | Re-focus the laser, clean the lens, increase power setting in software, check cable connections. |
| La máquina no se conecta a la computadora/aplicación | Driver not installed, incorrect COM port, Wi-Fi issues. | Install CH340 driver, select correct COM port, ensure stable Wi-Fi connection. |
| La calidad del grabado es deficiente o inconsistente | Incorrect speed/power settings, material not flat, loose X/Y axis. | Adjust speed and power settings, ensure material is flat and secure, tighten eccentric nuts if axes are loose. |
| La máquina hace ruidos inusuales | Loose components, debris in moving parts. | Inspect and tighten all screws, clean guide rails, lubricate moving parts. |
7. Especificaciones
- Dimensiones del producto: 11.5 x 11.26 x 6.5 pulgadas
- Número de modelo del artículo: RAY5 Mini
- Potencia del láser: 3.5 W
- Área de grabado: 140x130 mm
- Velocidad de grabado: Hasta 12,000 mm/min
- Tamaño del punto láser: 0.04 mm x 0.04 mm
- Conectividad: USB, Wi-Fi, APP
- Software compatible: LáserGRBL, LightBurn
- Peso del artículo: 5.15 libras
- Fabricante: MÁS EXTENSO
8. Garantía y soporte
Longer provides comprehensive support for your RAY5 Mini Laser Engraver.
- Garantía: Por favor, consulte el Longer oficial websitio o su documentación de compra para obtener información detallada sobre la garantía.
- Apoyo técnico: Lifetime technical support is available. Contact Longer customer service for assistance with any issues or questions.
- Contacto: Para obtener ayuda, visite el Longer Official Store on Amazon or refer to the contact information in your product packaging.