1. Introducción
Thank you for choosing the Behringer B-2 Pro Dual-Diaphragm Condenser Microphone. This versatile microphone is designed for professional audio recording in various applications, including vocals, instruments, and ambient sound capture. Its robust construction and flexible features make it an excellent choice for home studios, project studios, and professional recording environments. This manual provides essential information for the proper setup, operation, and maintenance of your B-2 Pro microphone.
2. Instrucciones de seguridad importantes
- Lea atentamente estas instrucciones antes de utilizar el producto.
- Conserve estas instrucciones para futuras consultas.
- Preste atención a todas las advertencias y siga todas las instrucciones.
- No utilice este aparato cerca del agua o la humedad.
- Limpiar únicamente con un paño seco.
- No obstruya las aberturas de ventilación. Instale el producto según las instrucciones del fabricante.
- No lo instale cerca de fuentes de calor como radiadores, rejillas de calefacción, estufas u otros aparatos (incluidos ampificadores) que producen calor.
- Utilice únicamente accesorios especificados por el fabricante.
- Encargue todas las tareas de mantenimiento a personal técnico cualificado. Se requiere realizar el mantenimiento cuando el aparato haya sufrido algún daño, como por ejemplo si el cable de alimentación o el enchufe están dañados, si se ha derramado líquido o han caído objetos en el interior del aparato, si el aparato ha estado expuesto a la lluvia o la humedad, si no funciona con normalidad o si se ha caído.
- This microphone requires +48V phantom power to operate. Ensure your audio interface or mixer provides phantom power and that it is enabled before connecting the microphone.
3. Contenido del paquete
Verifique que todos los artículos enumerados a continuación estén en su paquete. Si falta algún artículo o está dañado, comuníquese con su vendedor.
- Behringer B-2 Pro Dual-Diaphragm Condenser Microphone
- Custom Shockmount
- Parabrisas
- Durable Aluminum Carrying Case
- Tripod Microphone Stand
- Cable XLR
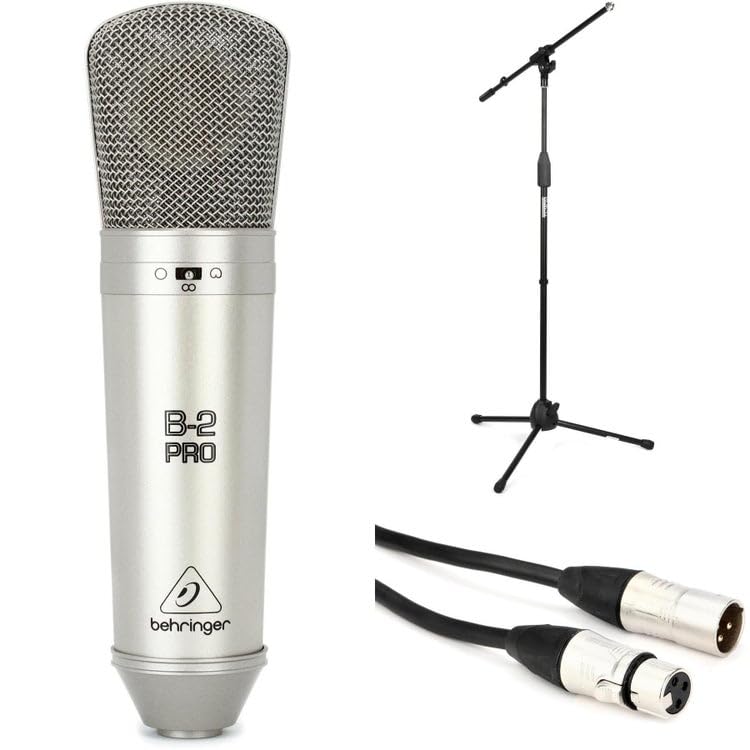
Image: Behringer B-2 Pro microphone with its shockmount, windscreen, and XLR cable, as typically included in the package.
4. Características del producto
The B-2 Pro is engineered to deliver high-quality audio performance with exceptional versatility.
- Dual-Diaphragm Design: Enables selection of multiple polar patterns for diverse recording applications.
- Selectable Polar Patterns: Choose between Cardioid, Omnidirectional, and Figure-8 patterns to optimize sound capture for different sources and environments.
- Switchable 10dB Pad: Attenuates input signals by 10dB, allowing the microphone to handle very loud sound sources without distortion. Ideal for drums, guitar amplifiers, or brass instruments.
- Filtro de corte bajo: Reduces unwanted low-frequency rumble or proximity effect, improving clarity in recordings.
- Conector XLR chapado en oro: Ensures signal integrity and corrosion resistance.
- Construcción robusta: Designed for durability and reliable performance in studio settings.
5. Configuración
- Desembalaje del micrófono: Carefully remove the B-2 Pro microphone and its accessories from the aluminum carrying case.
- Ensamble el soporte del micrófono: Extend the tripod legs of the included microphone stand for stability. Adjust the height as needed.
- Attach the Shockmount: Screw the custom shockmount onto the top of the microphone stand. Ensure it is securely fastened.
- Monte el micrófono: Gently insert the B-2 Pro microphone into the shockmount. The shockmount's elastic suspension helps isolate the microphone from vibrations and handling noise.
- Coloque el parabrisas: Place the foam windscreen over the microphone capsule to reduce plosives (harsh "p" and "b" sounds) and protect the microphone from dust.
- Conecte el cable XLR: Connect one end of the supplied XLR cable to the microphone's XLR output. Connect the other end to an XLR input on your audio interface, mixer, or preampmás duradero.
- Habilitar Phantom Power: The B-2 Pro is a condenser microphone and requires +48V phantom power to operate. Ensure that phantom power is enabled on your audio interface or mixer antes connecting the microphone to prevent potential damage.

Image: Illustration of the B-2 Pro microphone setup, including stand, shockmount, and cable connection to an audio interface.
6. Operating the B-2 Pro
6.1. Selección del patrón polar
The B-2 Pro features a switch on the microphone body to select between three polar patterns. Adjust this switch according to your recording needs.
- Cardioide: This pattern picks up sound primarily from the front of the microphone, rejecting sound from the sides and rear. It is ideal for isolating a single sound source, such as a vocalist or an instrument, in a live or studio setting.
- Omnidireccional: This pattern picks up sound equally from all directions. It is suitable for capturing room ambiance, group vocals, or multiple instruments simultaneously.
- Figura 8: This pattern picks up sound equally from the front and rear of the microphone, while rejecting sound from the sides. It is commonly used for recording two vocalists facing each other, or for capturing a specific instrument while minimizing room reflections from the sides.

Image: Visual representation of the three selectable polar patterns: Cardioid, Omnidirectional, and Figure-8, showing their sound pickup characteristics.
6.2. 10dB Pad Switch
The B-2 Pro includes a switchable 10dB pad. When engaged, this pad reduces the microphone's output level by 10 decibels.
- Engage the Pad: Use the 10dB pad when recording very loud sound sources, such as drums, loud guitar amplifiers, or brass instruments, to prevent input clipping at your audio interface or mixer.
- Disengage the Pad: For quieter sources like vocals or acoustic guitars, disengage the pad to ensure a healthy signal level.
6.3. Interruptor de filtro de corte bajo
The low-cut filter (also known as a high-pass filter) reduces low-frequency content below a certain point.
- Engage the Filter: Use the low-cut filter to reduce unwanted rumble, handling noise, or proximity effect (an increase in bass response when a microphone is close to the sound source). This can improve clarity, especially for vocals and acoustic instruments.
- Disengage the Filter: For sources where full low-frequency response is desired, such as bass instruments or kick drums, disengage the filter.
6.4. Colocación del micrófono
Proper microphone placement is crucial for optimal sound quality. Experiment with distance and angle to achieve the desired tone.
- vocales: Start with the microphone 6-12 inches from the vocalist, slightly off-axis to reduce plosives. Use the cardioid pattern.
- Guitarra acústica: Aim the microphone towards the 12th fret at a distance of 6-18 inches. Cardioid pattern is generally preferred.
- Ambiente de la habitación: Use the omnidirectional pattern and place the microphone in the center of the room or at a distance that captures the desired room sound.
- Two Vocalists: Use the Figure-8 pattern with vocalists positioned on opposite sides of the microphone.
7. Mantenimiento
- Limpieza: Utilice un paño suave y seco para limpiar el cuerpo del micrófono. No utilice limpiadores líquidos ni disolventes, ya que pueden dañar el acabado o los componentes internos.
- Almacenamiento: When not in use, store the B-2 Pro microphone in its aluminum carrying case to protect it from dust, moisture, and physical damage. Avoid extreme temperatures and humidity.
- Manejo: Always handle the microphone with care. Avoid dropping it or subjecting it to strong impacts.
8. Solución de problemas
| Problema | Posible causa | Solución |
|---|---|---|
| No hay salida de sonido |
|
|
| Sonido distorsionado |
|
|
| zumbido o ruido |
|
|
9. Especificaciones
| Marca | Behringer |
| Número de modelo | B2ProPk |
| Tipo | Micrófono de condensador |
| Patrones polares | Cardioid, Omnidirectional, Figure-8 (Switchable) |
| Almohadilla intercambiable | -10 dB |
| Filtro de corte bajo | Sí |
| Tecnología de conectividad | XLR |
| Requisito de potencia | Alimentación fantasma de +48 V |
| Peso del artículo | 1 libras (0.45 kg) |
| Dispositivos compatibles | Audio Interfaces, Mixers, Preamplifiers with XLR input |
| Software compatible | Any DAW with microphone input |
| Compatibilidad del sistema operativo | Ventanas, MacOS |
| Máximo Samptasa | 192 kHz |
Nota: las especificaciones están sujetas a cambios sin previo aviso.
10. Garantía y soporte
Para obtener información detallada sobre la garantía y soporte técnico, consulte el sitio web oficial de Behringer. webVisite el sitio web o contacte a su distribuidor local de Behringer. Conserve el recibo de compra como comprobante para cualquier reclamación de garantía.
Behringer oficial Websitio: www.behringer.com