1. Introducción
Thank you for choosing the Generic 112 Digital Egg Poultry Hatcher. This fully automatic incubator is designed to provide an optimal environment for hatching various poultry eggs, including chicken, duck, goose, and quail. It features intelligent temperature and humidity control, automatic egg turning, and an LED display for easy monitoring. Please read this manual thoroughly before operation to ensure proper use and successful hatching results.
2. Instrucciones de seguridad
- Conecte siempre la incubadora a una toma de corriente con conexión a tierra.
- Do not operate the incubator with a damaged power cord or plug.
- Keep the incubator away from water or high humidity environments to prevent electrical shock.
- Ensure proper ventilation around the incubator.
- Desenchufe la incubadora antes de limpiarla o realizar cualquier mantenimiento.
- Mantener fuera del alcance de los niños y las mascotas.
- Do not attempt to modify or repair the incubator yourself. Contact qualified personnel for service.
3. Producto terminadoview
The Generic 112 Digital Egg Poultry Hatcher is designed for efficient and automatic incubation. It features a clear casing for observation, a control panel for settings, and multiple egg trays.
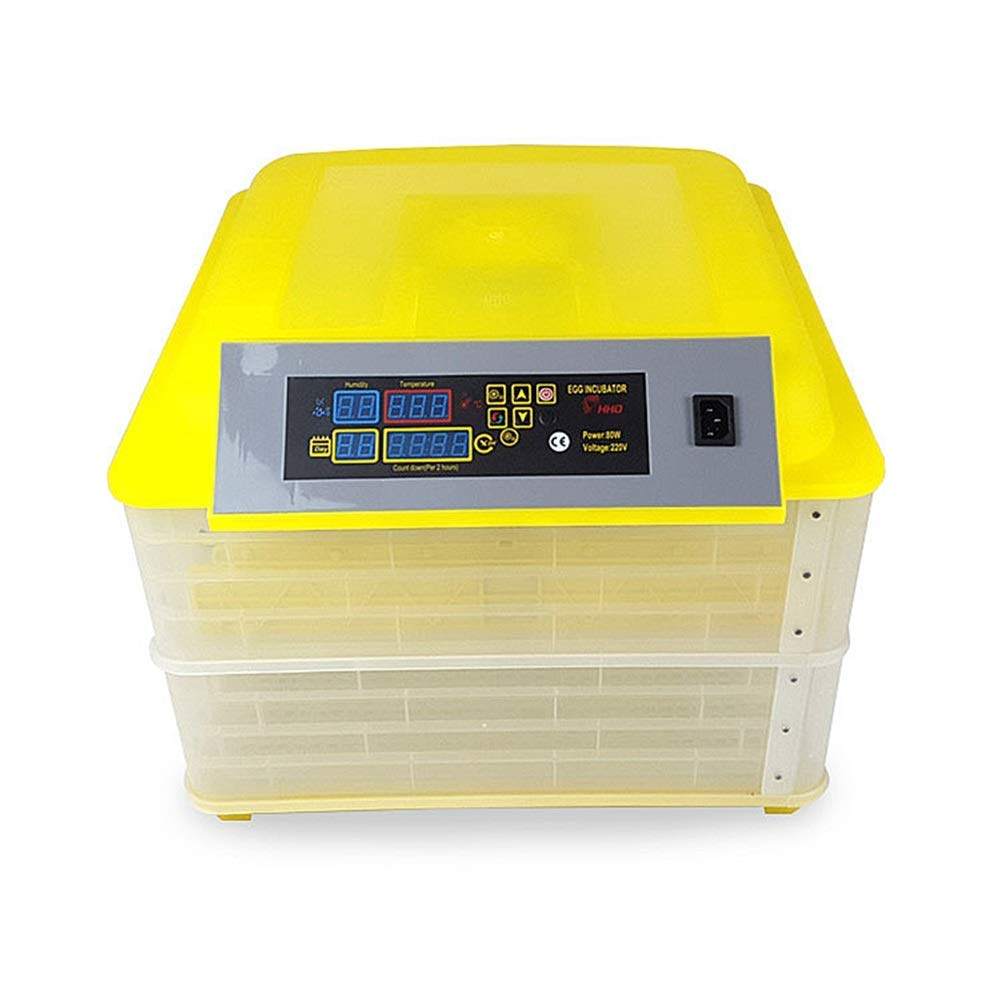
Figura 1: Frente view of the Generic 112 Digital Egg Poultry Hatcher, showing the control panel and two incubation layers.

Figura 2: Interior view of the incubator, illustrating the egg turning trays and internal structure.
Diagrama del panel de control

Figure 3: Detailed diagram of the control panel, indicating the functions of each display and button.
- Pantalla de humedad: Muestra el nivel de humedad actual.
- Pantalla de temperatura: Shows current temperature inside the incubator.
- Incubation Days Display: Tracks the number of days since incubation started.
- Egg Turning Countdown: Displays the time remaining until the next automatic egg turn.
- Botón de configuración: Se utiliza para ingresar y confirmar configuraciones.
- Setting + / Setting - Buttons: Adjust values up or down during setting.
- Botón de reinicio: Resets certain parameters or alarms.
- Turn the Egg Button: Manually initiates an egg turning cycle.
- Indicador de calentamiento: Se ilumina cuando el elemento calefactor está activo.
- Indicador de configuración: Illuminates when in setting mode.
- Cambiar: Interruptor de encendido / apagado.
- Potencia / VoltagPantalla: Shows power consumption and voltage.
- Función de alarma: Automatically activates when temperature or humidity are outside the set range.
4. Configuración
4.1 Asamblea
- Desempaque con cuidado todos los componentes y verifique si hay algún daño.
- Coloque la incubadora sobre una superficie estable y nivelada en una habitación con una temperatura ambiente constante, lejos de la luz solar directa o de corrientes de aire.
- Ensure the egg turning trays are correctly seated within the incubator layers.
4.2 Adding Water for Humidity
Humidity is crucial for successful hatching. The incubator requires water to maintain the correct humidity levels.
- Locate the water channels or reservoirs at the bottom of the incubator.
- Carefully pour distilled or demineralized water into the channels. Avoid overfilling.
- Monitor the humidity display and add water as needed throughout the incubation period.
5. Instrucciones de funcionamiento
5.1 Initial Power-On and Pre-heating
- Conecte el cable de alimentación a una toma eléctrica adecuada.
- Turn on the power switch. The LED display will illuminate.
- Allow the incubator to run for at least 2-3 hours to stabilize the internal temperature and humidity before placing eggs.
5.2 Ajuste de temperatura y humedad
The incubator comes with factory default settings, but these can be adjusted if necessary.
- Presione el Botón de configuración once to enter temperature setting mode. The temperature display will flash.
- Utilice el Configuración + y Configuración - buttons to adjust the desired temperature (recommended range: 20℃ ~ 40℃).
- Presione el Botón de configuración again to confirm the temperature and move to humidity setting (if applicable).
- Adjust humidity using the Configuración + y Configuración - botones.
- Presione el Botón de configuración one more time to save all settings and exit setting mode.
5.3 Colocación de los huevos
- Once the incubator has stabilized at the desired temperature and humidity, carefully place the fertilized eggs into the egg trays.
- Ensure eggs are placed with the larger end slightly elevated, if possible, for optimal development.
- Close the incubator lid securely.
5.4 Volteo automático de huevos
The incubator automatically turns eggs every 2 hours to prevent the embryo from sticking to the shell and promote even development.
- El Egg Turning Countdown display shows the time until the next automatic turn.
- To manually initiate an egg turn, press the Turn the Egg Button.
- Nota: Automatic turning should be disabled for the last 3 days of incubation (lockdown period) to allow chicks to position themselves for hatching. Refer to specific egg type incubation guides for exact timings.
5.5 Monitoring and Adjustments
- Regularly check the temperature and humidity displays.
- Refill water channels as needed to maintain humidity.
- The built-in fan circulates air for even temperature and humidity distribution.
- The incubator will sound an alarm if temperature or humidity deviates significantly from the set parameters. Address the issue promptly.
6. Mantenimiento
6.1 Limpieza
- After each hatch, unplug the incubator and allow it to cool completely.
- Remove all egg trays and the bottom grid.
- Limpia todas las superficies con publicidad.amp cloth and a mild disinfectant solution. Avoid harsh chemicals.
- Asegúrese de que todas las piezas estén completamente secas antes de volver a montarlas o guardarlas.
6.2 Almacenamiento
Store the incubator in a clean, dry place, away from direct sunlight and extreme temperatures, when not in use.
7. Solución de problemas
| Problema | Posible causa | Solución |
|---|---|---|
| La incubadora no se enciende | No hay suministro de energía; cable de alimentación/enchufe dañado | Check power connection; Inspect cord/plug for damage; Try a different outlet. |
| Temperatura demasiado alta/baja | Incorrect temperature setting; Room temperature fluctuations; Sensor malfunction | Adjust temperature settings; Move incubator to a stable environment; Contact support if sensor is suspected faulty. |
| Humidity too high/low | Too much/little water in channels; Room humidity too high/low; Ventilation issues | Adjust water levels; Ensure proper room ventilation; Open/close vents if available. |
| Los huevos no giran automáticamente | Egg turning mechanism jammed; Motor malfunction; Setting error | Check for obstructions; Manually turn eggs if necessary; Verify settings. |
| Alarm sounding frequently | Temperature/humidity outside set range; Sensor issue | Address temperature/humidity issues; Check sensor for debris; Reset alarm. |
8. Especificaciones
| Característica | Detalle |
|---|---|
| Modelo | 112 Digital Egg Poultry Hatcher |
| Capacidad | Up to 112 Chicken Eggs (varies by egg size) |
| Rango de control de temperatura | 20℃ ~ 40℃ (68°F ~ 104°F) |
| Volumentage | 220V (as indicated on control panel image) |
| Fuerza | 80W (as indicated on control panel image) |
| Girar los huevos | Automatic, every 2 hours |
| Mostrar | LED for Temperature, Humidity, Incubation Days, Egg Turning Time |
| Alarma | Alarma de temperatura y humedad |
| Fabricante | YINWUMAOSI |
| ASIN | B0F5366KY6 |


