1. Introducción
The Laser 9177 Injector Extractor Set is a specialized tool designed for the safe and efficient removal of Piezo-style injectors found in Ford and Stellantis DW10 engines. This kit facilitates the extraction of injectors in one piece, allowing for potential refitting. It is suitable for various applications including Citroën, Ford, Opel/Vauxhall, Peugeot, and Toyota vehicles equipped with 2.0L DW10 diesel engines.
This manual provides essential information for the correct setup, operation, and maintenance of the Laser 9177 Injector Extractor Set to ensure safe and effective use.
2. Información de seguridad
WARNING: Always read and understand all safety warnings and instructions before using this tool. Failure to follow these instructions may result in serious injury or property damage.
- Utilice siempre el equipo de protección personal (EPP) adecuado, incluidas gafas de seguridad y guantes.
- Ensure the vehicle is stable and properly supported before beginning any work. Disconnect the battery if necessary.
- Trabajar en un área bien ventilada.
- Mantenga el área de trabajo limpia y bien iluminada.
- Do not use this tool for purposes other than its intended design.
- Ensure all components of the extractor set are clean and in good working condition before use.
- Lubricate the force screw with molybdenum disulphide grease before each use to prevent damage and ensure smooth operation.
- If you are unsure about any procedure, consult a qualified mechanic or refer to the vehicle's service manual.
3. Componentes del producto
The Laser 9177 Injector Extractor Set includes the following components:
- Extraction frame
- Tornillo de fuerza
- Thrust nut with integral bearing
- Injector adaptor body
- Threaded adaptor for slide hammer or air hammer extractor (e.g., Laser Part No. 6263)
- Various adaptors and washers for specific injector types.

Figura 1: Sobreview of the Laser 9177 Injector Extractor Set components. The kit includes the main extraction frame, force screw, thrust nut, injector adaptor body, and various smaller adaptors and washers, all organized within a protective foam tray.
4. Configuración
- Prepare the Injector Area: Ensure the engine and surrounding area are clean and free from debris. Remove any components obstructing access to the injectors.
- Lubricate the Force Screw: IMPORTANTE: Before each use, apply a generous amount of molybdenum disulphide grease to the threads of the force screw. This lubrication is critical for smooth operation and to prevent damage to the tool.
- Select Correct Adaptors: Identify the specific Piezo injector type you are working with and select the appropriate adaptors and washers from the kit.
- Assemble the Extractor: Assemble the extraction frame, force screw, and thrust nut. Attach the correct injector adaptor body to the injector.
5. Instrucciones de funcionamiento
Follow these steps carefully to extract the injectors:
- Position the Extractor: Carefully place the assembled extraction frame over the injector, ensuring the injector adaptor body is securely attached to the injector. The frame should sit squarely on the cylinder head or surrounding engine components, providing a stable base for extraction.
- Engage the Force Screw: Begin to turn the force screw clockwise using an appropriate wrench. The thrust nut with its integral bearing will apply upward force to the injector adaptor body, gradually pulling the injector from its seat.
- Extracción de monitor: Continue turning the force screw slowly and steadily. Observe the injector as it begins to lift. If excessive resistance is encountered, do not force the tool. Re-check lubrication and ensure the adaptor is correctly seated.
- Extracción completa: Once the injector is free from its bore, carefully remove the entire extractor assembly. Inspect the injector and the injector bore for any damage or remaining debris.
- Alternative Extraction (Slide Hammer/Air Hammer): For extremely stubborn injectors, the kit includes a threaded adaptor that allows the injector adaptor body to be used with a 5/8" slide hammer or a Laser injector air hammer extractor (e.g., Laser Part No. 6263). Attach the adaptor to the injector adaptor body and use the slide hammer or air hammer according to its specific instructions.

Figure 2: The extractor frame is positioned over the injector, with the adaptor body engaged. Ensure the frame is stable on the engine surface.
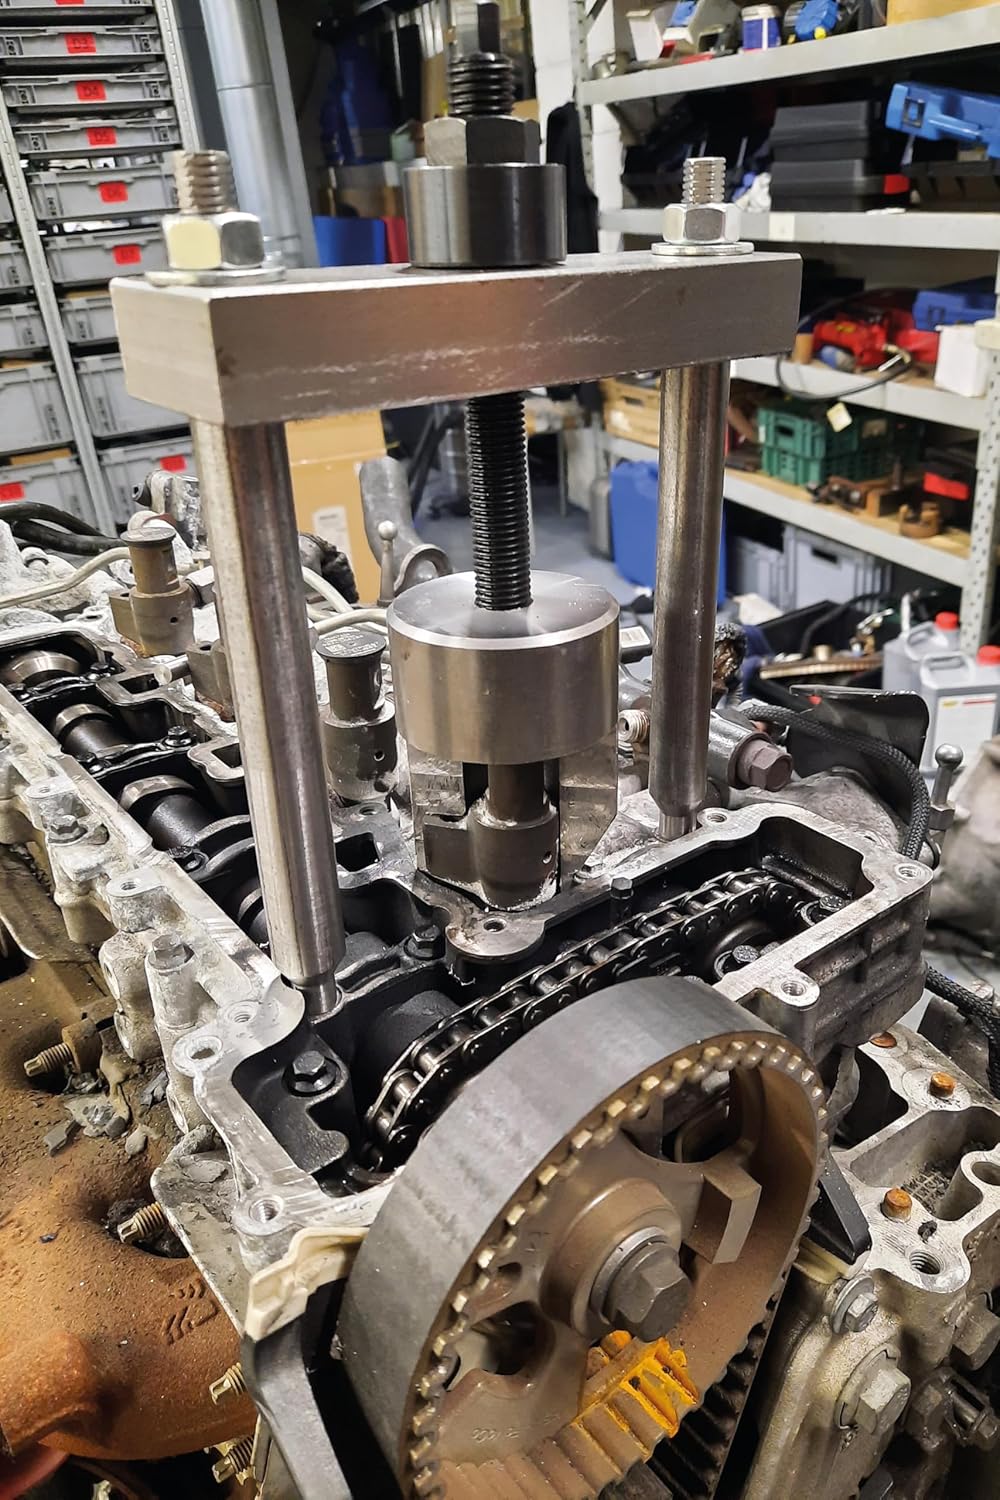
Figura 3: Una vista más cercana view of the extraction process. The force screw is being turned, applying upward pressure to the injector through the adaptor. Observe the injector slowly lifting from its bore.

Figura 4: detallada view of the injector adaptor body securely gripping the top of the injector. This connection is crucial for a successful, one-piece extraction.
6. Mantenimiento
- Limpieza: After each use, clean all components of the extractor set thoroughly to remove any grease, dirt, or engine fluids.
- Lubricación: Re-lubricate the force screw with molybdenum disulphide grease before storing.
- Inspección: Regularly inspect all components for wear, damage, or deformation. Pay close attention to the threads of the force screw and the integrity of the adaptors.
- Almacenamiento: Store the set in its original case in a dry, clean environment to protect it from corrosion and damage.
7. Solución de problemas
- Injector Not Moving:
- Ensure the force screw is adequately lubricated.
- Verify the injector adaptor is correctly seated and gripping the injector.
- Consider using a penetrating oil around the injector base and allowing it to soak.
- If the standard method fails, utilize the slide hammer or air hammer adaptor as an alternative.
- Deslizamiento de la herramienta:
- Confirm the correct adaptor is being used for the specific injector type.
- Ensure the adaptor is fully engaged and tightened onto the injector.
- Check for wear on the adaptor or injector that might prevent a secure grip.
- Excessive Force Required:
- Stop immediately if excessive force is needed. Forcing the tool can cause damage to the injector, engine, or the tool itself.
- Re-evaluate the setup, lubrication, and adaptor selection.
- Seek professional assistance if the injector remains seized.
8. Especificaciones
| Número de modelo: | 9177 |
| Aplicaciones: | Citroën, Ford, Opel/Vauxhall, Peugeot, Toyota with DW10 2.0L diesel engines |
| Tipo de inyector: | Delphi Piezo-style injectors |
| Peso: | Aproximadamente 13.9 libras (6.3 kg) |
| Dimensiones del paquete: | 16.34 x 7.99 x 3.74 pulgadas (41.5 x 20.3 x 9.5 cm) |
| Fabricante: | Láser |
| País natal: | Made in Sheffield, UK |
9. Información de garantía
Specific warranty details for the Laser 9177 Injector Extractor Set are not provided in the available product information. Please refer to the manufacturer's official website or contact your point of purchase for warranty terms and conditions.
10. Atención al cliente
Customer support contact information for the Laser 9177 Injector Extractor Set is not provided in the available product information. For technical assistance or inquiries, please visit the official Laser Tools websitio o póngase en contacto con su distribuidor.