UNIDADESTAGE 12-Tier Shoe Rack
UNIDADESTAGE 12-Tier Non-Woven Shoe Rack Shelf Instruction Manual
Model: 12-Tier Shoe Rack
Brand: UNITSTAGE
Introducción
This manual provides detailed instructions for the assembly, use, and maintenance of your UNITSTAGE 12-Tier Non-Woven Shoe Rack Shelf. Designed for efficient storage, this rack helps organize footwear in various spaces such as closets, garages, corridors, and entryways. Please read these instructions carefully before assembly and retain them for future reference.
Instrucciones de seguridad
- Mantenga todas las piezas pequeñas fuera del alcance de los niños durante el montaje para evitar peligro de asfixia.
- Asegúrese de que todas las conexiones estén bien fijadas antes de colocar artículos en el estante.
- No sobrecargue los estantes más allá de su capacidad prevista.
- Use the provided anti-tip device to secure the rack to a wall, especially in households with children or pets, to prevent accidental tipping.
- Avoid exposing the non-woven fabric to open flames or excessive heat.
Contenido del paquete
Verifique que todos los componentes enumerados a continuación estén presentes antes de comenzar el ensamblaje. Si alguna pieza falta o está dañada, comuníquese con atención al cliente.
- Metal Tubes (various lengths for frame and shelves)
- Non-Woven Fabric Sheets (for shelves)
- Plastic Connectors (for joining tubes)
- Anti-Tip Device (wall anchor and strap)
- Manual de instrucciones de montaje
This image displays the various parts included in the package, such as the rust-proof coated metal tubes, durable non-woven fabric sheets for the shelves, and plastic connectors used to build the frame. An anti-tip device is also shown.
Configuración y montaje
Assembly is tool-free and straightforward. Follow these steps to construct your shoe rack:
- Identificar componentes: Separate and identify all metal tubes, non-woven fabric sheets, and plastic connectors. Refer to the parts list in the "Package Contents" section.
- Ensamblar el marco base: Connect four short metal tubes to four plastic connectors to form the base rectangle. Ensure the connectors are oriented correctly to allow for vertical tube insertion.
- Instalar el primer estante: Slide a non-woven fabric sheet over the assembled base frame. Ensure it is taut and evenly distributed.
- Construir hacia arriba: Insert four longer metal tubes into the top holes of the plastic connectors from the base. Then, attach another set of plastic connectors to the top of these tubes.
- Repeat for Tiers: Continue adding fabric shelves, vertical tubes, and plastic connectors layer by layer until all 12 tiers are assembled. Ensure each fabric shelf is properly seated and secured.
- Coloque el marco superior: For the final tier, attach the remaining short metal tubes to the top plastic connectors to complete the top frame.
- Dispositivo antivuelco seguro: Position the assembled shoe rack in its desired location. Attach the anti-tip device to the top rear of the rack and secure it to a wall stud using appropriate hardware (not always included, but generally recommended).

This image highlights the robust construction materials: the anti-tip device for stability, the rustproof metal tubes forming the frame, and the durable plastic connectors that join the structure.
Características principales
- Diseño espacioso de 12 niveles: This shoe rack provides ample storage, capable of holding 36-48 pairs of shoes, depending on shoe size and style. Its vertical design maximizes storage in minimal floor space.

Image: Dimensions and capacity illustration for flats, high heels, and high boots. This diagram illustrates the overall dimensions of the 12-tier shoe rack and demonstrates how different types of footwear, such as flats, high heels, and high boots, can be accommodated on its shelves.
- Dustproof and Durable Non-Woven Fabric: Each shelf is made from thickened non-woven fabric, designed to prevent dust and dirt from falling onto lower shoes. This material is also water-resistant and easy to clean.

Image: Water droplets on the non-woven fabric, demonstrating its water-resistant property. This image shows water beading on the non-woven fabric shelf, highlighting its water-resistant quality which helps protect shoes from moisture and makes cleaning easier.
- Marco de metal resistente: Constructed with rust-proof coated metal tubes and robust plastic connectors, the frame ensures stability and durability, preventing wobbling even when fully loaded.
- Customizable and Versatile Design: The modular design allows for flexible configuration. Shelves can be removed to create taller compartments for boots or storage boxes, or the unit can be split into smaller racks.

Image: Diagram showing how shelves can be removed to store tall boots or boxes. This visual demonstrates the customizable nature of the shoe rack, illustrating how individual shelves can be removed to create larger vertical spaces suitable for storing tall boots or various storage boxes.
Operación y uso
To maximize the utility of your UNITSTAGE shoe rack:
- Colocación del calzado: Place shoes neatly on each tier. For optimal capacity, arrange smaller shoes or flats side-by-side.
- Personalización: If you need to store boots or larger items, carefully remove the non-woven fabric sheets and corresponding horizontal tubes from the desired tiers to create taller sections. Re-insert the tubes and fabric if you wish to revert to standard shelving.
- Ubicación: This rack is suitable for various indoor environments including closets, entryways, bedrooms, and garages. Ensure it is placed on a flat, stable surface.

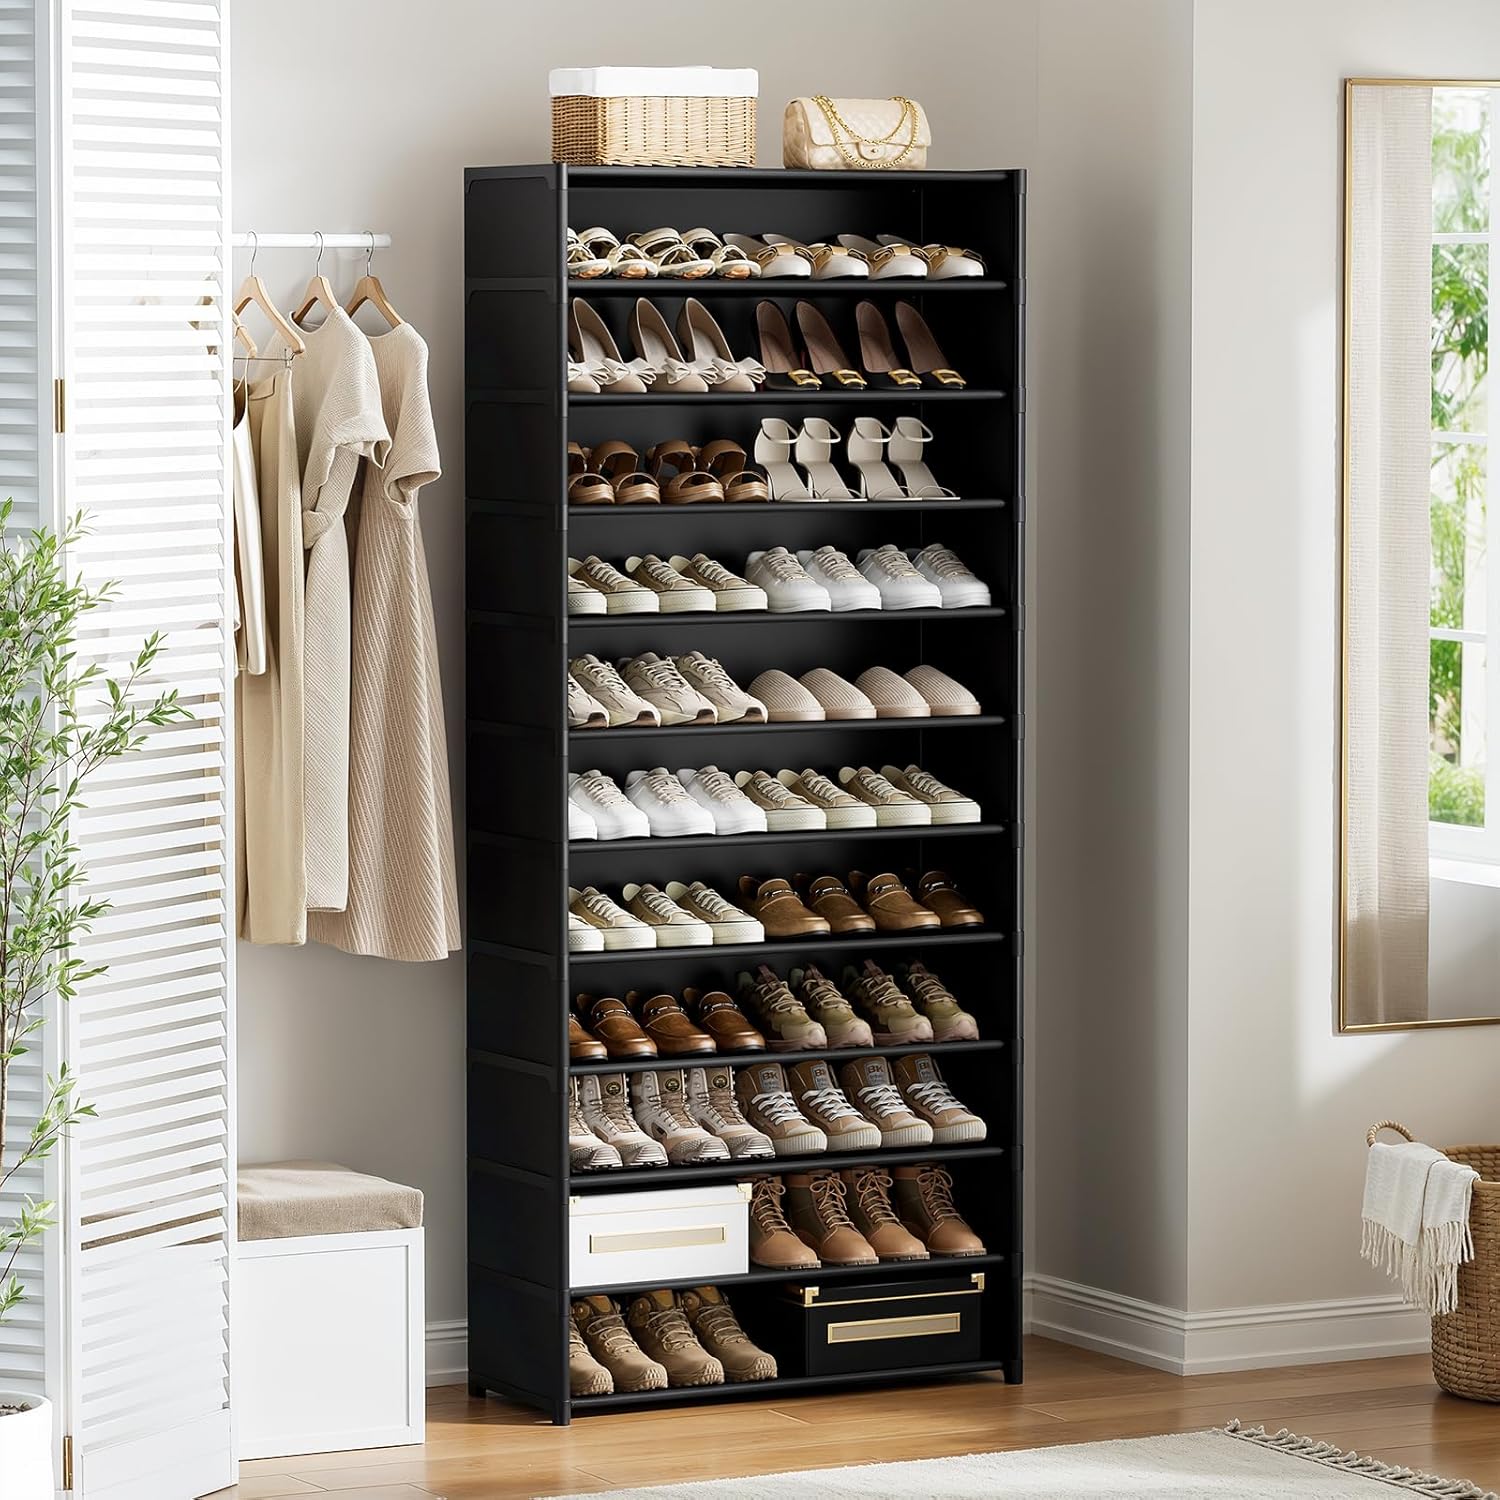
This image shows the complete 12-tier shoe rack, highlighting its tall, narrow design suitable for various spaces. It is depicted empty, ready to be filled with footwear.
Mantenimiento y cuidado
- Limpieza: Wipe the metal tubes and plastic connectors with a dry cloth to remove dust. For the non-woven fabric shelves, use a damp cloth to gently wipe away dirt or spills. Avoid harsh chemical cleaners.
- Inspección: Revise periódicamente todas las conexiones para garantizar su seguridad. Vuelva a apretarlas si es necesario.
- Protección contra el polvo: If your model includes a dustproof cover, ensure it is properly positioned to protect shoes from dust accumulation.
Solución de problemas
| Problema | Posible causa | Solución |
|---|---|---|
| El estante está inestable. | Connections are not fully secured; uneven floor surface. | Ensure all metal tubes are firmly inserted into plastic connectors. Place the rack on a level surface. Utilize the anti-tip device. |
| Shelves sag or shoes fall through. | Shelf fabric not taut; excessive weight on a single shelf. | Re-adjust the non-woven fabric sheets to ensure they are stretched tightly across the frame. Distribute shoe weight evenly across shelves. |
| Difficulty assembling tubes into connectors. | Misalignment or burrs on tubes/connectors. | Ensure correct orientation of connectors. Apply gentle, even pressure. If a part is defective, contact customer support. |
Presupuesto
| Marca | UNIDADESTAGE |
| Modelo | Zapatero de 12 niveles |
| Número de niveles | 12 |
| Capacidad | Approximately 36-48 pairs of shoes |
| Dimensiones del producto (L x An x Al) | 27.76" de profundidad x 11.82" de ancho x 74.81" de alto |
| Material | Rust-proof coated metal tubes, non-woven fabric, plastic connectors |
| Requiere ensamblaje | Sí (sin herramientas) |
| Características especiales | Portable, Space Saving, Rust Proof, Weather Resistant, Durable, Customizable |
Garantía y soporte
For information regarding warranty coverage, please refer to the product packaging or contact UNITSTAGE customer support directly. If you encounter any issues or have questions not covered in this manual, please reach out to the manufacturer for assistance.
Fabricante: UNIDADESTAGE
Contacto: Please visit the official UNITSTAGE websitio o la página de soporte de su minorista para obtener detalles de contacto.