1. Introducción
This manual provides essential instructions for the safe and correct installation and operation of your new Generic Fricpart-046364 replacement ice maker. This part is designed for compatibility with Kenmore Refrigerator Model 106.56173500. Please read these instructions thoroughly before beginning installation to ensure proper function and to prevent damage to the appliance or injury.
Información de seguridad importante:
- Always disconnect power to the refrigerator before performing any service or installation.
- Utilice equipo de protección personal adecuado, como guantes, durante la instalación.
- Si no está seguro acerca de algún paso, consulte con un técnico de electrodomésticos calificado.
2. Instrucciones de instalación
Follow these steps carefully to replace your refrigerator's ice maker unit.
2.1 Preparación
- Desconectar la energía: Unplug the refrigerator from the electrical outlet or turn off the circuit breaker supplying power to the refrigerator.
- Acceso a la máquina de hielo: Open the freezer door and locate the existing ice maker. Depending on your refrigerator model, you may need to remove the ice bucket and any shelves obstructing access.
- Reunir herramientas: You may need a screwdriver (Phillips or flathead, depending on fasteners) and possibly a nut driver.
2.2 Removing the Old Ice Maker
- Disconnect Water Line: If the ice maker has a direct water line connection, carefully disconnect it. Be prepared for a small amount of residual water.
- Desconecte el conector eléctrico: Locate the electrical wire harness connected to the ice maker. Gently squeeze or unclip the connector and pull it apart.
- Unmount Ice Maker: Identify the screws or clips holding the ice maker in place. Typically, there are two or three screws. Remove these fasteners.
- Remove Unit: Carefully slide or pull the old ice maker unit out of its mounting brackets.
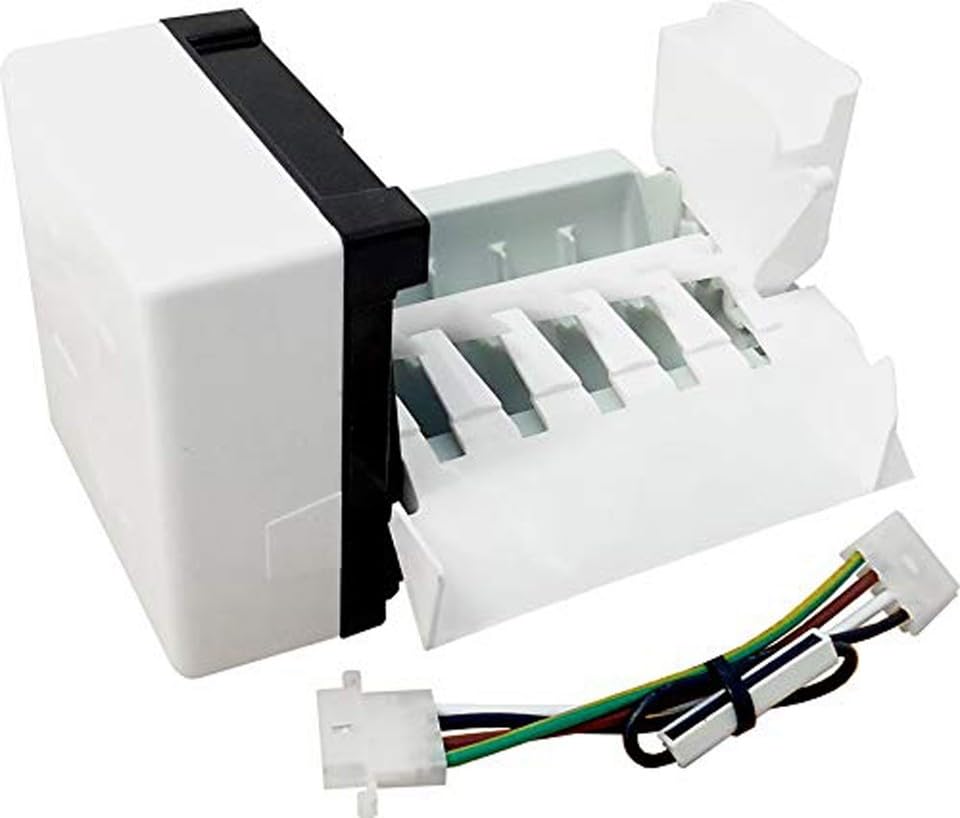
Figure 1: Generic Fricpart-046364 Replacement Ice Maker. This image shows the complete ice maker unit, including the motor, ice mold, and wiring harness, ready for installation.
2.3 Installing the New Ice Maker
- Posición Nueva Unidad: Align the new Fricpart-046364 ice maker with the mounting brackets in the freezer.
- Unidad segura: Reinsert and tighten the screws or re-engage the clips to secure the new ice maker firmly in place. Ensure it is level.
- Conectar el conector eléctrico: Plug the electrical wire harness from the refrigerator into the corresponding connector on the new ice maker. Ensure a secure connection.
- Conectar la línea de agua: If applicable, reattach the water line to the new ice maker. Check for a snug fit to prevent leaks.
- Reemplazar componentes: Reinstall any shelves or the ice bucket that were removed during the process.
2.4 Post-instalación
- Restaurar energía: Vuelva a enchufar el refrigerador a la toma eléctrica o encienda el disyuntor.
- Llenado de agua inicial: The ice maker will typically perform an initial water fill cycle within a few minutes of power restoration. Listen for the sound of water filling the ice mold.
- Compruebe si hay fugas: Monitor the water line connections for any signs of leaks.
3. Instrucciones de funcionamiento
After installation, allow sufficient time for the ice maker to begin producing ice.
- Primera producción de hielo: It may take 12 to 24 hours for the ice maker to produce its first full batch of ice, as the freezer needs to reach the optimal temperature.
- Desechar los primeros lotes: For sanitary reasons, discard the first two to three batches of ice produced. This flushes any air or impurities from the water line and ice maker components.
- Funcionamiento normal: The ice maker will automatically produce ice until the ice bucket is full, at which point the shut-off arm will stop production. When ice is removed, the cycle will resume.
- Brazo de nivel de hielo: Ensure the ice level arm (bail arm) is in the down position for ice production. Lifting it up will stop ice production.
4. Mantenimiento
El mantenimiento regular ayuda a garantizar el rendimiento óptimo y la longevidad de su máquina de hielo.
- Limpieza: Periodically remove the ice bucket and wash it with mild soap and warm water. Rinse thoroughly and dry before returning it to the freezer. Do not use abrasive cleaners.
- Filtro de agua: Si su refrigerador tiene un filtro de agua, asegúrese de reemplazarlo según las recomendaciones del fabricante para mantener la calidad del agua y la producción de hielo.
- Water Line Check: Occasionally inspect the water supply line for kinks, leaks, or damage.
- Ice Build-up: If ice builds up around the ice maker mechanism, disconnect power and allow it to defrost naturally, then clean and restart.
5. Solución de problemas
Antes de llamar al servicio técnico, vuelva aview Estos problemas comunes y soluciones.
| Problema | Posible causa | Solución |
|---|---|---|
| La máquina de hielo no produce hielo. |
|
|
| Cubitos de hielo pequeños o huecos. |
|
|
| El hielo tiene mal sabor o olor. |
|
|
6. Especificaciones
Key specifications for the Generic Fricpart-046364 Replacement Ice Maker:
- Número de pieza: Fricpart-046364
- Modelo de refrigerador compatible: Kenmore 106.56173500
- Marca: Genérico
- Fabricante: Piezas de fricción
- ASIN: B0FDKKF6XK
- Función: Replacement ice maker for compatible refrigerator models.
Note: Appliance parts can appear similar. Always verify compatibility with your specific refrigerator model before installation.
7. Garantía y soporte
Warranty information and specific customer support details for this Generic replacement part are not provided in the product listing. Please refer to the seller or manufacturer's documentation included with your purchase for any warranty claims or technical assistance.
For general inquiries regarding your Kenmore refrigerator, please consult your original Kenmore appliance manual or contact Kenmore customer service.