1. Introducción
Thank you for choosing the PUTORSEN Triple Monitor Mount EMPT09-C036P-35B. This heavy-duty monitor mount is designed to provide a stable and adjustable solution for multi-screen workstations, supporting up to three monitors, each up to 35 inches in size and weighing up to 12 kg (26.4 lbs). It features fully articulating gas spring arms for precise positioning and includes options for both desk clamp y montaje con ojal.
2. Información de seguridad
- Lea atentamente todas las instrucciones: Ensure you understand all assembly and installation steps before proceeding.
- Capacidad de peso: Do not exceed the maximum weight capacity of 12 kg (26.4 lbs) per arm. Exceeding this limit may result in instability and potential damage.
- Tamaño del monitor: Este soporte está diseñado para monitores de entre 17 y 35 pulgadas.
- Grosor del escritorio: Ensure your desk meets the required thickness for the chosen mounting method (Clamp: 10-45mm; Grommet: 10-40mm).
- Compatibilidad VESA: Verify your monitors have VESA mounting patterns of 75x75mm or 100x100mm.
- Asamblea: Monte el producto sobre una superficie suave y limpia para evitar rayones.
- Ajuste del resorte de gas: Ajuste la tensión del resorte de gas solo después de montar el monitor para evitar que el brazo salte hacia arriba o hacia abajo inesperadamente.
- Niños: Mantenga las piezas pequeñas fuera del alcance de los niños.
3. Contenido del paquete
Please verify that all components are present before beginning assembly. Refer to the parts list in your physical manual for detailed identification.

Figura 3.1: All components included in the package. This diagram illustrates the various parts such as the main pole, gas spring arms, VESA plates, desk clamp, grommet base, and hardware.
4. Especificaciones
| Marca | PUTORES |
| Número de modelo | EMPT09-C036P-35B |
| Tipo de montaje | Montaje de sobremesa (Clamp o ojal) |
| Tipo de movimiento | Articulación, giro, inclinación y rotación |
| Material | Acrilonitrilo butadieno estireno (ABS), acero aleado |
| Color | Negro |
| Minimum Supported Screen Size | 17 pulgadas |
| Maximum Supported Screen Size | 35 pulgadas (cada una) |
| Capacidad de peso | 12 kg (26.4 lbs) per arm |
| Compatibilidad VESA | 75 x 75 mm, 100 x 100 mm |
| Escritorio Clamp Espesor | 0.39"-1.77" (10 mm-45 mm) |
| Grosor del soporte de ojal | 0.39"-1.57" (10 mm-40 mm) |
| Diámetro del orificio del ojal | 0.39"-2.36" (10 mm-60 mm) |
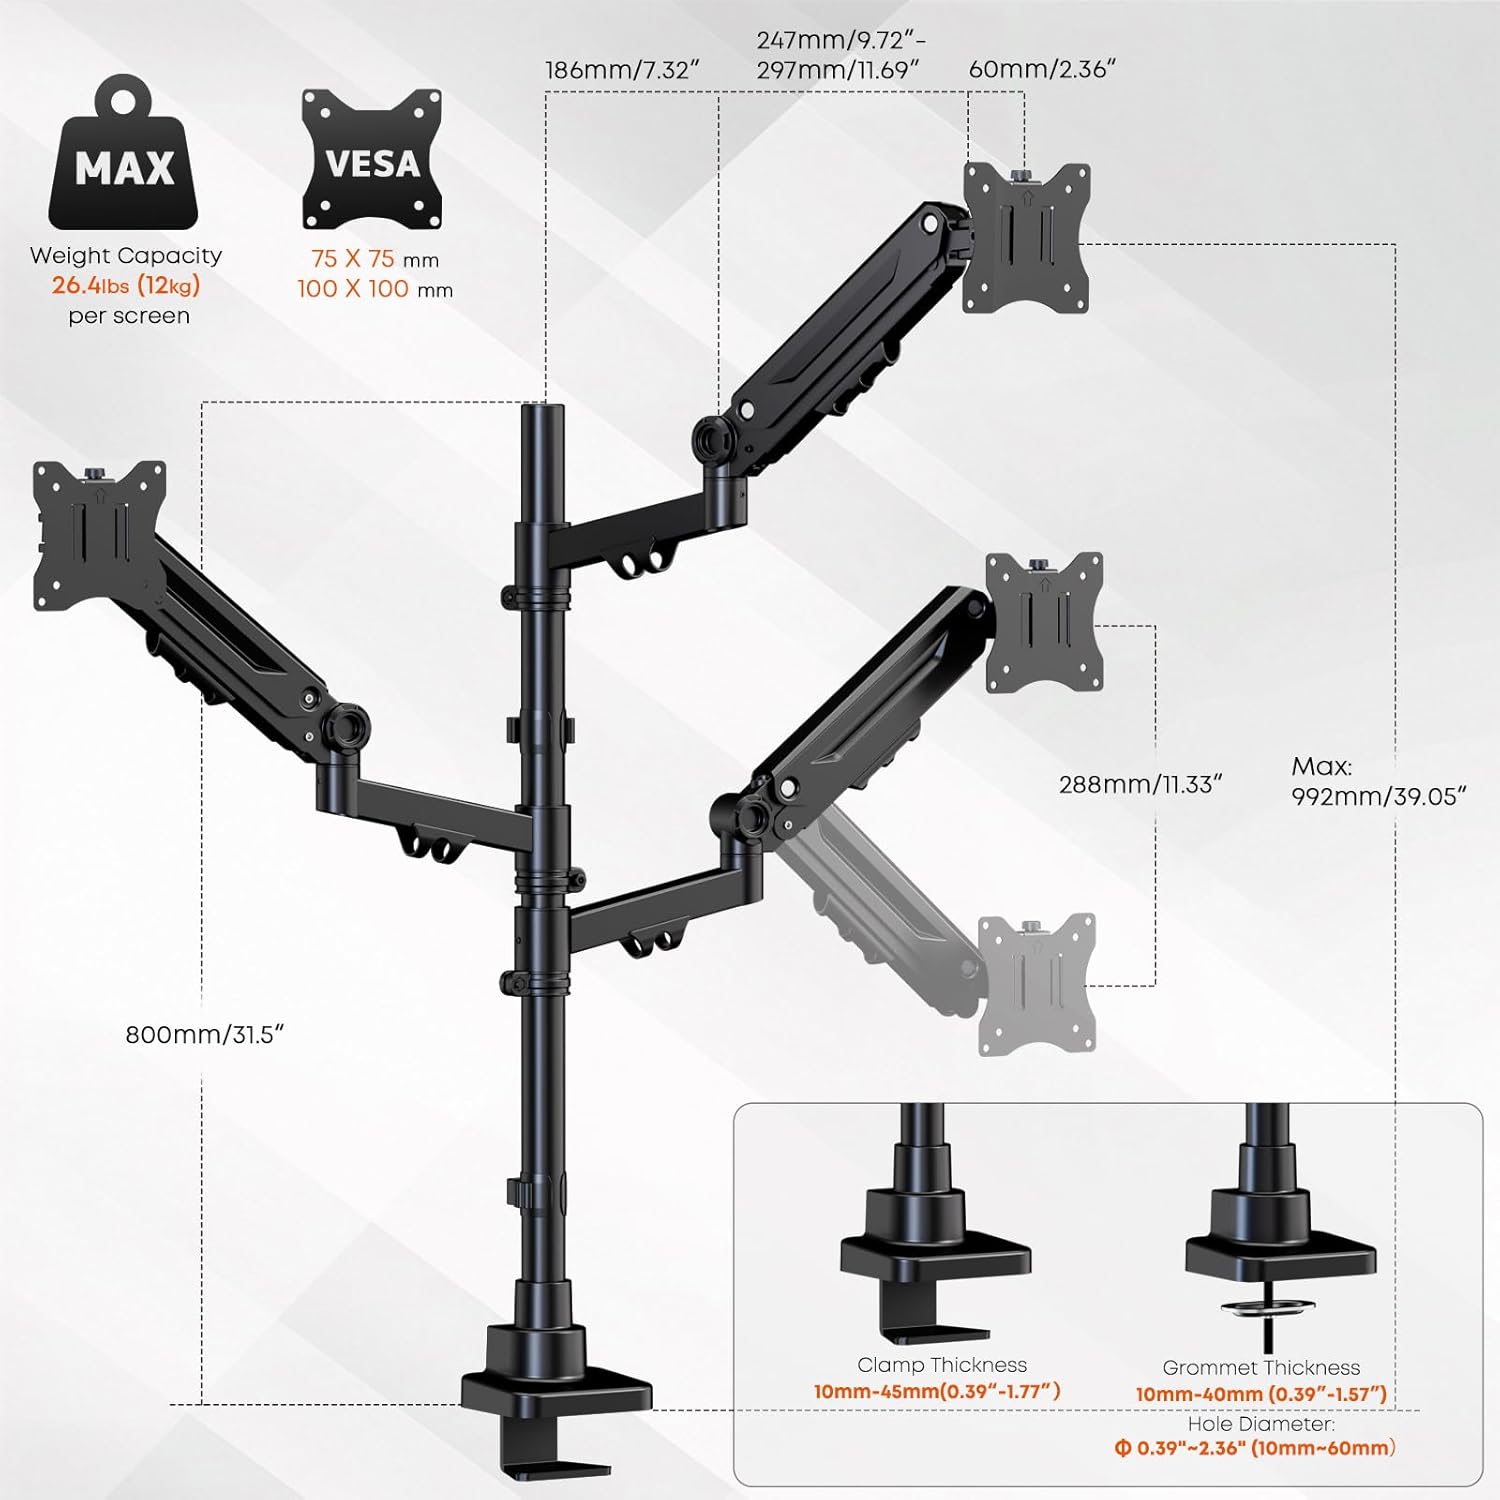
Figura 4.1: Detailed specifications and dimensions of the monitor mount, including VESA patterns, weight capacity, and desk compatibility for clamp y montaje con ojal.
5. Configuración e instalación
Follow these steps to properly install your PUTORSEN Triple Monitor Mount.
5.1 Elija su método de montaje
The mount supports two installation methods: C-clamp O montaje con ojal. Seleccione el método adecuado para su escritorio.
- C-Clamp Instalación: Coloque el C-clamp to the edge of your desk. Ensure the desk thickness is between 10mm and 45mm. Tighten the clamp de forma segura para evitar el movimiento.
- Instalación del ojal: If your desk has a grommet hole (10mm-60mm diameter) and a thickness between 10mm and 40mm, use the grommet base. Secure the base through the hole using the provided hardware.
5.2 Ensamblar el poste y los brazos
- Attach the main pole to your chosen desk base (C-clamp o arandela).
- Slide the gas spring arms onto the main pole. The arms can be positioned at desired heights. Secure them using the provided collars and screws.
5.3 Attach Monitors
- Attach the VESA plates to the back of each monitor using the appropriate screws (M4x12, M4x30, M5x12, M5x30). Ensure the screws are tightened securely but do not overtighten.
- Carefully slide the monitors (with VESA plates attached) onto the gas spring arms. Ensure they click into place or are secured with the locking mechanism.

Figura 5.1: The triple monitor mount with monitors installed, demonstrating the gas spring arms and support for up to 35-inch screens.
6. Operación y ajustes
The PUTORSEN Triple Monitor Mount offers extensive adjustability for optimal viewing comodidad.
6.1 Ajuste de la tensión del resorte de gas
After mounting your monitors, you may need to adjust the gas spring tension to ensure the arms hold the monitors in place without sagging or floating. Use the included Allen key to turn the adjustment screw on each arm:
- Doblar en sentido horario (-) to decrease tension for lighter monitors.
- Doblar en sentido antihorario (+) para aumentar la tensión para monitores más pesados.
Adjust gradually until the monitor stays at the desired height when released.
6.2 Posicionamiento del monitor
Each arm allows for independent adjustment:
- Ajuste de altura: Move the arms up or down along the main pole, or use the gas spring mechanism for vertical movement.
- Inclinación: Adjust the monitor screen vertically by tilting it up or down (±35°).
- Girar: Rotate the monitor horizontally left or right (±90°).
- Rotación: Gire el monitor 360° para orientación vertical u horizontal.

Figura 6.1: Demonstrating the full range of motion including tilt, swivel, and 360-degree rotation for optimal monitor positioning.
6.3 Gestión de cables
Utilize the integrated cable management clips along the arms and pole to route and organize your monitor cables. This helps maintain a clean and clutter-free workspace.

Figura 6.2: Integrated cable management system for a tidy setup.
7. Mantenimiento
El mantenimiento regular garantiza la longevidad y el funcionamiento seguro de su soporte para monitor.
- Limpieza: Limpie el soporte con un paño suave.amp Paño. Evite limpiadores abrasivos o disolventes.
- Inspección periódica: Revise periódicamente todos los tornillos y conexiones para asegurarse de que estén bien apretados. Vuelva a apretarlos si es necesario.
- Comprobación del resorte de gas: If monitors begin to sag or drift over time, re-adjust the gas spring tension as described in Section 6.1.
8. Solución de problemas
If you encounter issues with your monitor mount, refer to the following common problems and solutions:
| Problema | Posible causa | Solución |
|---|---|---|
| Monitor sags or drifts down | La tensión del resorte de gas es demasiado baja para el peso del monitor. | Aumente la tensión del resorte de gas girando el tornillo de ajuste en sentido antihorario (+). |
| El monitor flota hacia arriba o es difícil empujarlo hacia abajo | La tensión del resorte de gas es demasiado alta para el peso del monitor. | Disminuya la tensión del resorte de gas girando el tornillo de ajuste en el sentido de las agujas del reloj (-). |
| Mount feels unstable or wobbles | Escritorio clamp o la base del ojal no está bien apretada. | Asegúrese de que el escritorio esté limpioamp or grommet base is fully tightened to the desk. Check all arm connections. |
| Monitors are not level | Pequeñas variaciones en la altura del brazo o en la alineación de la placa VESA. | Adjust individual monitor tilt and rotation. Ensure arms are at the same height on the pole. |
| Cables do not fit into management clips | Demasiados cables o cables demasiado gruesos. | Reduce the number of cables or use thinner cables if possible. Use external cable ties if clips are insufficient. |
9. Garantía y soporte
9.1 Información de garantía
This PUTORSEN Triple Monitor Mount is covered by a 10 año de garantía from the date of purchase. This warranty covers manufacturing defects and material flaws under normal use. It does not cover damage caused by improper installation, misuse, accidents, or unauthorized modifications.
9.2 Atención al cliente
For technical assistance, warranty claims, or any questions regarding your PUTORSEN product, please contact our customer support team. Refer to the contact information provided in your product packaging or visit the official PUTORSEN websitio para detalles de soporte.
Recursos en línea: For additional information, FAQs, and video tutorials, please visit the Tienda PUTORSEN en Amazon.