Vetroo M06
Vetroo M06 Micro-ATX/Mini-ITX Gaming PC Case Instruction Manual
Modelo: M06
Introducción
This manual provides detailed instructions for the installation, operation, and maintenance of your Vetroo M06 Micro-ATX/Mini-ITX Gaming PC Case. Please read this manual thoroughly before beginning assembly to ensure proper setup and optimal performance.

Image: The Vetroo M06 Micro-ATX/Mini-ITX Gaming PC Case in black, showcasing its mesh front panel and side window, viewvisto desde un ángulo.
Características principales
- Diseño compacto: Micro-ATX / Mini-ITX form factor with a high-airflow mesh front panel, designed for space-efficient builds.
- Refrigeración optimizada: Supports up to five 120mm fans and a 240mm top-mounted liquid radiator for efficient thermal management.
- Compatibilidad de GPU: Admite tarjetas gráficas de hasta 355 mm de longitud.
- Flexible PSU Mounting: Features an adjustable power supply installation area with a maximum length of 160mm.
- Conectividad moderna: Front panel includes USB Type-C and USB 3.0 ports for convenient peripheral access.
Contenido del paquete
Verifique que todos los componentes estén presentes antes de continuar con la instalación:
- Vetroo M06 PC Case
- Accessory Box (screws, standoffs, cable ties)
- SFX PSU Bracket (1x)
- Manual de usuario (este documento)
Presupuesto
| Característica | Detalle |
|---|---|
| Nombre del modelo | M06 |
| Tipo de caso | Mini-Torre |
| Compatibilidad de la placa base | Micro-ATX, Mini-ITX |
| Dimensiones del producto (L x An x Al) | 15.55" x 7.87" x 13.07" (395 mm x 200 mm x 332 mm) |
| Peso del artículo | 13.37 libras (6.06 kg) |
| Material | Acrylonitrile Butadiene Styrene (ABS), SPCC (0.8mm metal plate) |
| Longitud máxima de GPU | 355 mm |
| Altura máxima del enfriador de CPU | 165 mm |
| Longitud máxima de la fuente de alimentación | 160mm (Adjustable mounting) |
| Apoyo de los fans | Hasta 5 ventiladores de 120 mm |
| Soporte del radiador | 1 x 240mm (Top) |
| Puertos de E / S frontales | 1 x USB Type-C, 1 x USB 3.0, HD Audio, Power Button, Reset Button |

Image: Diagram illustrating the compact dimensions of the Vetroo M06 PC case, measuring 15.5 inches in depth, 7.8 inches in width, and 13.0 inches in height.

Image: A detailed diagram outlining the compatibility specifications for the Vetroo M06 PC case, including maximum CPU cooler height (165mm), GPU length (355mm), PSU length (160mm), and supported motherboard form factors (M-ATX/ITX).
Configuración e instalación
Before starting, ensure you have a clean, static-free workspace. Refer to your component manuals for specific installation details.
1. Instalación de la placa base
- Remove the side panel(s) of the case.
- Install the necessary motherboard standoffs into the case tray according to your motherboard's form factor (Micro-ATX or Mini-ITX).
- Coloque con cuidado la placa base sobre los separadores, alineando los orificios de los tornillos.
- Asegure la placa base con tornillos.
2. Instalación de la GPU
- Retire las cubiertas de las ranuras PCIe correspondientes de la parte trasera de la carcasa.
- Inserte su tarjeta gráfica en la ranura PCIe principal de su placa base.
- Fije la tarjeta gráfica a la carcasa con tornillos.
- Connect any required PCIe power cables from your power supply to the GPU.
3. Instalación de fuente de alimentación
- Determine the desired mounting position for your power supply. The Vetroo M06 supports adjustable PSU mounting.
- If using an SFX power supply, attach the included SFX bracket to the PSU.
- Slide the power supply into its designated bay and secure it with screws from the rear of the case.
- Route the necessary power cables to your components.

Imagen: Un interno view of the Vetroo M06 PC case highlighting the three adjustable mounting positions for ATX/SFX power supplies, along with an illustration of the included SFX bracket.
4. Storage Installation (HDD/SSD)
- Locate the designated mounting points for 3.5" HDDs and 2.5" SSDs.
- Asegure sus unidades de almacenamiento utilizando los tornillos proporcionados.
- Connect SATA data and power cables to each drive.
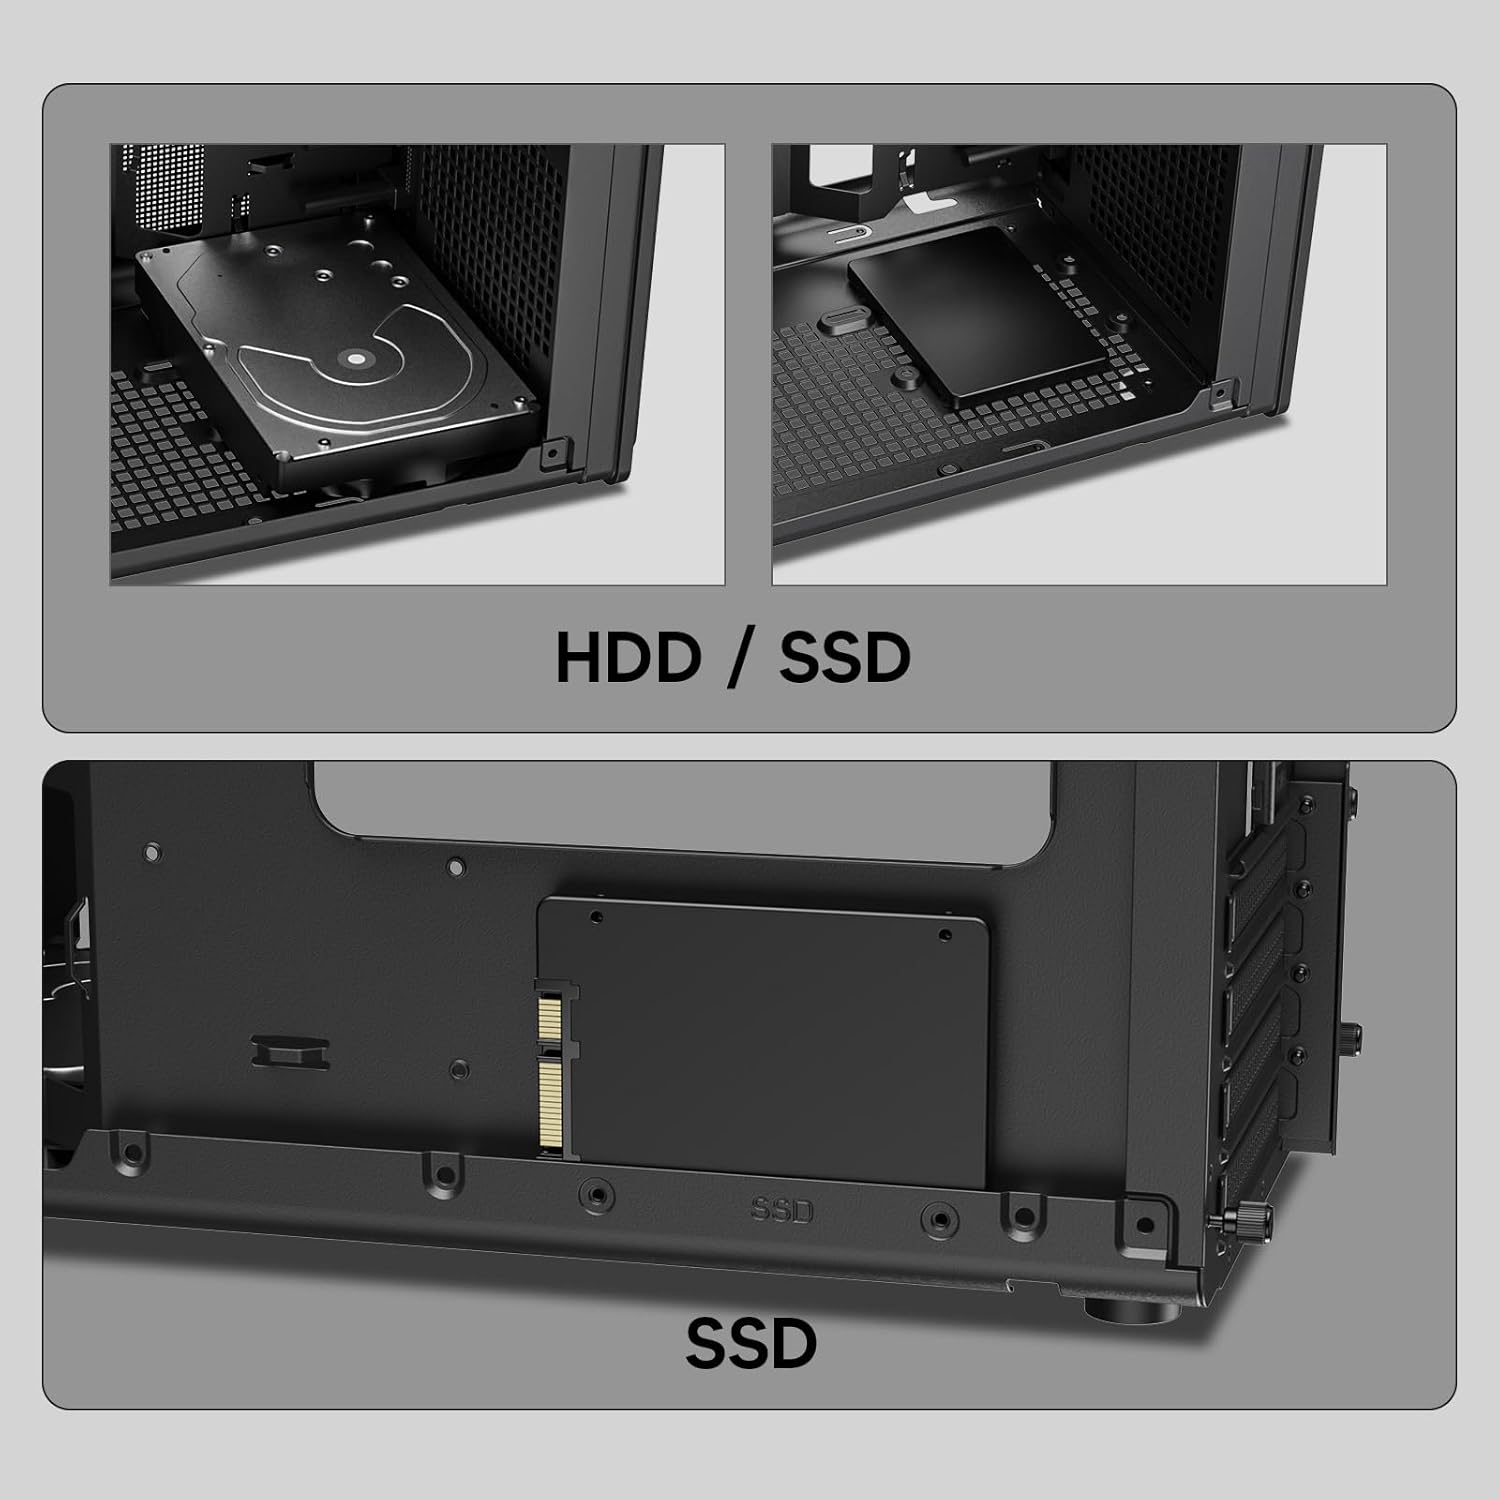
Imagen: Primer plano views of the Vetroo M06 PC case interior, demonstrating the mounting options for both 3.5-inch Hard Disk Drives (HDDs) and 2.5-inch Solid State Drives (SSDs).
5. Cooling System Installation (Fans/Radiator)
- Identify the fan mounting locations (up to five 120mm fans).
- Mount fans using appropriate screws, ensuring correct airflow direction.
- For liquid cooling, install a 240mm radiator at the top mounting position, securing it with screws.
- Connect fan and pump cables to your motherboard or fan controller.
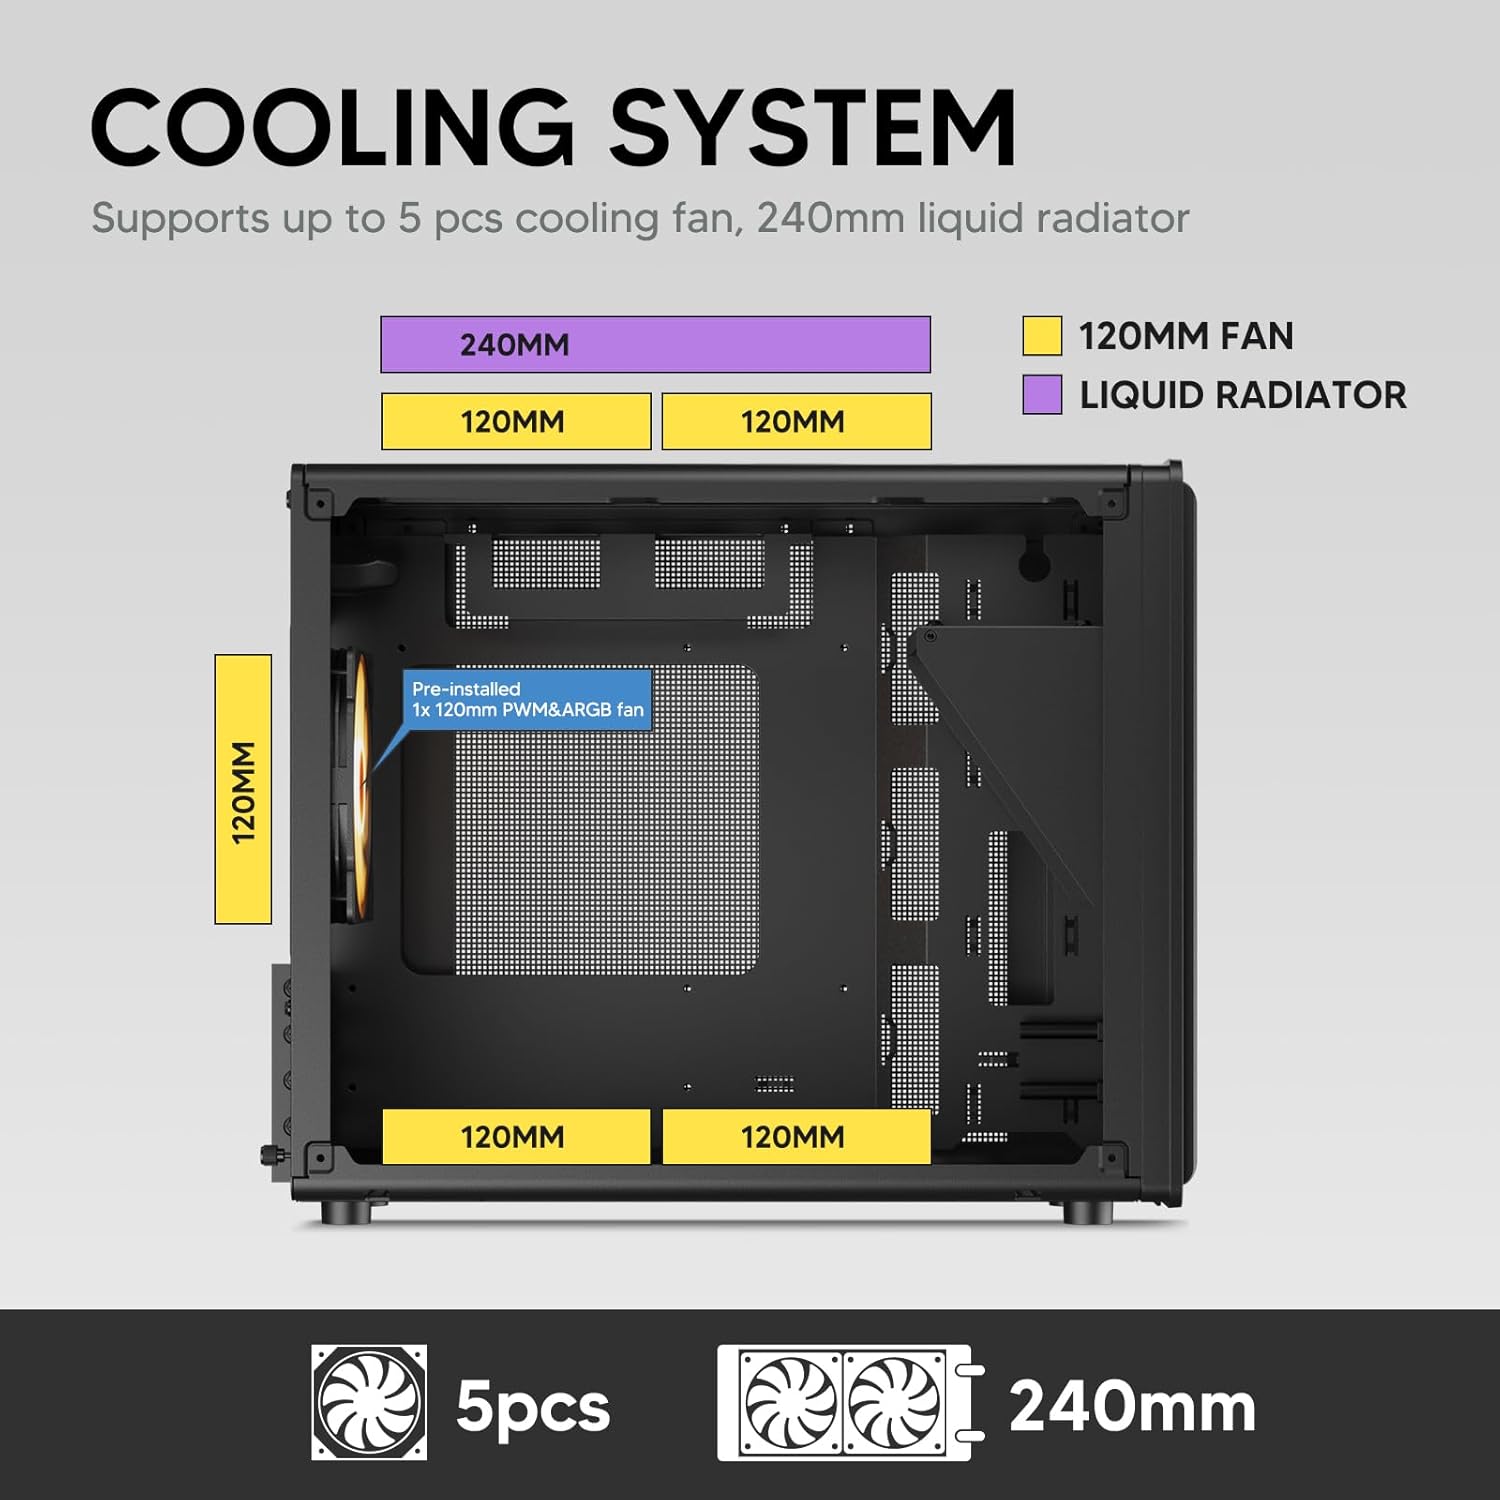
Image: A diagram illustrating the cooling system layout within the Vetroo M06 PC case, detailing the positions for up to five 120mm fans and a 240mm liquid radiator at the top.
6. Conexiones del panel de E/S
- Connect the front panel cables (Power, Reset, USB 3.0, USB Type-C, HD Audio) to the corresponding headers on your motherboard. Refer to your motherboard manual for header locations.

Image: A close-up of the Vetroo M06 PC case's front I/O panel, clearly labeling the Power button, Reset button, USB 3.0 port, HD Audio jack, and USB Type-C port.
Instrucciones de funcionamiento
Once all components are installed and cables are connected, replace the side panels. Connect your peripherals (monitor, keyboard, mouse) and power cable to the PSU. Press the power button on the front panel to start your system.
Gestión del flujo de aire
The Vetroo M06 case features an excellent airflow design with mesh panels to facilitate optimal cooling. Ensure fans are installed to create a balanced airflow, typically with intake fans at the front/bottom and exhaust fans at the rear/top.

Image: An exploded diagram of the Vetroo M06 PC case, illustrating the intended airflow patterns with blue arrows indicating cool air intake and red arrows showing warm air exhaust through its mesh panels.
Mantenimiento
El mantenimiento regular ayuda a prolongar la vida útil de los componentes de su PC y garantiza un rendimiento óptimo.
- Limpieza de polvo: Limpie periódicamente los filtros de polvo y los componentes internos con aire comprimido. Asegúrese de que el sistema esté apagado y desenchufado antes de limpiarlo.
- Sistema de organización de cables: Verify that internal cables are neatly routed and do not obstruct airflow.
- Comprobaciones de componentes: Ensure all screws are tight and components are securely seated.

Image: A close-up shot of the Vetroo M06 PC case, featuring a digital caliper measuring the thickness of the metal plate, which is specified as 0.8mm, highlighting the case's robust construction.
Solución de problemas
Si encuentra problemas, consulte los siguientes pasos de solución de problemas comunes:
- El sistema no se enciende:
- Check all power connections, including the PSU to wall outlet, PSU to motherboard (24-pin and CPU 8-pin), and front panel power switch cable to motherboard.
- Asegúrese de que el interruptor de la fuente de alimentación esté en la posición "ENCENDIDO".
- Sin salida de pantalla:
- Verify that your monitor is connected to the graphics card (not the motherboard's integrated graphics ports, unless you are using integrated graphics).
- Vuelva a colocar la tarjeta gráfica y los módulos de RAM.
- Problemas de sobrecalentamiento:
- Asegúrese de que todos los ventiladores de la caja giren y estén orientados correctamente para un flujo de aire óptimo.
- Verifique la instalación del disipador de la CPU y la aplicación de pasta térmica.
- Clean any dust buildup from fans and filters.
- Los puertos USB no funcionan:
- Verify that the front panel USB 3.0 and USB Type-C cables are correctly connected to the motherboard headers.
Garantía y soporte
Vetroo products are designed for quality and reliability. For warranty information and technical support, please visit the official Vetroo webSitio web o contacte con el servicio de atención al cliente. Conserve su comprobante de compra para reclamaciones de garantía.
Vetroo Official Websitio: Vetroo Store on Amazon
For further assistance, please refer to the contact information provided with your product packaging or on the official Vetroo support channels.
Ask a question about this manual
Ask about setup, troubleshooting, compatibility, parts, safety, or missing instructions. Manuals+ will review the question and use this page’s manual context to help answer it.