
1. Introducción
Gracias por la compraasing the EasySMX X05PRO Wireless PC Game Controller. This manual provides detailed instructions on how to set up, operate, and maintain your controller. Please read this manual carefully before use to ensure optimal performance and a satisfying gaming experience.
Producto terminadoview presentación de videoasing the EasySMX X05PRO controller's design and key features.
2. Producto terminadoview
The EasySMX X05PRO is a versatile wireless game controller designed for a wide range of platforms including PC, Nintendo Switch, iOS, and Android devices. It features advanced technologies such as Hall effect joysticks and triggers, a 1000Hz polling rate, and customizable RGB lighting to enhance your gaming sessions.
Contenido del paquete:
- EasySMX X05PRO Wireless Game Controller
- Cable de carga USB-C
- Receptor inalámbrico 2.4G (dongle USB)
- Manual de usuario

An image displaying the EasySMX X05PRO controller with its main features such as wireless/wired connection, silent buttons, RGB lighting, 1000Hz polling rate, TURBO function, vibration adjustment, and 1000mAh battery.
3. Configuración y conexión
The X05PRO controller supports multiple connection methods for various devices.
3.1. 2.4G Wireless Connection (for PC Windows)
- Inserte el receptor inalámbrico 2.4G en un puerto USB disponible en su PC.
- Mantenga pulsado el Hogar button on the controller until the indicator light flashes rapidly, indicating pairing mode.
- Once connected, the indicator light will become solid. The controller is now ready for use.
3.2. Bluetooth Connection (for Switch, iOS, Android)
- On your device (Switch, iOS, or Android), navigate to the Bluetooth settings and enable Bluetooth.
- On the EasySMX X05PRO controller, press and hold the Emparejamiento Bluetooth button (refer to the diagram in Section 2 for button layout) until the indicator light flashes rapidly.
- Select "EasySMX X05PRO" from the list of available devices on your screen.
- Una vez emparejado, la luz indicadora del controlador se volverá fija.
3.3. Wired Connection (for PC, Switch, and charging)
- Connect one end of the USB-C cable to the controller and the other end to your device (PC or Switch).
- The controller will automatically switch to wired mode. This mode also charges the controller.

An image illustrating the wireless connection capabilities of the EasySMX X05PRO controller, highlighting its compatibility with PC and other devices.
4. Características principales
4.1. Botones silenciosos
The X05PRO features a redesigned full button structure with silicone dampers, ensuring ultra-quiet operation. This design is optimized for late-night gaming sessions, preventing disturbance to family, roommates, or neighbors.

Un detallado view of the controller's buttons, illustrating the silicone damper mechanism for reduced noise during gameplay.
4.2. Dual-StagDisparadores de efecto Hall
Experience precise control with adjustable trigger locks, allowing for short (3mm) or long (9mm) stroke distances. The 2+2 built-in rumble motors provide realistic haptic feedback for immersive racing and FPS experiences.
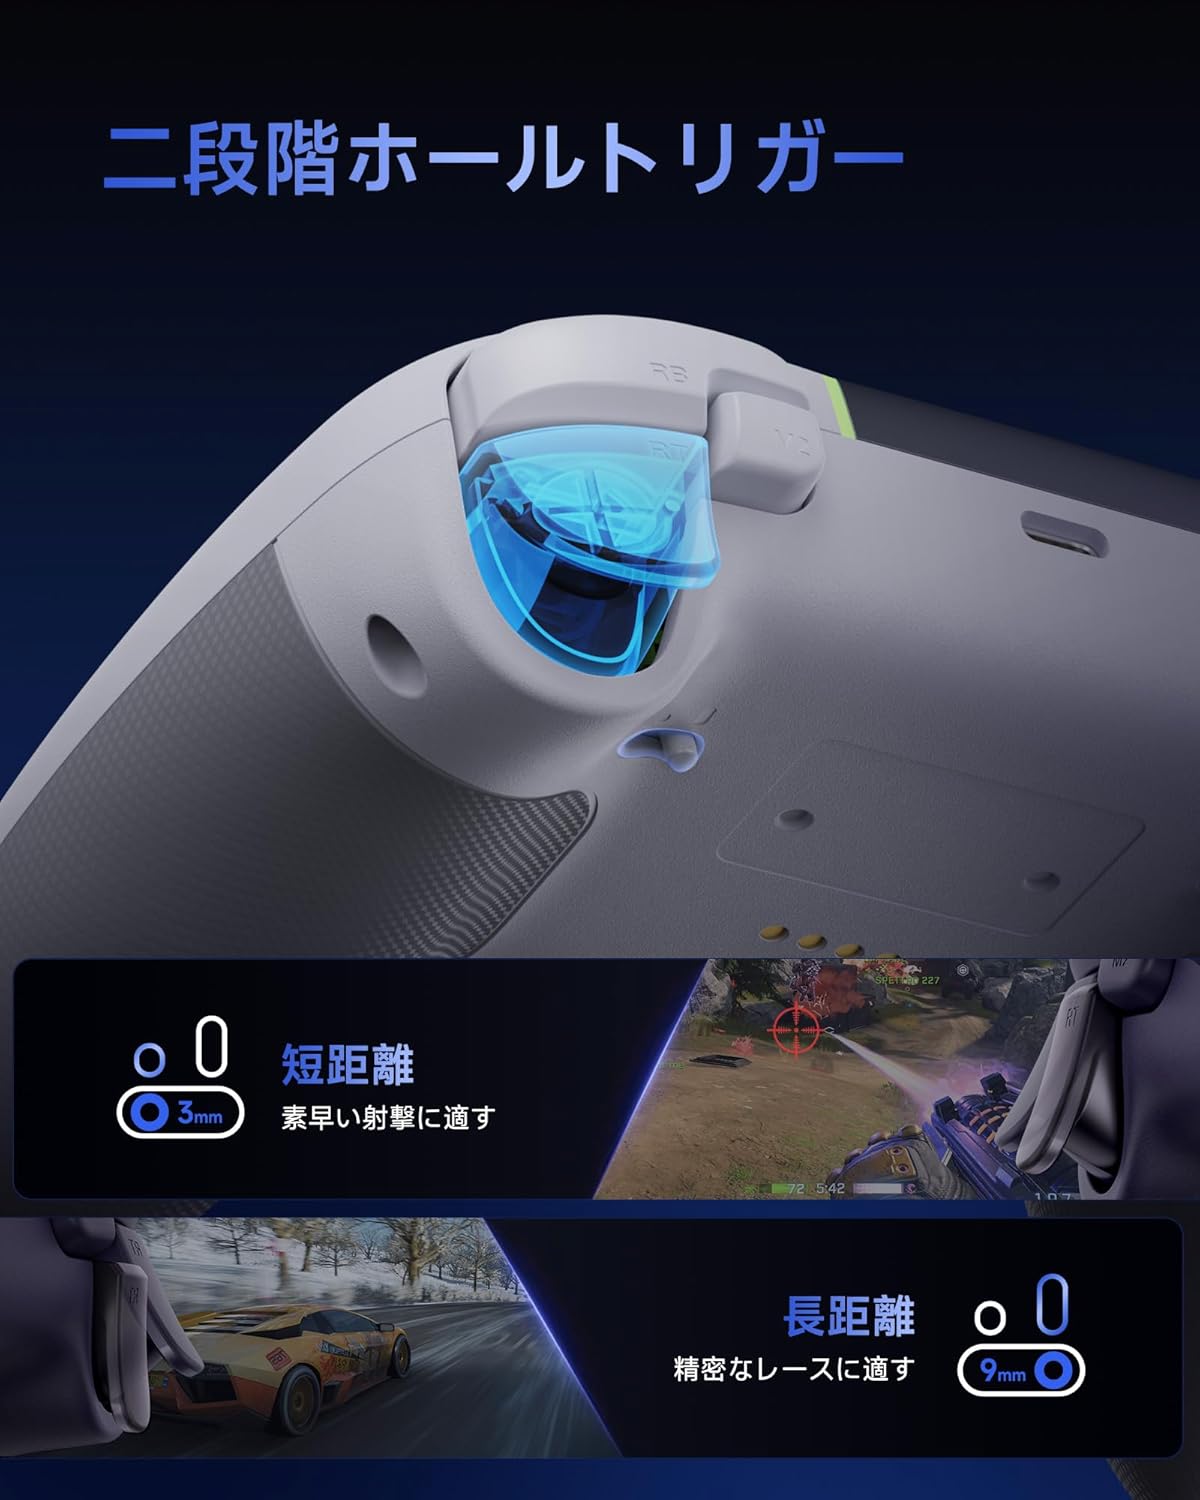
An image demonstrating the dual-stage Hall effect triggers, highlighting the short travel distance for quick shots and long travel for precise racing control.
4.3. Upgraded 8-Way D-Pad
The D-pad incorporates a dome switch and concave pivot structure, enabling smooth diagonal inputs and precise 8-way control. This design is particularly beneficial for fighting games and retro titles requiring accurate directional commands.

An exploded diagram showing the internal components of the upgraded 8-way D-pad, emphasizing its improved design for seamless and precise operation.
4.4. 4-Zone Vibration Feedback
The controller features a 2+2 motor structure that provides immersive 4-zone vibration feedback, enhancing tactile immersion during gameplay. Note: Trigger vibration requires in-game support and may only be available in certain titles.

An illustration of the controller's 4-zone vibration feedback system, depicting the internal motors and their effect on tactile immersion.
4.5. Dynamic RGB Backlight
Personalize your gaming experience with customizable RGB lighting effects. Choose from 7 color combinations and 5 diverse lighting modes (Brightness, Breathing, Colorful, Fade, Off) to match your style or mood.

Una imagen muestraasing two controllers with different dynamic RGB lighting effects, illustrating the customizable illumination options.
4.6. Two Programmable Buttons
The controller includes two additional programmable buttons located on the top, designed to prevent accidental presses during intense gameplay, a common issue with traditional back paddles.

A view of the controller's top side, highlighting the two programmable buttons (M1 and M2) and their programming settings.
4.7. 1000Hz Polling Rate & Hall Effect Joysticks
Achieve virtually no input lag with a 1000Hz polling rate in both wired and 2.4G wireless modes. The high-precision 11-bit Hall effect sensors in the joysticks ensure drift-free accuracy and a long operational lifespan.

A diagram illustrating the 1000Hz polling rate and the internal mechanism of the Hall effect joystick, emphasizing drift-free high precision.
4.8. Ergonomic Grip & Long-Life Battery
The controller features a soft-touch silicone coating for a sweat-resistant, non-slip grip, ensuring comfort during extended gaming sessions. A built-in 1000mAh rechargeable battery provides prolonged playtime.

An image highlighting the ergonomic, skin-friendly grip texture and the 1000mAh battery capacity of the controller.
5. Operación
5.1. Changing RGB Lighting Modes
To cycle through the 5 RGB lighting modes (Brightness, Breathing, Colorful, Fade, Off) and 7 color combinations, refer to the detailed instructions in the full product manual or the manufacturer's website. Typically, a dedicated button or a combination of buttons is used for this function.
5.2. Programming Buttons (M1/M2)
The M1 and M2 buttons can be programmed to replicate other button inputs. To program:
- Mantenga pulsado el M button (usually located near the D-pad) and the desired programmable button (M1 or M2) simultaneously.
- The indicator light will flash, indicating programming mode.
- Press the button you wish to map (e.g., A, B, X, Y, LB, RB, LT, RT, L3, R3).
- Press the M button again to save the mapping. The indicator light will return to solid.
5.3. Adjusting Trigger Modes
los dualestage triggers can be adjusted for different travel distances. Consult the full product manual for specific button combinations or switches to toggle between short (3mm) and long (9mm) trigger strokes, optimizing for quick actions or precise control.
6. Carga del controlador
The EasySMX X05PRO controller is equipped with a built-in 1000mAh rechargeable Lithium-ion battery.
Procedimiento de carga:
- Connect the USB-C charging cable to the controller's charging port.
- Connect the other end of the USB-C cable to a USB power source (e.g., PC, USB wall adapter, power bank).
- The indicator light on the controller will show the charging status (e.g., breathing light, solid light when fully charged). Refer to the controller's LED indicators for specific charging status details.
- Una carga completa suele tardar entre 2 y 3 horas aproximadamente.
7. Especificaciones
| Característica | Detalle |
|---|---|
| Número de modelo | X05PRO |
| Tipo de batería | 1 batería de iones de litio (incluida) |
| Capacidad de la batería | 1000 mAh |
| Conectividad | 2.4G inalámbrico, Bluetooth, con cable (USB-C) |
| Tasa de sondeo | 1000 Hz (con cable e inalámbrico 2.4 G), 125 Hz (Bluetooth) |
| Tipo de disparador | Doble-StagDisparadores de efecto Hall |
| Tipo de joystick | Hall Effect Joysticks (11-bit precision) |
| Mando direccional | Upgraded 8-Way D-Pad (Dome switch, concave pivot) |
| Vibración | 4-Zone Vibration Feedback (2+2 motors) |
| Iluminación | Dynamic RGB Backlight (7 colors, 5 modes) |
| Botones programables | 2 (M1, M2) |
| Dimensiones | 17.9 x 14.7 x 7.4 cm |
| Peso | 400 gramos |
| País natal | Porcelana |

Image showing the EasySMX X05PRO controller and its technical compliance certifications for the Japanese market.
8. Solución de problemas
8.1. El controlador no se conecta
- Comprobar la batería: Asegúrate de que el mando tenga suficiente carga. Conéctalo mediante el cable USB-C para cargarlo.
- Reparar: For wireless connections, try re-pairing the controller with your device. Follow the steps in Section 3.
- Check Receiver (2.4G): Ensure the 2.4G wireless receiver is securely plugged into a working USB port on your PC. Try a different USB port.
- Interferencia de Bluetooth: If using Bluetooth, ensure no other devices are causing interference. Try disconnecting other Bluetooth devices.
- Conexión por cable: If wireless connection fails, try connecting the controller directly via USB-C cable to confirm functionality.
8.2. Retraso de entrada o botones/joysticks que no responden
- Tasa de votación: Ensure you are using 2.4G wireless or wired mode for the optimal 1000Hz polling rate. Bluetooth mode operates at 125Hz, which may feel less responsive in competitive gaming.
- Interferencia: For 2.4G wireless, ensure the receiver is not obstructed and is close to the controller. Avoid areas with high electromagnetic interference.
- Actualización de firmware: Consulta la información oficial de EasySMX websitio para obtener actualizaciones de firmware disponibles para su controlador.
- Recalibración: Some operating systems or game platforms allow for controller calibration. Refer to your device's settings for this option.
8.3. La vibración no funciona
- In-Game Support: Verifica que el juego que estás jugando admita la respuesta de vibración.
- Configuración del juego: Check the in-game settings to ensure vibration is enabled.
- Instalación del controlador: For PC, ensure the correct drivers are installed.
9. Mantenimiento
- Limpieza: Utilice un paño suave y seco para limpiar el mando. No utilice productos químicos agresivos ni materiales abrasivos.
- Almacenamiento: Guarde el controlador en un lugar fresco y seco, alejado de la luz solar directa y de temperaturas extremas.
- Cuidado de la batería: Evite descargar la batería por completo con frecuencia. Cargue el mando regularmente, incluso si no lo usa durante periodos prolongados, para mantener la batería en buen estado.
- Evite las gotas: Proteja el controlador de caídas e impactos que puedan dañar los componentes internos.
10. Información de seguridad
- Do not attempt to disassemble or modify the controller. This may void your warranty and cause damage.
- Keep the controller away from water, moisture, and high temperatures.
- No exponga la batería al fuego ni al calor extremo.
- Deseche el producto y su batería de forma responsable de acuerdo con las regulaciones locales.
- Este producto no es un juguete. Mantener fuera del alcance de los niños pequeños.
11. Garantía y soporte
EasySMX products come with a standard warranty. For specific warranty terms, duration, and to register your product, please visit the official EasySMX websitio o póngase en contacto con el servicio de atención al cliente.
If you encounter any issues not covered in this manual or require further assistance, please contact EasySMX customer support through their official websitio o la información de contacto proporcionada con su compra.
EasySMX Oficial Websitio: www.easysmx.com