hygger Aquarium LED Light HG160-18W Instruction Manual
Modelo: HG160-18W
Producto terminadoview
This manual provides detailed instructions for the hygger Aquarium LED Light, model HG160-18W. This full-spectrum LED light is designed for aquariums, offering various lighting modes, adjustable colors, and brightness levels to create an optimal environment for aquatic plants and fish. It features an external controller for easy customization and a durable, waterproof design.

Image: hygger Aquarium LED Light with external controller.
Instrucciones de seguridad
Please read and understand all safety instructions before installing or operating this product. Failure to follow these instructions may result in injury or damage to the product.
- No sumergir: This light is rated IP65 for splash protection, but it is no sumergible. Do not immerse the light fixture or controller in water.
- Desconexión de energía: Desconecte siempre la fuente de alimentación antes de realizar cualquier instalación, mantenimiento o limpieza.
- Niños y mascotas: Mantenga el producto y sus componentes fuera del alcance de los niños y las mascotas.
- Inspección de daños: Do not operate the light if any part of the fixture, power cord, or adapter is damaged. Contact customer support for assistance.
- Adaptador correcto: Use only the power adapter supplied with this product. Using an incorrect adapter may cause damage or fire.
- Uso exclusivo en interiores: This product is designed for indoor aquarium use only. Do not use outdoors.
- Ventilación: Asegúrese de que haya una ventilación adecuada alrededor de la luminaria para evitar el sobrecalentamiento.
Contenido del paquete
Verifique que todos los artículos estén presentes en el paquete:
- hygger Aquarium LED Light (HG160-18W)
- Adaptador de corriente (CC 12 V/1.5 A)
- Extendable Metal Brackets
Características del producto
- Adjustable Color and Brightness: Offers 8 customizable colors (Red, Green, Orange, Yellow, Cyan, Purple, Blue, Full Spectrum White) and 10 adjustable brightness levels (10% to 100%).
- Múltiples modos de trabajo: Features 5 functional modes: Day Mode, Night Mode, Day + Night Mode, 24/7 Natural Mode, and DIY Mode to suit various aquarium needs.
- Modo natural 24/7: Automatically simulates natural sunrise, daylight, sunset, and moonlight cycles, creating a realistic environment for aquatic life.
- Modo DIY: Allows users to program custom lighting schedules with adjustable time, color, and brightness across 5 distinct stages.
- Iluminación de espectro completo: Equipped with high-quality 5050 and 2835 LED chips, providing a high PAR value and optimal wavelengths (blue and red light) to promote photosynthesis in aquatic plants.
- Diseño duradero e impermeable: Constructed with an aluminum shell for efficient heat dissipation and an IP65 waterproof rating, protecting against splashes and moisture. Each LED bead is individually sealed.

Image: Full spectrum light details with LED types and spectral distribution.
- Extendable and Detachable Brackets: Stable and robust metal brackets allow for easy installation and adjustment on various aquarium sizes (30-45 cm for the 18W model), including rimmed and rimless tanks.
Instrucciones de instalación
- Desempaquetar componentes: Carefully remove the LED light fixture, power adapter, and extendable metal brackets from the packaging.
- Fijar soportes: Slide the extendable metal brackets onto both ends of the LED light fixture. Ensure they are securely inserted into the designated slots.

Image: Illustration of the extendable and detachable brackets for tank mounting.
- Position Light on Aquarium: Place the light fixture on top of your aquarium. Adjust the extendable brackets to fit the length of your tank (e.g., 30-45 cm for the 18W model). Ensure the light is centered and stable on the tank edges.
- Conecte la electricidad: Connect the power adapter's DC plug to the input port on the light fixture's controller cable. Then, plug the power adapter into a standard electrical outlet.
- Ubicación del controlador: Position the external controller in a dry, easily accessible location, away from direct water splashes.
Instrucciones de funcionamiento
Controlador terminadoview
The external smart LCD display controller allows for easy management of all light functions. Familiarize yourself with the buttons and display:

Imagen: Detallada view of the external controller, showing the LCD screen and control buttons.
- Pantalla LCD: Shows current mode, local time, start/end times, brightness level, and color.
- Botón COLOR: Cycles through 8 available colors.
- Botón de ajuste: Used to confirm settings or move to the next parameter during programming.
- Botones ARRIBA / ABAJO: Adjust values (time, brightness, color options).
- Botón 24/7: Activates the 24/7 Natural Mode. Long press for 3 seconds to set local time.
- DIY/OK Button: Enters DIY Mode. Also acts as an 'OK' button to confirm and save settings in DIY mode.
- Botón ON/OFF: Short press to turn the light on after plugging in. Long press to turn off.
Configuración de la hora local
- Mantenga pulsado el 24/7 Botón durante 3 segundos hasta que la pantalla de la hora parpadee.
- Utilice el UP y ABAJO Botones para ajustar la hora.
- Presione el COLOCAR Botón para pasar al ajuste de minutos.
- Utilice el UP y ABAJO Botones para ajustar los minutos.
- Prensa DIY/OK para confirmar y salir del ajuste de la hora.
Modos de funcionamiento
The light offers 5 distinct operating modes:

Image: Visual representation of Day Mode, Night Mode, and Day + Night Mode.
- Modo día: Provides a bright, full-spectrum white light. In this mode, the color is not adjustable, but the brightness can be set to one of 10 levels. Timer settings are optional.
- Modo nocturno: Offers adjustable color (8 options) and brightness (10 levels). This mode is ideal for creating a calming nighttime ambiance. Timer settings are optional.
- Day + Night Mode: Features fixed full-spectrum white light during the day and fixed blue light during the moon time. Brightness is adjustable.
- Modo natural 24/7: This mode automatically simulates a natural light cycle:
- Sunrise (soft orange glow)
- Daylight (full spectrum white glow)
- Sunset (soft orange glow)
- Moonlight (blue light)

Image: Diagram of the 24/7 Natural Mode light cycle and examples of DIY mode stages.
- Modo DIY: This mode allows for complete customization of your lighting schedule. You can set 5 different stages (L1-L5) with specific times, colors (8 options), and brightness levels (10 options).
- Presione el DIY/OK Botón para ingresar al modo DIY.
- Utilice el COLOCAR button to cycle through the parameters for each stage (time, color, brightness).
- Utilice el UP y ABAJO buttons to adjust the desired values for each parameter.
- After setting all 5 stages, press DIY/OK to confirm and save your custom program.
Ajuste de color y brillo
In modes where color and brightness are adjustable (e.g., Night Mode, DIY Mode):

Image: Visual guide to adjustable colors and brightness levels.
- Ajuste de color: Presione el COLOR button repeatedly to cycle through the 8 available color options.
- Ajuste del brillo: Utilice el UP y ABAJO buttons to increase or decrease the light intensity across 10 levels (10% to 100%).
Configuración del temporizador
The light offers options for timed operation:
- No Timed Setting: To disable the timer, press the `MODE` button for 1 second, then press the `SET` button for 3 seconds.
- Timed Setting: To enable and set a timer, press the `MODE` button for 3 seconds, then press the `SET` button for 3 seconds. You can then set the desired start and end times for the light to operate.
- DIY Mode Timer: In DIY mode, the timer is integrated into each of the 5 stages, allowing for precise scheduling of light changes.
Mantenimiento
Regular maintenance ensures the longevity and optimal performance of your hygger Aquarium LED Light.
- Limpieza del accesorio: With the power disconnected, gently wipe the light fixture with a soft, damp cloth to remove dust, water spots, and algae buildup. Do not use harsh chemicals or abrasive materials, as these can damage the light's surface or waterproof seal.
- Cuidado del controlador: Keep the external controller dry and clean. Avoid exposing it to water or high humidity.
- Cable de alimentación y adaptador: Periodically inspect the power cord and adapter for any signs of wear, cuts, or damage. If damage is found, discontinue use immediately and contact customer support.
- Ventilación: Ensure that the aluminum housing remains clear of obstructions to allow for proper heat dissipation.
Solución de problemas
If you encounter issues with your hygger Aquarium LED Light, refer to the following table for common problems and solutions.
| Problema | Posible causa | Solución |
|---|---|---|
| La luz no se enciende. |
|
|
| La luz parpadea o se atenúa inesperadamente. |
|
|
| La pantalla del controlador está en blanco o no responde. |
|
|
| No se puede cambiar el color ni el brillo. |
|
|
| El modo 24/7 no funciona como se esperaba. |
|
|
Specifications (Model HG160-18W)
Detailed technical specifications for the hygger Aquarium LED Light 18W model:

Image: Product size and specification chart for various wattagy modelos.
| Especificación | Valor |
|---|---|
| Modelo | HG160 |
| Quétage | 18 vatios |
| Vol de entradatage | CA 100-240 V |
| Vol de salidatage | CC 12 V/1.5 A |
| Tamaño de la luz (sin soporte) | 27.5 x 11 x 1.3 cm (10.8 x 4.3 x 0.5 pulgadas) |
| Application Tank Length | 30-45 centímetros |
| Cantidad de LED | 60 PCS (40 White, 2 Red, 4 Blue, 2 Green, 12 RGB) |
| Lúmenes | 591 lúmenes |
| Índice de representación | > 90 |
| Temperatura de color | 16568K |
| Longitud del cable de alimentación | 150cm + 60cm |
| Material | Aluminio |
| Clasificación de impermeabilidad | IP65 (a prueba de salpicaduras) |
| Peso del artículo | 630 gramos |
| Clase de eficiencia energética | E |
For more detailed product information and energy label, please refer to the official EPREL database:
Información del producto EPREL (Código QR: 2369463)

Image: Product Information Sheet with EPREL data.
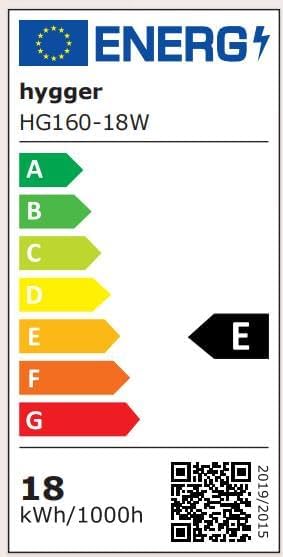
Image: Energy Label for hygger HG160-18W.
Garantía y soporte
This hygger product comes with a standard manufacturer's warranty. For specific warranty terms, duration, and conditions, please refer to the warranty card included with your purchase or contact hygger customer support directly.
If you require technical assistance, have questions about product operation, or need to report a defect, please contact hygger customer service through their official websitio o la información de contacto proporcionada en el embalaje de su producto.