
Introducción
Thank you for choosing the LIORQUE Wireless Weather Station YGH6208. This device provides accurate indoor and outdoor temperature and humidity readings, weather forecasts, and features a DCF radio-controlled clock with alarm functions. This manual will guide you through the setup, operation, and maintenance of your weather station.
Contenido del paquete
- 1 x Estación meteorológica inalámbrica LIORQUE (Unidad principal)
- 1 x sensor exterior
- 3 x AAA Batteries (for Main Unit)
- 2 x AAA Batteries (for Outdoor Sensor)
- 1 x Manual de usuario (este documento)
Producto terminadoview
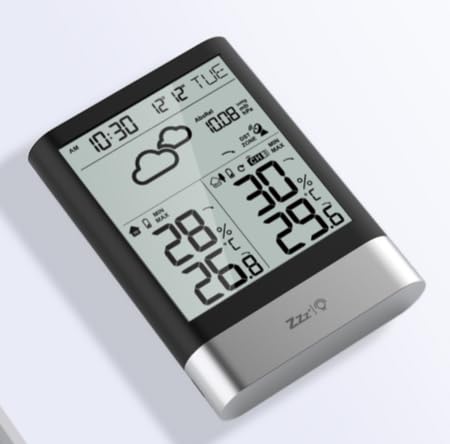
Imagen 1: LIORQUE Wireless Weather Station Main Unit. This image shows the front view of the main display unit, highlighting its LCD screen and compact design.
Características de la unidad principal:
- 4.3-inch LCD screen with backlight
- Pantalla de temperatura y humedad interior
- Visualización de temperatura y humedad exterior
- Iconos de pronóstico del tiempo
- DCF radio-controlled clock with manual setting option
- Double alarm clock with snooze function
- Calendar and day of the week display (7 languages)
- Registros de temperatura y humedad máximas y mínimas
- Air pressure display and weather trend
- Pantalla de tiempo de 12/24 horas
Características del sensor exterior:
- Wireless transmission up to 100m (open area)
- Medición de temperatura y humedad
- Supports hanging or standing placement
- Data updated every 30 seconds
- Admite hasta 3 sensores (uno incluido)
Configuración
1. Instalación de la batería
- Sensor exterior: Open the battery compartment cover on the back of the outdoor sensor. Insert 2 x AAA batteries, ensuring correct polarity (+/-). Close the cover.
- Unidad principal: Abra la tapa del compartimento de las pilas, situada en la parte trasera de la unidad principal. Inserte 3 pilas AAA, asegurándose de que la polaridad sea correcta (+/-). Cierre la tapa.
- The main unit will power on and display indoor readings.
2. Emparejamiento de sensores
After installing batteries in both units, the main unit will automatically search for the outdoor sensor. The outdoor temperature and humidity should appear on the main unit's display within a few minutes. If the outdoor readings do not appear:
- Ensure both units are within range (up to 100m in open air).
- Presione el botón "TX" dentro del compartimiento de la batería del sensor exterior para enviar una señal manualmente.
- On the main unit, press and hold the "CHANNEL" button to initiate a manual search for the sensor.
3. Configuración inicial (hora, fecha, unidades)
The weather station will attempt to synchronize with the DCF radio signal for automatic time setting. This may take several hours, especially in areas with weak signals. You can manually set the time and date if needed.
- Configuración manual de la hora: Press and hold the "MODE" button to enter time setting mode. Use the "UP" and "DOWN" buttons to adjust values and "MODE" to confirm and move to the next setting (e.g., 12/24 hour format, hour, minute, year, month, day, language for day of week).
- Unidades de temperatura: Presione el botón "°C/°F" para cambiar entre Celsius y Fahrenheit.
- Air Pressure Units: Press the "BARO" button to cycle through air pressure units (e.g., hPa, inHg).
Instrucciones de funcionamiento
Información de la pantalla
The 4.3-inch LCD screen displays various information:
- Hora y fecha: Hora actual, fecha y día de la semana.
- Lecturas en interiores: Temperatura y humedad interior actual.
- Lecturas al aire libre: Current outdoor temperature and humidity from the connected sensor.
- Pronóstico del tiempo: Iconos que indican las condiciones meteorológicas previstas (por ejemplo, soleado, nublado, lluvioso).
- Presión del aire: Presión atmosférica actual y tendencia.
- Iluminar desde el fondo: The screen backlight activates with a light touch and returns to normal brightness after 10 seconds to conserve battery.
Función de despertador
The weather station features a double alarm clock with snooze.
- Configuración de alarmas: Press the "ALARM" button to view Alarm 1. Press "ALARM" again to view Alarm 2. Hold "ALARM" to enter alarm setting mode. Use "UP" and "DOWN" to adjust the hour and minute, and "ALARM" to confirm.
- Activación/desactivación de alarmas: Mientras viewing an alarm, press "UP" to toggle it on or off. An alarm icon will appear when active.
- Función de repetición: When an alarm sounds, press any button (except "ALARM OFF") to activate snooze. The alarm will sound again after a set interval. Press "ALARM OFF" to stop the alarm completely.
Registros Máximos y Mínimos
The weather station records the maximum and minimum indoor/outdoor temperature and humidity values.
- Press the "MAX/MIN" button once to display maximum recorded values.
- Press "MAX/MIN" again to display minimum recorded values.
- Press "MAX/MIN" a third time to return to current readings.
- To clear records, hold the "MAX/MIN" button while viewing los registros.
Mantenimiento
- Reemplazo de batería: Reemplace las baterías de la unidad principal y del sensor exterior cuando aparezca el indicador de batería baja en la pantalla. Siempre reemplace todas las baterías a la vez.
- Limpieza: Limpie la pantalla y las superficies de la unidad con un paño suave.amp Paño. No utilice limpiadores abrasivos ni disolventes.
- Colocación del sensor al aire libre: For optimal performance and longevity, install the outdoor sensor in a shaded area, protected from direct sunlight and rain. Ensure it is within the 100m wireless range of the main unit.
Solución de problemas
| Problema | Posible solución |
|---|---|
| No hay visualización de temperatura/humedad exterior. |
|
| Visualización de hora incorrecta. |
|
| La pantalla está tenue o en blanco. |
|
| El pronóstico del tiempo parece inexacto. |
|
Presupuesto
- Modelo: YGH6208
- Marca: LIORQUE
- Tipo de pantalla: Pantalla LCD
- Fuente de alimentación (unidad principal): Baterías 3 x AAA (incluidas)
- Fuente de alimentación (sensor exterior): Baterías 2 x AAA (incluidas)
- Alcance inalámbrico: Hasta 100m (área abierta)
- Precisión de temperatura: ±0.5 °C
- Tecnología de sensores: Funk (Wireless)
- Características especiales: DCF Radio Clock, Alarm, Snooze, Weather Forecast, Max/Min Records, Backlight
- Componentes incluidos: Weather Station Main Unit, Outdoor Sensor
Garantía y soporte
LIORQUE products are designed for reliability and performance. For warranty information or technical support, please refer to the contact details provided with your purchase or visit the official LIORQUE webSitio web. Conserve su comprobante de compra para reclamaciones de garantía.