
1. Introducción
The Skyking WORKZONE 36TRMS Digital Clamp Meter is a portable, stable, and versatile instrument designed for accurate electrical measurements. Featuring a 6000-count LCD display, auto-ranging capabilities, and overload protection, this meter is suitable for a wide range of applications, from home electrical needs to professional use. It can measure AC/DC Voltage, AC/DC Current, Resistance, Capacitance, Frequency, Duty Cycle, Temperature, and includes Non-Contact AC Voltage (NCV) detection, diode, and continuity test functions.
2. Información de seguridad
Respete siempre las precauciones de seguridad al utilizar equipos de prueba eléctrica. De lo contrario, podría sufrir descargas eléctricas, lesiones o daños al medidor o al equipo bajo prueba.
- Asegúrese de que el medidor esté en buenas condiciones de funcionamiento antes de usarlo.
- No exceda los valores de entrada máximos para ningún rango.
- Utilice equipo de protección personal (EPP) adecuado, como gafas de seguridad y guantes aislantes.
- Disconnect power to the circuit before making resistance, capacitance, or continuity measurements.
- Be cautious when working with live circuits. Avoid contact with bare conductors.
- No utilice el medidor si parece dañado o si la tapa de la batería no está bien cerrada.
3. Contenido del paquete
Verifique que todos los artículos estén presentes en el paquete:
- WORKZONE 36TRMS Digital Clamp Metro
- Cables de prueba (rojo y negro)
- Sonda de temperatura
- AAA Batteries (Pre-installed or separate)
- Manual de usuario (este documento)

This image displays the Skyking WORKZONE 36TRMS Digital Clamp Meter along with its included test leads (red and black) and a white temperature probe. The clamp meter itself is red and black, showing the rotary dial, LCD screen, and input jacks.
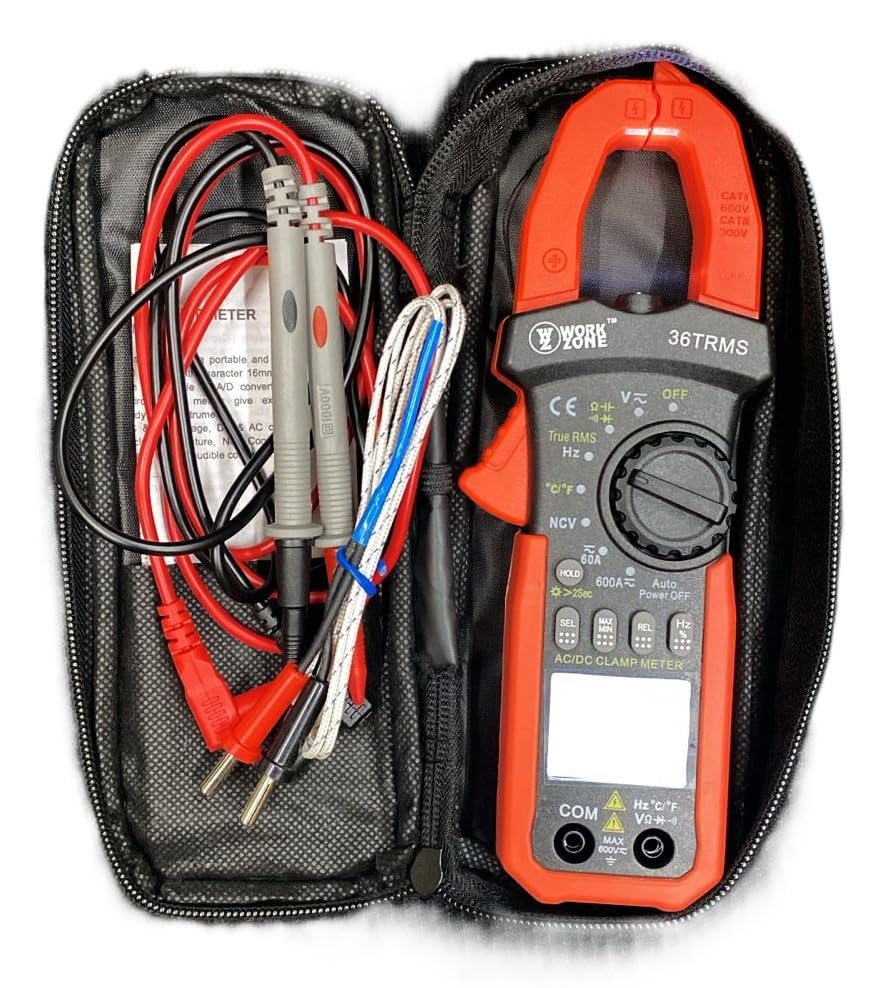
The Skyking WORKZONE 36TRMS Digital Clamp Meter, test leads, and temperature probe neatly organized within a black zippered carrying case. This illustrates how the product and its accessories are stored and transported.
4. Producto terminadoview
The WORKZONE 36TRMS Digital Clamp El medidor ofrece una gama de funciones para realizar pruebas eléctricas integrales:
- 6000 counts digit LCD monitor with 16mm character height.
- Auto-range and auto power-off function (after 15 minutes of inactivity).
- Clamp opening size: 26mm for non-invasive current measurement.
- Medidas DC Voltage (600mV~600V) and AC Voltagy (6 V ~ 600 V).
- Measures DC Current (60A~600A) and AC Current (True RMS) (60A~600A).
- Measures Resistance (600Ω~60MΩ) and Capacitance (6nF~60mF).
- Measures Frequency (9.999Hz~9.999MHz) and Duty Cycle (0.1%~99.9%).
- Temperature measurement: -20~1000°C / -4~1832°F.
- Vol. CA sin contactotage (NCV) detection for safety.
- Funciones de prueba de continuidad audible y de diodos.
- Función de retención de datos para congelar lecturas.
- Backlight for easy reading in dark environments.
- Relative measurement (REL) function for zeroing readings.

A detailed close-up of the Skyking WORKZONE 36TRMS Digital Clamp Meter. The image highlights the rotary switch with various measurement functions, the LCD display showing '0.000', function buttons (HOLD, SEL, MAX/MIN, REL, Hz), and the input jacks at the bottom.
5. Configuración
5.1 Instalación de la batería
- The meter requires 2x 1.5V 'AAA' batteries.
- Localice la tapa del compartimiento de la batería en la parte posterior del medidor.
- Open the cover, insert the batteries observing correct polarity (+ and - markings).
- Cierre bien la tapa del compartimento de la batería.
5.2 Encendido y apagado
- To power on the meter, rotate the rotary switch from the 'OFF' position to any desired measurement function.
- To power off, rotate the switch back to the 'OFF' position.
- The meter features an auto power-off function after approximately 15 minutes of inactivity to conserve battery life.
5.3 Conexión del cable de prueba
- Por voltage, resistance, capacitance, frequency, duty cycle, diode, and continuity measurements, insert the red test lead into the 'VΩHz°C' input jack.
- Inserte el cable de prueba negro en el conector de entrada “COM”.
- Asegúrese de que los cables de prueba estén completamente insertados y conectados de forma segura.
6. Instrucciones de funcionamiento
6.1 Voltaje CC / CAtagMedición electrónica
- Rotate the rotary switch to 'V~' for AC Voltage o 'V-' para DC Voltage.
- Conecte los cables de prueba en paralelo al circuito o componente bajo prueba.
- Leer el vol.tage valor en la pantalla LCD.
6.2 Medición de corriente CA/CC (Clamp Mandíbula)
- Rotate the rotary switch to '60A~' or '600A~' for AC Current, or '60A-' or '600A-' for DC Current.
- Presione la tecla clamp trigger to open the jaws and clamp alrededor de un solo conductor. Asegúrese de que el conductor esté centrado dentro de las mordazas.
- Lea el valor actual en la pantalla LCD.
6.3 Medición de resistencia
- Rotate the rotary switch to 'Ω'.
- Ensure the circuit or component is de-energized before measurement.
- Conecte los cables de prueba al componente que se va a medir.
- Lea el valor de resistencia en la pantalla LCD.
6.4 Medición de capacitancia
- Rotate the rotary switch to 'F'.
- Asegúrese de que el capacitor esté completamente descargado antes de realizar la prueba para evitar dañar el medidor.
- Conecte los cables de prueba a los terminales del capacitor.
- Lea el valor de la capacitancia en la pantalla LCD.
6.5 Medición de frecuencia/ciclo de trabajo
- Rotate the rotary switch to 'Hz'.
- Conecte los cables de prueba a la fuente de señal.
- Press the 'Hz' button to toggle between Frequency (Hz) and Duty Cycle (%) display.
6.6 Medición de temperatura
- Rotate the rotary switch to '°C/°F'.
- Connect the temperature probe to the input jacks.
- Place the probe tip on the object whose temperature is to be measured.
- Press the '°C/°F' button to switch between Celsius and Fahrenheit units.
6.7 Prueba de diodos
- Rotate the rotary switch to 'Diode/Continuity'.
- Conecte el cable de prueba rojo al ánodo y el cable de prueba negro al cátodo del diodo.
- La pantalla mostrará el volumen hacia adelante.tage drop. Reverse the leads; the display should show 'OL' for an open circuit.
6.8 Prueba de continuidad
- Rotate the rotary switch to 'Diode/Continuity'.
- Conecte los cables de prueba a través del circuito o componente.
- An audible buzzer will sound if continuity is detected (typically resistance below approximately 50Ω).
6.9 Vol CA sin contactotagDetección de e (NCV)
- Rotate the rotary switch to 'NCV'.
- Coloque el sensor NCV (ubicado en la parte superior del clamp meter) close to an AC voltagy fuente.
- El medidor emitirá un pitido audible y la luz indicadora NCV parpadeará si el voltaje de CA es bajo.tagSe detecta e.
6.10 Función de retención de datos
- Press the 'HOLD' button to freeze the current reading on the display. Press again to release the hold.
- Long press the 'HOLD' button to activate the backlight for improved visibility in low-light conditions.
6.11 Medición relativa (REL)
- In a measurement mode, press the 'REL' button to zero the current reading. Subsequent measurements will be displayed relative to this zero point.
- Press the 'REL' button again to exit relative mode.
7. Mantenimiento
7.1 Limpieza
- Limpie el medidor casing con un suave, damp paño.
- Do not use abrasive cleaners, solvents, or harsh chemicals, as these may damage the casing o pantalla.
7.2 Reemplazo de batería
- When the low battery indicator appears on the LCD, replace the batteries promptly to ensure accurate readings.
- Siga los pasos de instalación de la batería descritos en la Sección 5.1.
- Deseche las baterías usadas de acuerdo con las normas locales.
7.3 Almacenamiento
- When not in use for extended periods, store the meter in a cool, dry place.
- Evite la luz solar directa, las temperaturas extremas y la humedad alta.
- It is recommended to remove batteries if storing for a very long time to prevent leakage.
8. Solución de problemas
- Sin pantalla o pantalla tenue: Check battery installation. If the low battery indicator is on, replace the batteries.
- Lecturas incorrectas: Ensure the correct function is selected for the measurement. Verify test lead connections are secure and in the correct input jacks. For resistance or capacitance, ensure the circuit is de-energized. For current, ensure only a single conductor is clamped within the jaws.
- Pantalla "OL": This indicates an over-range condition or an open circuit. If measuring resistance, it means the resistance is too high or the circuit is open. If measuring voltage or current, the value exceeds the selected range; switch to a higher range if available.
- No hay pitido de continuidad: The resistance of the circuit or component is too high, or there is an open circuit.
9. Especificaciones
| Parámetro | Valor |
|---|---|
| Marca | Skyking |
| Número de modelo | Workzone 36 TRMS |
| Tipo de medida | Cl digitalamp Metro |
| Mostrar | 6000 counts digit LCD |
| Clamp Tamaño de apertura | 26 mm |
| Vol DCtage Rango | 600 mV ~ 600 V |
| Vol. CAtage Rango | 6V ~ 600V |
| Rango de corriente DC | 60A ~ 600A |
| AC Current Range (True RMS) | 60A ~ 600A |
| Rango de resistencia | 600Ω ~ 60MΩ |
| Rango de capacitancia | 6nF ~ 60mF |
| Rango de frecuencia | 9.999 Hz ~ 9.999 MHz |
| Ciclo de trabajo | 0.1% ~ 99.9% |
| Rango de temperatura | -20 °C ~ 1000 °C / -4 °F ~ 1832 °F |
| Indicación de sobrerrango | "OL" |
| Indicación de polaridad negativa | Visualización automática de "-" |
| Indicación de batería baja | Sí |
| Apagado automático | Aproximadamente 15 minutos |
| Fuente de alimentación | 2 x 1.5V "AAA" batteries |
| Temperatura de funcionamiento | 0°C ~ 40°C (relative humidity <85%) |
| Temperatura de almacenamiento | -10°C ~ 50°C (relative humidity <85%) |
| Guaranteed Precision Temp. | 23±5°C (relative humidity <70%) |
| Dimensiones (alto x ancho x profundidad) | 207 x 75 x 37 mm |
| Peso | Aprox. 280 g (incluida la batería) |
| Clasificación de seguridad | CAT II 600 V o CAT III 300 V |
10. Garantía y soporte
For warranty information or technical support regarding your Skyking WORKZONE 36TRMS Digital Clamp Meter, please contact Skyking Instruments directly. Refer to your purchase documentation or the manufacturer's official webSitio para conocer los términos de garantía, condiciones y detalles de contacto específicos.