Introducción
Thank you for choosing the Salange 2026 Mini Projector. This portable smart projector is designed to deliver a high-quality visual experience with its 4K support, Android 14 operating system, and advanced connectivity features like WiFi 6 and Bluetooth 5.4. This manual provides essential information for safe and efficient use of your device. Please read it thoroughly before operation and retain it for future reference.
Información de seguridad
- No mire directamente a la lente del proyector cuando la lamp Está encendido.
- Asegúrese de que haya una ventilación adecuada alrededor del proyector para evitar el sobrecalentamiento.
- Utilice únicamente el adaptador de corriente suministrado con el proyector.
- Mantenga el proyector alejado del agua, la humedad y materiales inflamables.
- Evite colocar el proyector sobre superficies inestables.
- No intente desmontar ni reparar el proyector usted mismo. Contacte con personal de servicio técnico cualificado.
Configuración
1. Desempaquetado y colocación inicial
Carefully remove the projector and all accessories from the packaging. Place the projector on a stable, flat surface. For optimal viewing, position the projector perpendicular to the projection surface. The projector features a 270° rotatable design for flexible placement.
2. Conexión de alimentación
Connect the power cord to the projector's power input port and then plug it into a power outlet. The projector will typically power on automatically or can be turned on using the power button on the device or remote control.

Imagen: Trasera view of the Salange 2026 Mini Projector with power, HDMI, and USB ports.
3. Enfoque y ajuste trapezoidal
The Salange 2026 Mini Projector supports manual focus adjustment. Rotate the focus ring on the projector to achieve a sharp image. It also features automatic vertical keystone correction (±45°) to eliminate image distortion, ensuring a rectangular picture even when the projector is not perfectly aligned. For more precise adjustments, 4-point correction may be available in the settings.

Image: Automatic vertical keystone correction and manual focus adjustment.
4. Network Connection (WiFi 6)
Navigate to the settings menu on the projector. Select 'Network' or 'Wi-Fi' and choose your desired network from the list. Enter the password if prompted. The projector supports dual-band (2.4 GHz + 5 GHz) Wi-Fi 6 for stable and fast connections.
5. Emparejamiento Bluetooth
To connect Bluetooth audio devices, go to the settings menu and select 'Bluetooth'. Turn on Bluetooth and search for available devices. Select your device from the list to pair. This allows for wireless audio output to speakers or headphones.
Instrucciones de funcionamiento
1. Encendido y apagado
Press the power button on the projector or the remote control to turn the device on or off. A short press typically puts the projector into standby mode, while a long press performs a full shutdown.
2. Navegando por la interfaz de Android 14
The projector runs on Android 14.0, providing access to a wide range of applications. Use the remote control to navigate through the home screen, app drawer, and settings. The interface is similar to a smart TV, allowing for intuitive use.
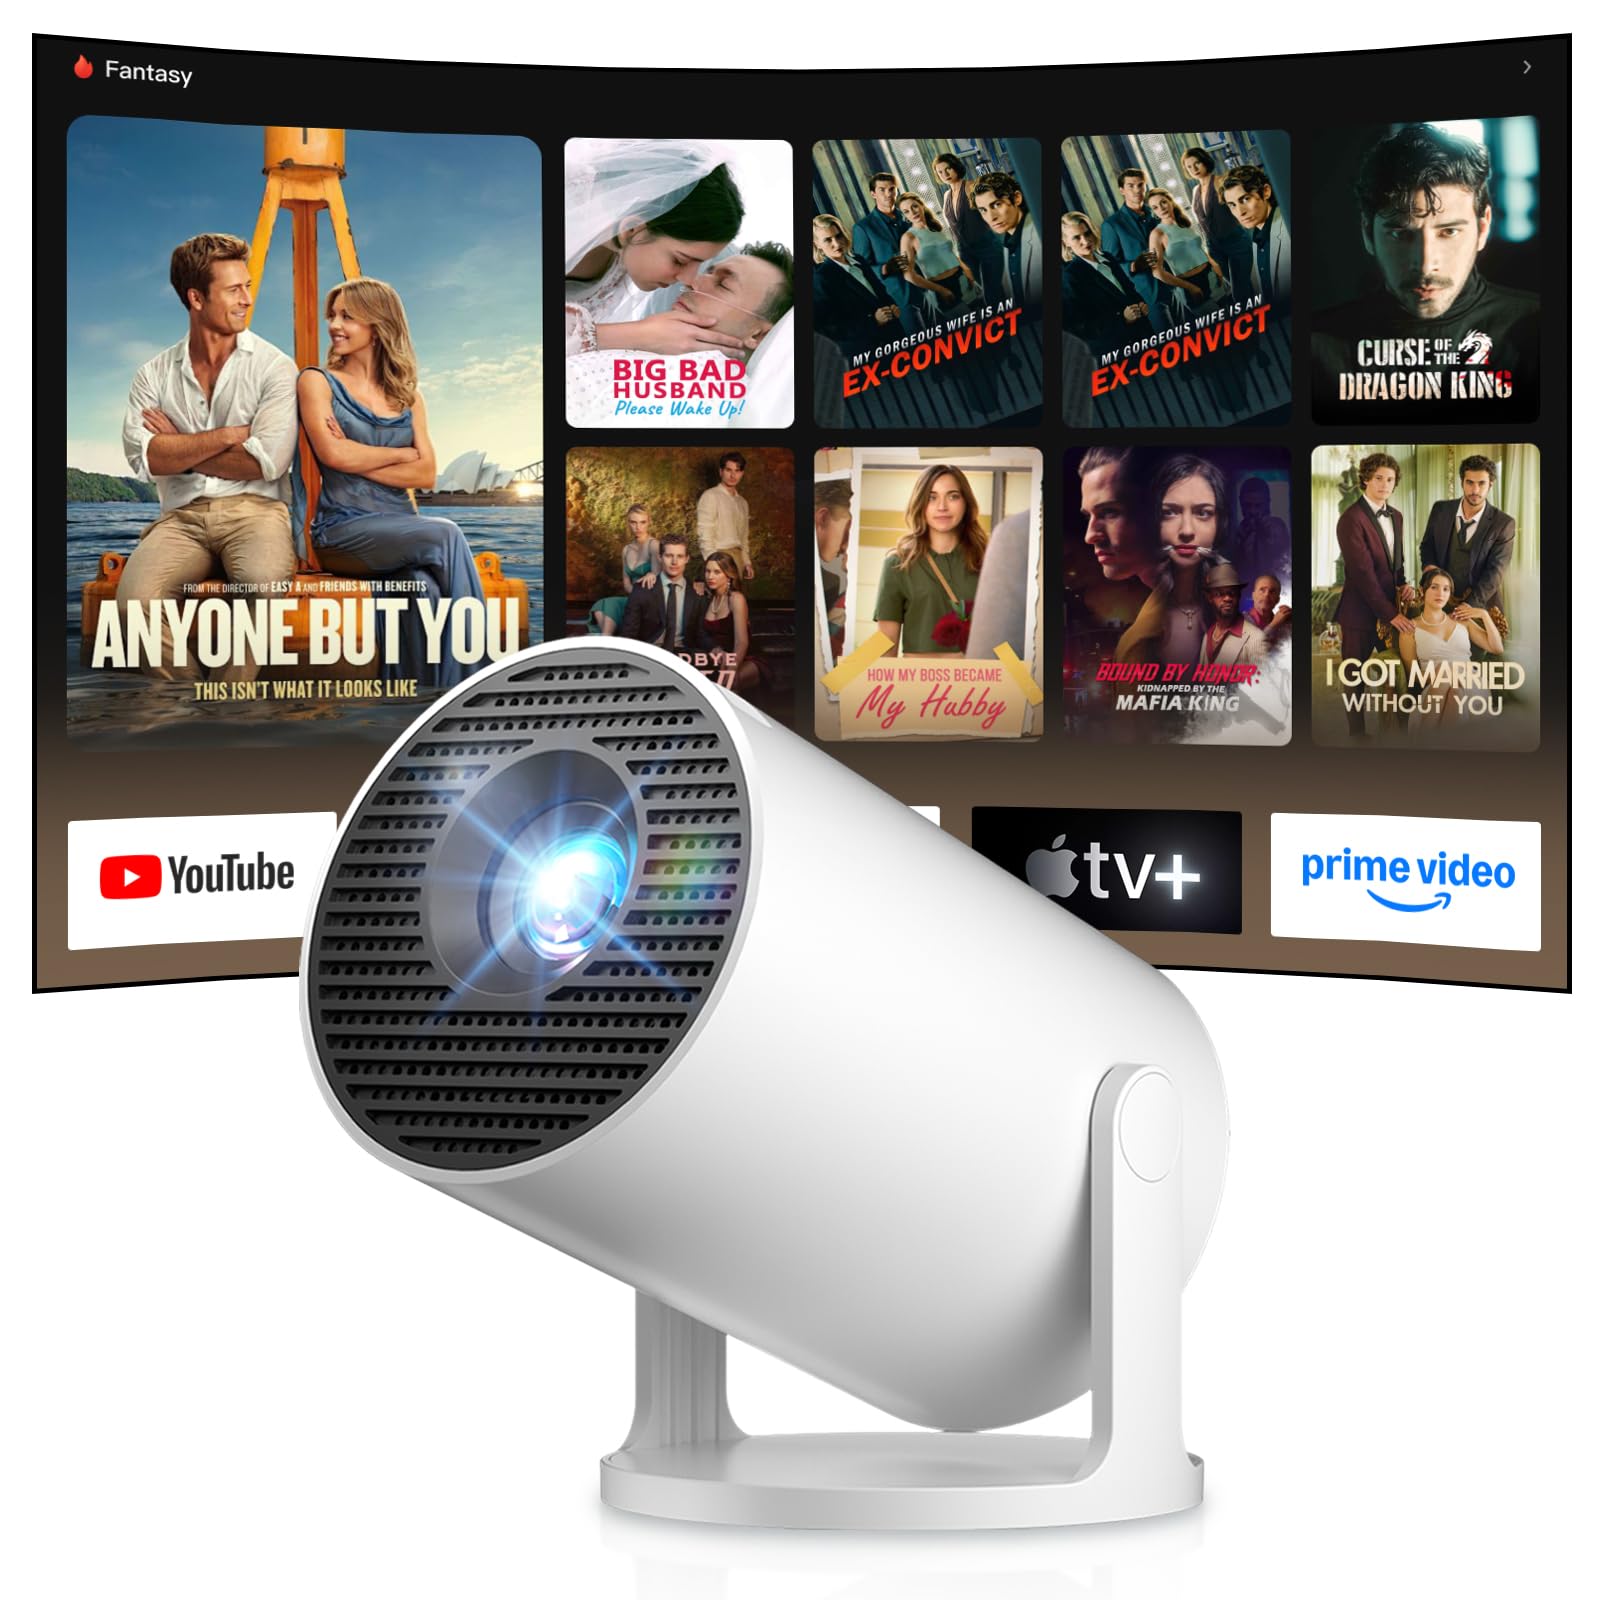
Image: Android TV 14.0 interface with streaming applications.
3. Instalación de la aplicación
With Android 14, you can install over 8,000 applications directly onto the projector. Access the app store (e.g., Google Play Store) from the home screen, search for desired apps (video players, games, office software), and install them.
4. Screen Mirroring (iOS/Android)
The projector supports screen mirroring for both iOS and Android devices. Ensure your mobile device and the projector are connected to the same Wi-Fi network. On your mobile device, activate the screen mirroring function (e.g., AirPlay for iOS, Cast for Android) and select the projector from the list of available devices.

Image: Wireless casting from mobile devices to the projector.
5. Connecting External Devices (HDMI, USB)
Use the HDMI port to connect devices such as laptops, game consoles (PS5, Switch), or TV sticks. Use the USB port to connect USB drives for media playback or other peripherals. Select the appropriate input source from the projector's input menu.
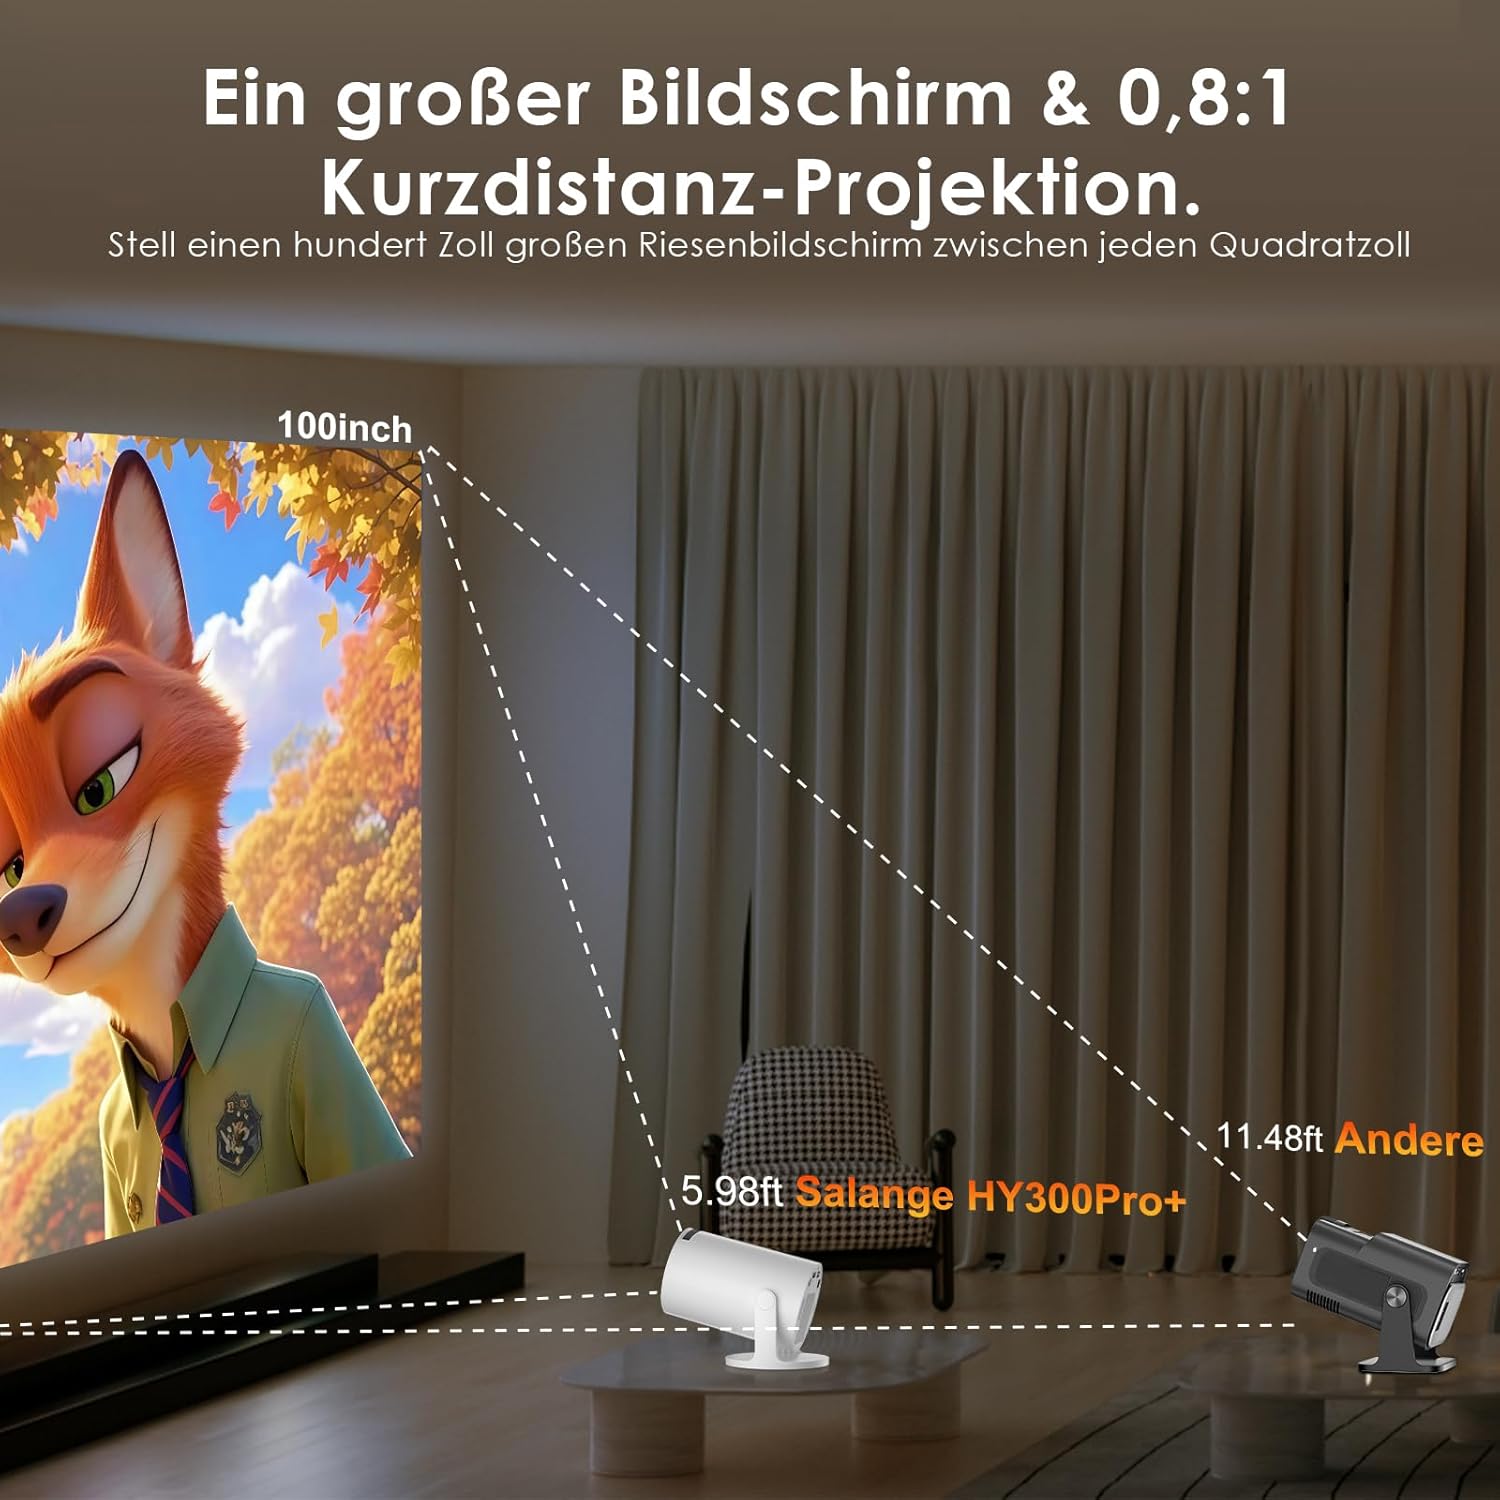
Image: Connectivity options for HDMI, Audio, and USB devices.
6 Salida de audio
The projector has built-in speakers. For enhanced audio, connect external speakers or headphones via Bluetooth or the 3.5mm audio jack.
Mantenimiento
1. Limpieza de la lente
Utilice un paño suave y sin pelusa, especialmente diseñado para lentes ópticas, para limpiar con cuidado la lente del proyector. Evite usar limpiadores abrasivos o ejercer demasiada presión, ya que pueden rayarla.
2. Limpieza del exterior
Limpie el exterior del proyector con un paño suave y seco. Para la suciedad difícil, utilice un paño ligeramente seco.amp Se puede usar un paño y luego un paño seco. No utilice productos químicos agresivos ni disolventes.
3. Almacenamiento
Cuando no lo utilice durante un período prolongado, guarde el proyector en un lugar fresco, seco y sin polvo. Utilice el embalaje original o una funda protectora para evitar daños.
Solución de problemas
- Sin energía: Asegúrese de que el cable de alimentación esté bien conectado tanto al proyector como a la toma de corriente. Pruebe con otra toma.
- Sin imágen: Check if the projector is powered on. Verify the input source is correctly selected (e.g., HDMI 1, USB). Ensure the lens cap is removed.
- Imagen borrosa: Adjust the manual focus ring until the image is sharp. Check if the projector is too close or too far from the screen.
- Image Distortion (Trapezoid): The projector has automatic keystone correction. If manual adjustment is needed, check the display settings for keystone correction options.
- Sin sonido: Check the volume level on both the projector and the connected source device. Ensure external audio devices are correctly connected and selected as the output.
- Problemas de conexión Wi-Fi/Bluetooth: Ensure the projector is within range of your router or Bluetooth device. Restart the projector and your network devices. Re-pair Bluetooth devices.
- El control remoto no responde: Revise las pilas del control remoto. Asegúrese de que no haya obstrucciones entre el control remoto y el receptor de infrarrojos del proyector.
Especificaciones del producto
| Característica | Especificación |
|---|---|
| Fabricante | Salange |
| ASIN | B0G43FF84L |
| País natal | Porcelana |
| Usos recomendados | Negocios, Cine en casa, Juegos, Educación |
| Características especiales | Wi-Fi Compatible, Digital Keystone Correction, Lightweight, Portable |
| Tecnología de conectividad | Bluetooth, HDMI, USB, Wi-Fi |
| Resolución de pantalla nativa | 1280 x 720 píxeles |
| Resolución máxima de pantalla | 3840 x 2160 pixels (4K supported) |
| Tipo de pantalla | Pantalla LCD |
| Dimensiones del producto (L x An x Al) | 10.1 x 10.1 x 17 cm |
| Factor de forma | Portátil |
| Tipo de montaje | Montaje de mesa |
| Brillo | 8000 lúmenes |
| Color | Blanco |
| Dispositivos compatibles | Game Console, Speaker, Laptop, Smartphone, Television |
| Relación de contraste | 1500:1 |
| Tamaño máximo de imagen | 150 pulgadas |
| Tamaño mínimo de imagen | 30 pulgadas |
| Codificación de vídeo | H.265 |
| Tecnología de mejora de imagen | Alto rango dinámico (HDR) |
| Contenido de la caja | 1 Projector, 1 Power Cord, 1 Remote Control, 1 User Manual |
Información de garantía
The Salange 2026 Mini Projector comes with a standard manufacturer's warranty. Please refer to the warranty card included in your product packaging for specific terms, conditions, and duration. Keep your proof of purchase for warranty claims.
Atención al cliente
For technical assistance, troubleshooting, or any questions regarding your Salange 2026 Mini Projector, please contact Salange customer support. Contact details can typically be found on the official Salange website or in the warranty information provided with your product.