1. Introducción
This manual provides essential information for the safe and effective installation, operation, and maintenance of the 1176920 Furnace Flame Sensor Rod. This component is designed as a replacement part for specific Heil, Tempstar, Sears, and Comfort Maker furnace models. The flame sensor plays a critical role in ensuring the safe operation of your furnace by detecting the presence of a flame in the combustion chamber. If a flame is not detected when expected, the sensor signals the furnace control board to shut off the gas supply, preventing uncombusted gas from accumulating.
2. Información de seguridad
Please read and understand all safety instructions before attempting any installation or maintenance. Failure to follow these instructions may result in property damage, personal injury, or death.
- Desconectar la energía: Always disconnect electrical power to the furnace at the main service panel before installing, servicing, or cleaning the flame sensor rod.
- Suministro de gas: Ensure the gas supply to the furnace is turned off before beginning work.
- Personal calificado: Installation and servicing should ideally be performed by a qualified HVAC technician. If you are not comfortable performing this task, consult a professional.
- Equipo de protección: Utilice equipo de protección personal adecuado, como guantes y protección para los ojos, durante la instalación.
- Superficies calientes: Furnace components can be hot. Allow the furnace to cool completely before handling any parts.
- Herramientas adecuadas: Use only appropriate tools for the task to avoid damage to the component or furnace.
3. Producto terminadoview
The 1176920 Flame Sensor Rod is a critical safety component in your furnace's ignition system. It is designed to detect the presence of a flame during the ignition sequence. This rod is constructed from durable materials to ensure longevity and reliable performance in high-temperature environments.
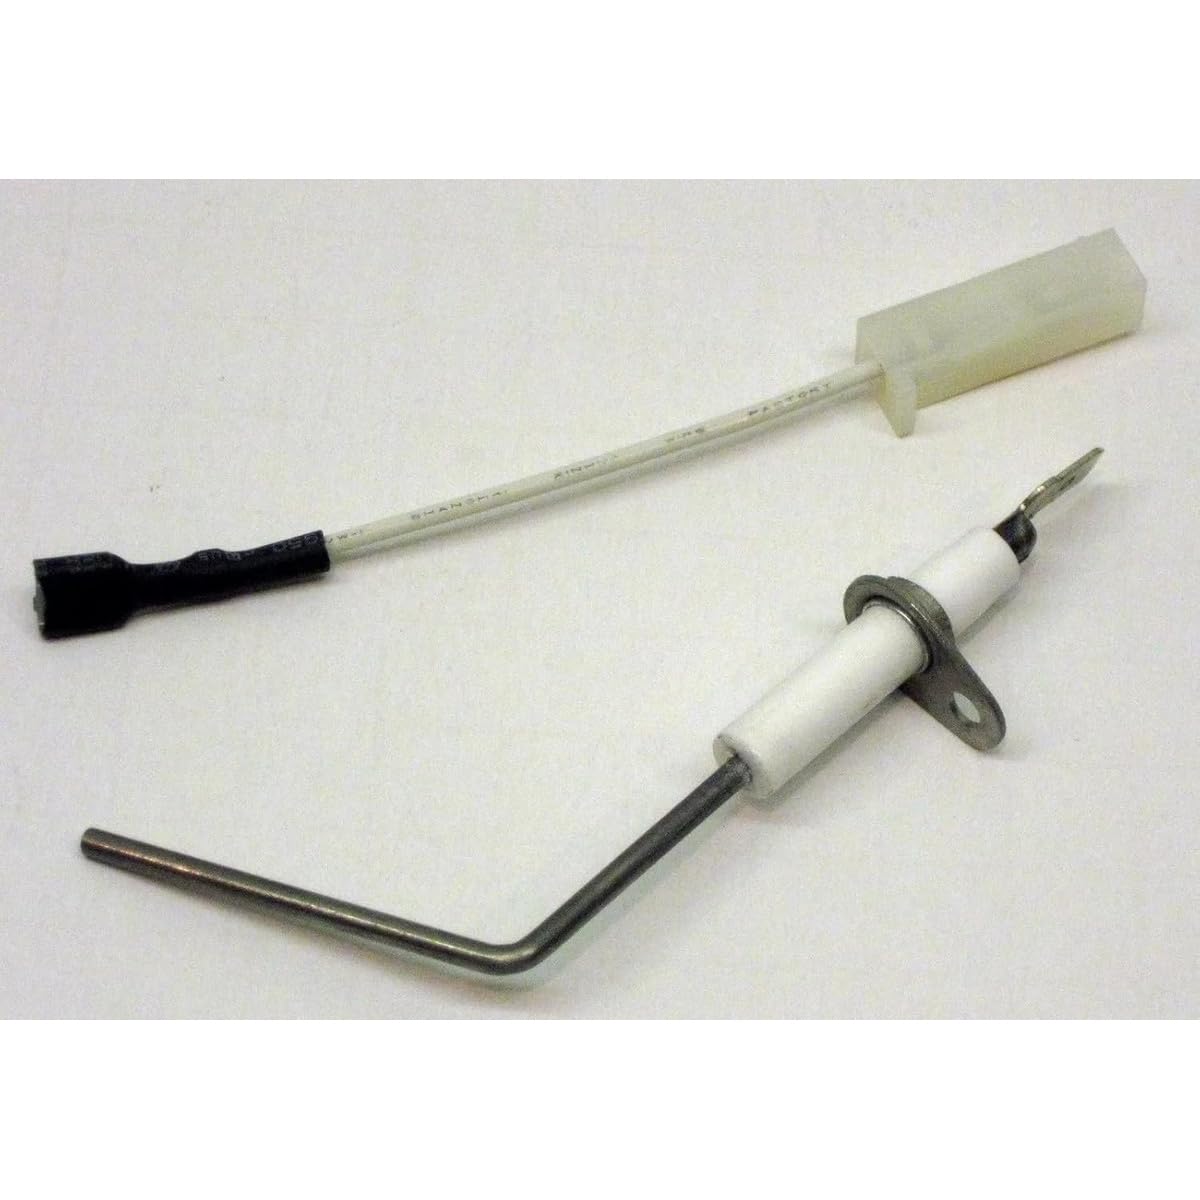
Image 1: The 1176920 Furnace Flame Sensor Rod. This image displays the metallic rod with its ceramic insulator and electrical connector, ready for installation.
4. Compatibilidad
This flame sensor rod (part number 1176920) is compatible with various Heil, Tempstar, Sears, and Comfort Maker furnace models. Please verify your furnace model number against the list below to ensure compatibility before installation.
Modelos compatibles: F8MTL0451412A1, F8MTL0701412A1, F8MTL0901714A1, F8MTL1102122A1, F8MTL1352422A1, F8MVL0701412A1, F8MVL0901716A1, F8MVL1102120A1, F8MVL1352422A1, F8MXL0451408A1, F8MXL0701716A1, F8MXL0902116A1, F8MXL1102120A1, F8MXL1352420A1, F8MXN0451408A1, F8MXN0701716A1, F8MXN0902116A1, F8MXN1102120A1, F8MXN1352420A1, G8MTL0451412A1, G8MTL0701412A1, G8MTL0901714A1, G8MTL1102122A1, G8MTL1352422A1, G8MVL0701412A1, G8MVL0901716A1, G8MVL1102120A1.
5. Instrucciones de instalación
Follow these steps carefully to replace the flame sensor rod. Always prioritize safety by disconnecting power and gas before starting.
- Desconecte la energía y el gas: Turn off the electrical power to the furnace at the circuit breaker or fuse box. Close the manual gas shut-off valve to the furnace.
- Acceda al compartimento del quemador: Remove the furnace access panel(s) to expose the burner assembly and flame sensor.
- Locate the Flame Sensor: The flame sensor is typically a single metallic rod with a ceramic insulator, positioned in the path of the burner flame. It will have a single wire connected to it.
- Desconecte el cable: Carefully pull the wire connector off the terminal of the old flame sensor.
- Retire el sensor antiguo: Using a wrench or nut driver, loosen and remove the screw or nut holding the flame sensor in place. Gently pull the old sensor out of its mounting bracket.
- Instalar el nuevo sensor: Insert the new 1176920 flame sensor rod into the mounting bracket. Ensure it is oriented correctly and tighten the screw or nut securely, but do not overtighten.
- Vuelva a conectar el cable: Push the wire connector firmly onto the terminal of the new flame sensor.
- Replace Access Panels: Securely reattach any furnace access panels that were removed.
- Restablecer la energía y el gas: Open the manual gas shut-off valve. Restore electrical power to the furnace at the circuit breaker or fuse box.
- Operación de prueba: Initiate a call for heat from your thermostat to test the furnace's operation. Observe the ignition sequence to ensure the burners ignite and remain lit.
6. Operación
Once installed, the flame sensor operates automatically as part of the furnace's ignition control system. When the thermostat calls for heat, the furnace initiates an ignition sequence. The igniter heats up, and then the gas valve opens to release gas to the burners. As the gas ignites, the flame sensor detects the presence of the flame. This detection sends a signal to the furnace's control board, confirming successful ignition and allowing the gas valve to remain open. If the flame sensor does not detect a flame within a specified timeframe, the control board will shut off the gas supply and may attempt to re-ignite or enter a lockout state for safety.
7. Mantenimiento
El mantenimiento regular del sensor de llama es crucial para el funcionamiento fiable del horno. Un sensor de llama sucio es una causa común de fallos en el horno.
- Inspección anual: It is recommended to inspect and clean the flame sensor annually, preferably before the heating season begins.
- Procedimiento de limpieza:
- Disconnect power and gas to the furnace.
- Remove the flame sensor as described in the installation section.
- Gently clean the metallic rod using fine-grit sandpaper (e.g., 180-grit or finer) or a Scotch-Brite pad. Do not use steel wool, as it can leave conductive residue.
- Wipe the rod clean with a dry cloth to remove any residue.
- Reinstall the sensor and restore power and gas.
- Reemplazo: If the flame sensor appears corroded, cracked, or damaged, or if cleaning does not resolve ignition issues, it should be replaced.
8. Solución de problemas
If your furnace is experiencing issues related to ignition or flame sensing, consult the table below for common problems and potential solutions.
| Problema | Posible causa | Solución |
|---|---|---|
| Furnace ignites, but burners shut off shortly after. | Dirty or faulty flame sensor. | Clean the flame sensor. If problem persists, replace the sensor. |
| Furnace attempts to ignite multiple times and then locks out. | Flame sensor not detecting flame, or weak flame. | Inspect and clean/replace flame sensor. Check for proper gas pressure and burner cleanliness. |
| No ignition, but igniter glows. | Gas valve issue, or flame sensor not signaling. | Verify gas supply. Check flame sensor and its wiring. Consult a professional for gas valve inspection. |
| Error code related to flame proving. | Faulty flame sensor or control board. | Refer to your furnace's specific error code manual. Clean or replace flame sensor. If issue persists, a control board inspection by a professional may be needed. |
Si los pasos de solución de problemas no resuelven el problema, se recomienda contactar a un técnico de HVAC calificado para obtener más diagnóstico y reparación.
9. Especificaciones
- Número de pieza: 1176920
- Número de modelo: KAYKAYWE3012.394
- Peso del artículo: Aproximadamente 1 libra
- Dimensiones del producto: Aproximadamente 1 x 1 x 1 pulgadas (dimensiones de embalaje/envío)
- Fuente de energía: AC (Alternating Current) - operates within the furnace's electrical system.
- Fabricante: KAYKAYWE68
- Material: Durable high-quality materials, including a metallic rod and ceramic insulator.
10. Información de garantía
This product is covered by the manufacturer's standard warranty against defects in materials and workmanship. The specific terms and duration of the warranty may vary. Please retain your proof of purchase for warranty claims. For detailed warranty information, refer to the documentation provided with your purchase or contact the seller directly.
11. Atención al cliente
For technical assistance, questions regarding compatibility, or support with installation and troubleshooting, please contact the seller or the manufacturer. When contacting support, please have your product model number (KAYKAYWE3012.394) and furnace model information readily available.


