1. Introducción
Thank you for choosing the Hikity Android 15 Car Stereo. This manual provides detailed instructions for the installation, operation, and maintenance of your new car stereo system. Please read this manual thoroughly before use to ensure proper functionality and to maximize your user experience. This unit is specifically designed for Hyundai i20 models manufactured between 2008 and 2012.
2. Información de seguridad
- Utilice siempre el dispositivo de forma responsable y conforme a las normas de tráfico locales. Conducir distraído puede provocar accidentes.
- No intente instalar ni reparar la unidad usted mismo si no está cualificado. Una instalación incorrecta puede dañar el sistema eléctrico del vehículo o la propia unidad.
- Asegúrese de que todas las conexiones del cableado sean seguras y estén adecuadamente aisladas para evitar cortocircuitos.
- Mantenga la unidad alejada del agua y la humedad excesiva.
- Evite exponer la unidad a temperaturas extremas.
3. Contenido del paquete
Verifique que todos los artículos enumerados a continuación estén incluidos en su paquete:

Image: Components included in the Hikity car stereo package, such as power cable, installation tool, RCA cable, rear camera input cable, accessories, USB cable, GPS antenna, microphone, and AHD rear camera.
- Unidad estéreo para automóvil
- Cable de alimentación
- Herramienta de instalación
- Cable RCA
- Cable de entrada de cámara trasera
- Accessories (various mounting brackets/screws)
- USB Cable (Dual USB)
- Antena GPS
- Micrófono
- Cámara trasera AHD
4. Producto terminadoview
The Hikity Android 15 Car Stereo features a 9-inch In-Cell touchscreen display and is powered by a quad-core processor with 4GB RAM and 64GB ROM, ensuring smooth operation and multitasking capabilities. It supports 1080P video decoding for clear media playback.

Image: Internal components showing the Cortex-A35 CPU, Mali G31 GPU, 4GB RAM, and 64GB ROM, highlighting the system's processing power.
The In-Cell touchscreen technology provides a thinner, lighter display with over 95% transparency and a faster touch response. The 1280x720 resolution offers a clear and bright visual experience.

Image: Visual representation of the In-Cell touchscreen, emphasizing its clarity, sensitivity, and light transmittance for outdoor visibility.
5. Instalación
This car stereo is designed for direct fitment in Hyundai i20 models from 2008 to 2012. Before proceeding with installation, ensure your vehicle's dashboard configuration matches the compatible design. Professional installation is recommended.

Image: A visual guide demonstrating the correct fitment of the Hikity car stereo into a Hyundai i20 dashboard (A:Fit) and an incompatible dashboard (B:Not Fit), highlighting the importance of checking dashboard configuration.
Pasos de instalación (guía general):
- Desconecte la batería del vehículo para evitar cortocircuitos eléctricos.
- Retire con cuidado el estéreo del automóvil existente y la moldura del tablero.
- Connect the provided wiring harness to the vehicle's wiring. Ensure all connections are secure.
- Connect the GPS antenna, USB cables, microphone, and rear camera input cable as needed.
- Mount the new Hikity car stereo into the dashboard opening.
- Vuelva a instalar la moldura del tablero.
- Vuelva a conectar la batería del vehículo y pruebe la unidad.
6. Configuración
Encendido inicial:
After installation, turn on your vehicle's ignition. The car stereo should power on automatically. Follow the on-screen prompts for initial setup.
Ajustes básicos:
- Idioma: Navigate to Settings > System > Languages & input to select your preferred language.
- Fecha y hora: Establezca la fecha y hora correctas o habilite la sincronización automática mediante GPS/red.
- Conexión Wi-Fi: Go to Settings > Network & internet > Wi-Fi to connect to a Wi-Fi hotspot for internet access and updates.
7. Instrucciones de funcionamiento
7.1 CarPlay y Android Auto inalámbricos
The unit supports wireless CarPlay for iOS devices and wireless Android Auto for Android devices. This allows for seamless integration of your smartphone's navigation, music, and communication features.

Image: Displays of Wireless CarPlay and Android Auto interfaces, showing common applications like Maps, Spotify, and WhatsApp, indicating wireless connectivity via Bluetooth.
Pasos de conexión:
- Asegúrese de que Bluetooth esté habilitado en su teléfono inteligente y en el estéreo del automóvil.
- En el estéreo del automóvil, vaya a la aplicación CarPlay/Android Auto.
- Buscar el nombre Bluetooth del estéreo de su automóvil en su teléfono y emparéjelo.
- Confirme el código de emparejamiento en ambos dispositivos.
- Una vez conectado, CarPlay o Android Auto se iniciarán automáticamente.
7.2 Navegación GPS y WiFi
The system includes integrated GPS for navigation, supporting both online and offline maps. Real-time traffic information is available when connected to the internet.

Image: The car stereo screen displaying a YouTube video, indicating 5G WiFi connectivity, alongside examples of online and offline GPS navigation maps.
Usando la navegación:
- Toque el ícono “Navegación” en la pantalla de inicio.
- Enter your destination. The system will provide voice-guided directions.
- For online maps and real-time traffic, ensure the unit is connected to a Wi-Fi hotspot (e.g., from your smartphone).
7.3 Reproducción multimedia
Reproducir audio y vídeo files from USB drives or streaming services when connected to the internet.
7.4 Pantalla dividida e imagen en imagen
The unit supports split-screen functionality, allowing two applications to run simultaneously, and Picture-in-Picture mode for continuous video playback while using other functions.
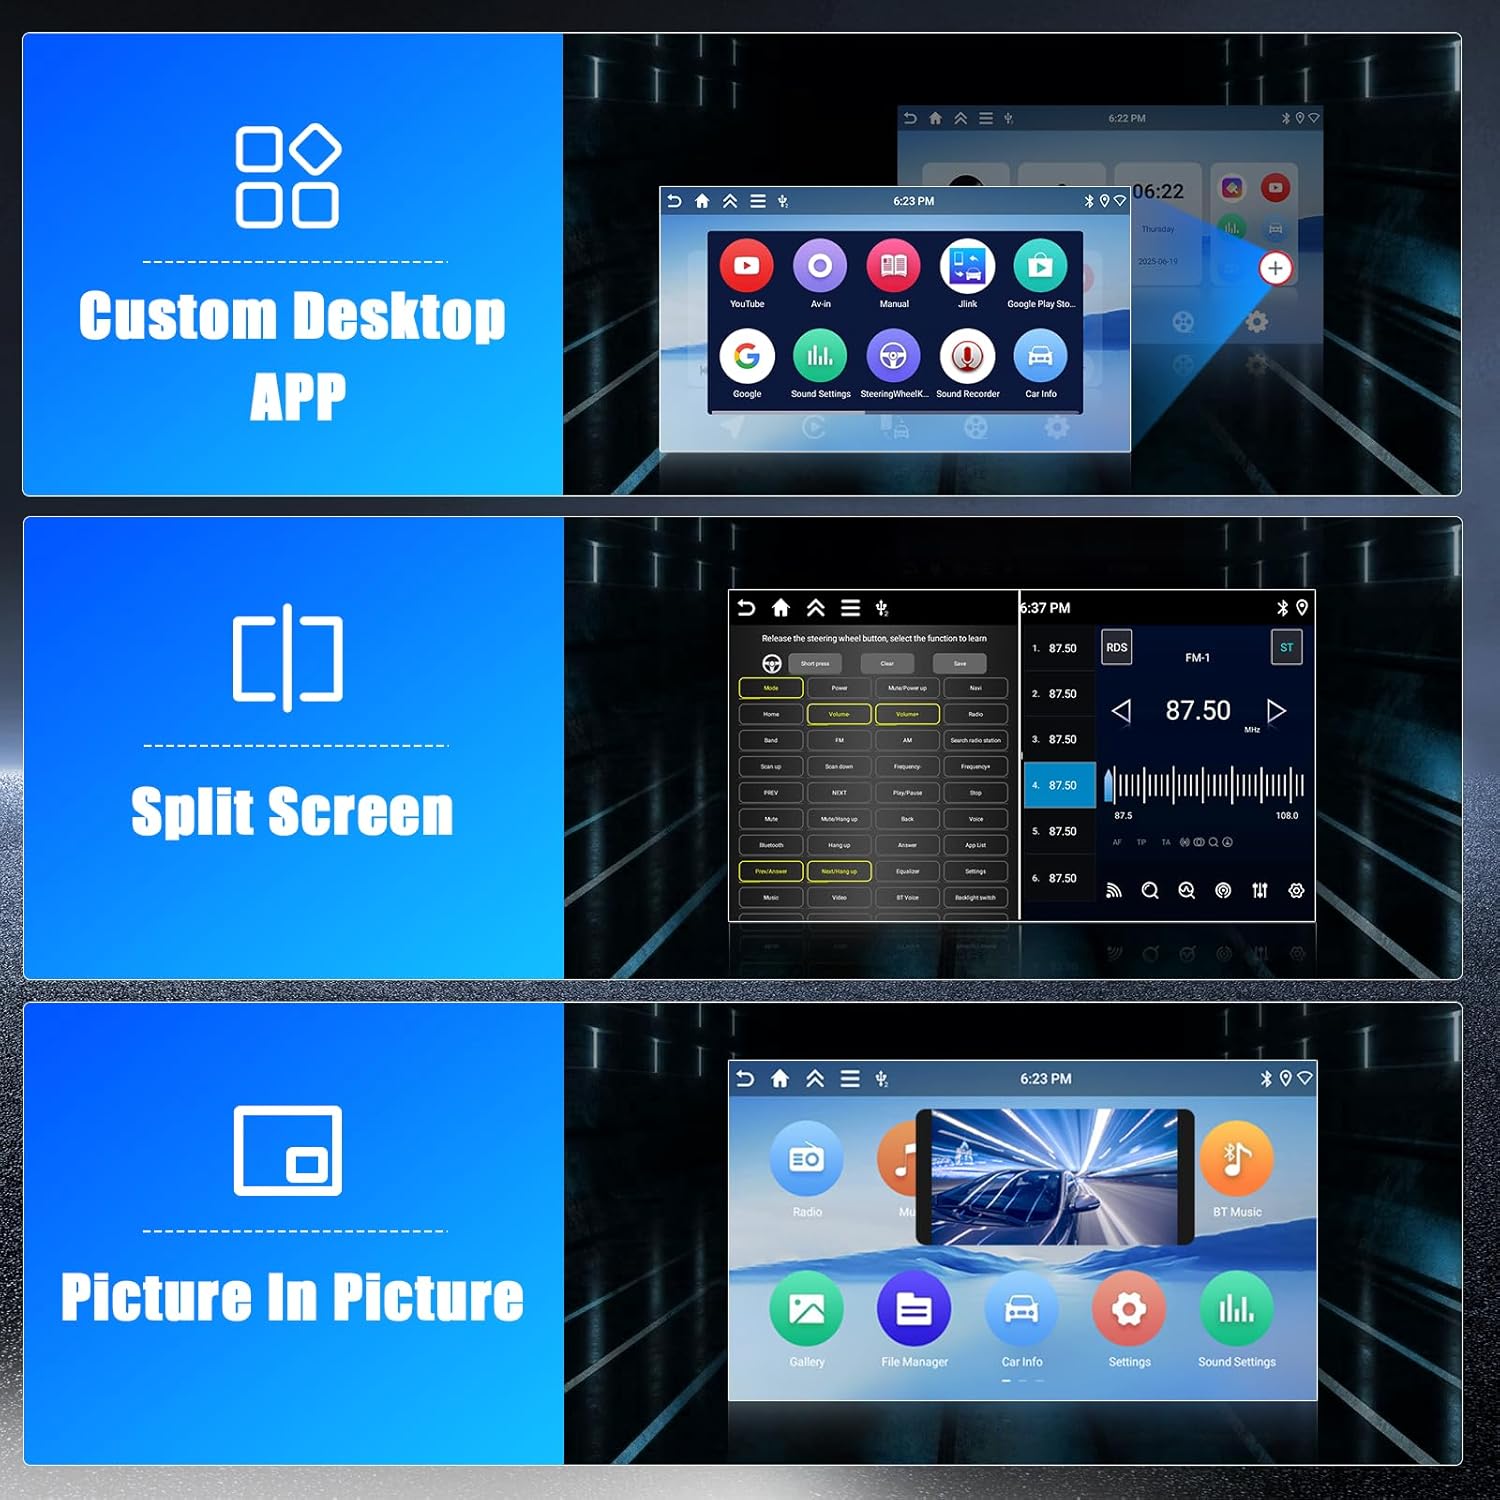
Imagen: Examples of the Custom Desktop APP interface, a split-screen view showing two applications side-by-side, and a Picture-in-Picture display with a video overlay.
Usando pantalla dividida:
- Abra la primera aplicación.
- Press and hold the recent apps button or swipe up from the bottom (depending on Android version) to enter split-screen mode.
- Seleccione la segunda aplicación para mostrar.
7.5 Bluetooth
Conecte su teléfono inteligente a través de Bluetooth para realizar llamadas manos libres y transmisión de audio.
Emparejamiento de un dispositivo Bluetooth:
- Habilite Bluetooth en su teléfono y en el estéreo del automóvil.
- On the car stereo, go to the Bluetooth settings.
- Buscar dispositivos disponibles y selecciona tu teléfono.
- Confirme el código de emparejamiento.
7.6 cámara trasera
La cámara trasera AHD incluida proporciona una visión clara view Al dar marcha atrás, la pantalla cambia automáticamente a la señal de la cámara al poner la marcha atrás.
8. Mantenimiento
- Limpieza: Utilice un paño suave y seco para limpiar la pantalla y la unidad. Evite limpiadores abrasivos o disolventes.
- Actualizaciones de software: Verifique periódicamente si hay actualizaciones de software a través de la configuración del sistema cuando esté conectado a Wi-Fi para garantizar un rendimiento óptimo y acceso a nuevas funciones.
- Conexiones de cable: Asegúrese de que todos los cables permanezcan conectados de forma segura.
9. Solución de problemas
Problemas comunes y soluciones:
- Sin energía: Check the vehicle's fuse box and the unit's power connections. Ensure the ignition is on.
- Sin sonido: Verifique las conexiones de los altavoces. Compruebe el volumen y la configuración de silencio. Asegúrese de que la fuente de audio seleccionada sea la correcta.
- Pérdida de señal GPS: Asegúrese de que la antena GPS esté correctamente instalada y tenga una vista clara. view del cielo. Mueva el vehículo a un área abierta.
- Problemas de conexión Bluetooth/CarPlay/Android Auto: Ensure Bluetooth is enabled on both devices. Try unpairing and re-pairing the device. Restart both the phone and the car stereo.
- La pantalla táctil no responde: Intente reiniciar la unidad. Si el problema persiste, podría ser necesario restablecer la configuración de fábrica (nota: esto borrará todos los datos del usuario).
- La unidad se congela: Press the reset button (if available, usually a small pinhole) or disconnect the power for a few minutes.
Si encuentra problemas que no se tratan aquí, consulte la sección de garantía y soporte para obtener más ayuda.
10. Especificaciones
| Característica | Especificación |
|---|---|
| Número de modelo | Hikity-A7904A4291H6MI2EU26 |
| Sistema operativo | Androide 15 |
| RAM | 4 GB |
| memoria de sólo lectura | 64 GB |
| Tamaño de pantalla | 9 pulgadas |
| Tipo de pantalla | Pantalla táctil en la celda |
| Resolución de pantalla | 1280x720 |
| Procesador | Quad-Core (Cortex-A35 CPU, Mali G31 GPU) |
| Conectividad | Wireless CarPlay, Wireless Android Auto, Bluetooth, GPS, WiFi (5G), Dual USB |
| Modo de salida de audio | Estéreo |
| Potencia de salida | 45 vatios |
| Peso del artículo | 1.98 kilogramos |
| Dispositivos compatibles | Teléfono inteligente |
| Tipo de conector | RCA |
11. Garantía y soporte
Información de garantía:
Este estéreo para automóvil Hikity viene con un 2 año de garantía A partir de la fecha de compra. Conserve el comprobante de compra para reclamaciones de garantía.
Atención al cliente:
For technical assistance, troubleshooting beyond this manual, or warranty inquiries, please contact Hikity customer support through the retailer where the product was purchased or visit the official Hikity websitio para información de contacto.