1. Configuración
1.1 Contenido del paquete
Antes del montaje, verifique que todos los componentes estén presentes en el paquete:
- KTC H24F7 24 Inch 240Hz Monitor
- Base del monitor
- Soporte del monitor
- Adaptador de corriente
- Cable HDMI
- Guía de inicio rápido (QSG)
1.2 Instrucciones de montaje
Siga estos pasos para ensamblar su monitor:
- Retire con cuidado el monitor y todos los componentes del embalaje.
- Attach the monitor stand to the monitor base. Ensure it clicks securely into place.
- Connect the assembled stand and base to the back of the monitor. The stand is designed for easy snap-in installation.
- Coloque el monitor sobre una superficie plana y estable.

1.3 Instalación del soporte VESA
The KTC H24F7 monitor supports VESA 100mm x 100mm mounting for alternative stand or wall mount solutions. Ensure you use M4-0.7 x 10mm screws (not included) for secure installation.

1.4 Conexión a dispositivos
Conecte su computadora u otros dispositivos al monitor utilizando los cables adecuados.
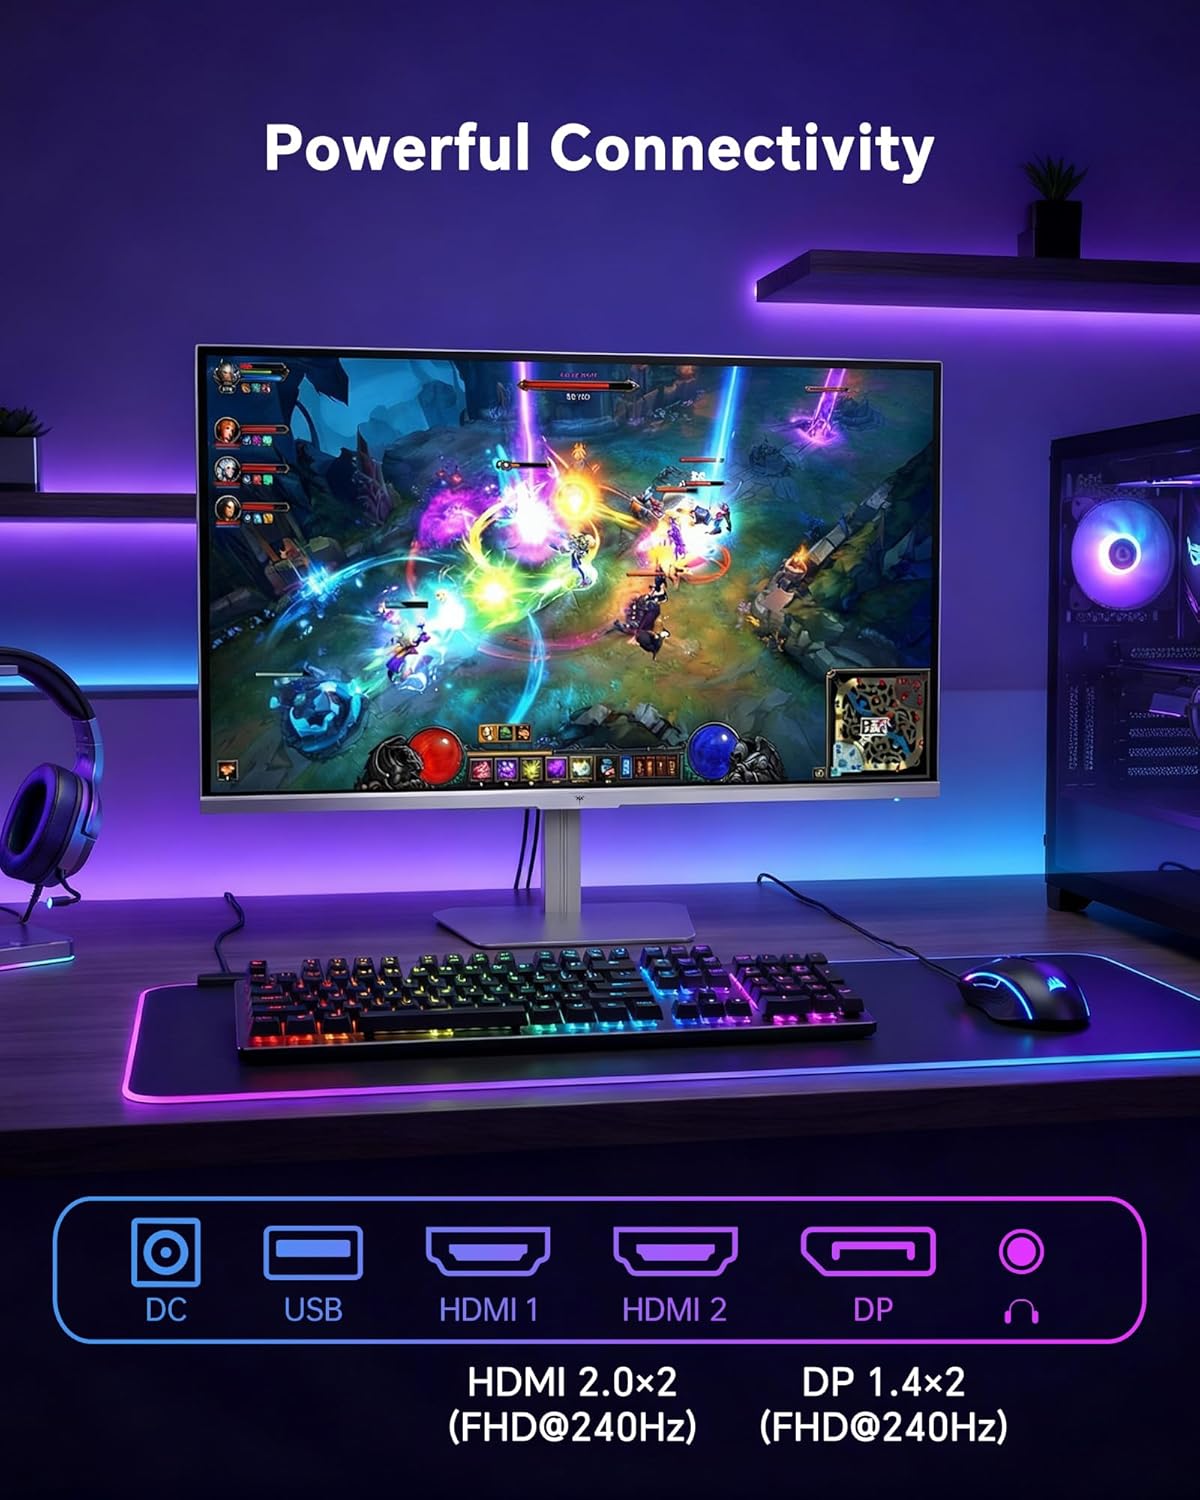
- HDMI: Use an HDMI cable to connect to devices with HDMI output. The monitor has two HDMI 2.0 ports, supporting FHD at 240Hz.
- Puerto de pantalla: Use a DisplayPort cable for devices with DisplayPort output. The monitor has one DisplayPort 1.4, supporting FHD at 240Hz.
- Fuerza: Connect the power adaptor to the DC input on the monitor and then to a power outlet.
- USB: A USB 2.0 port is available for connecting peripherals.
- Salida de audio: A 3.5mm audio jack is available for connecting headphones or external speakers.
2. Instrucciones de funcionamiento
2.1 Encendido y apagado
Presione el botón de encendido del monitor para encenderlo o apagarlo. El indicador de encendido se iluminará cuando el monitor esté activo.
2.2 Menú de visualización en pantalla (OSD)
The OSD menu allows you to adjust various monitor settings. Use the control buttons (typically located on the back or bottom of the monitor) to navigate the menu and select options. Refer to the Quick Start Guide for specific button functions.
2.3 Configuración de pantalla
Optimiza tu viewMejore su experiencia ajustando las siguientes configuraciones:
- Frecuencia de actualización: The monitor supports a 240Hz refresh rate for smooth motion. Ensure your graphics card settings are configured to utilize this rate.

- Sincronización adaptativa: This technology synchronizes the monitor's refresh rate with your graphics card's frame rate to eliminate screen tearing and stuttering. Enable Adaptive Sync in the OSD menu and ensure it is also enabled in your graphics card control panel (FreeSync/G-Sync compatible).

- HDR400: High Dynamic Range 400 provides enhanced contrast and color accuracy, delivering brighter highlights and deeper shadows. Activate HDR in the OSD menu and your operating system display settings for compatible content.

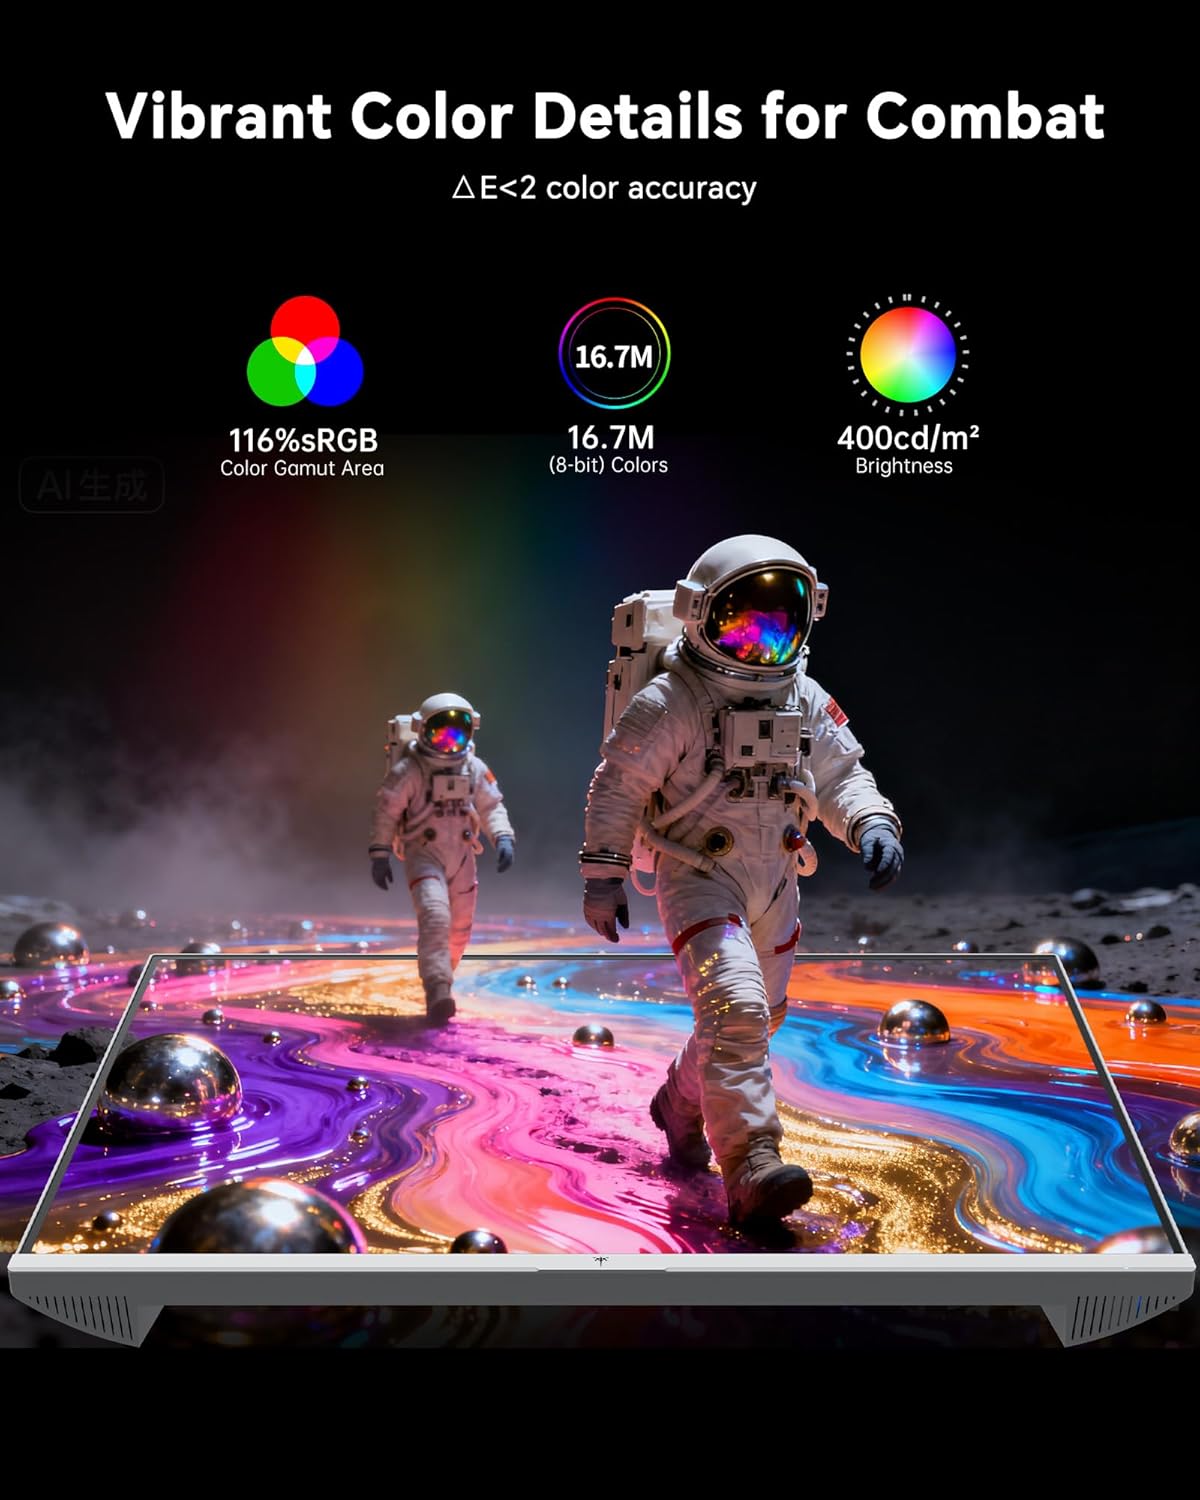
- Configuración de color: The monitor offers 116% sRGB color gamut and 16.7 million colors. Adjust brightness (up to 400 cd/m²) and color temperature through the OSD menu to suit your preference.
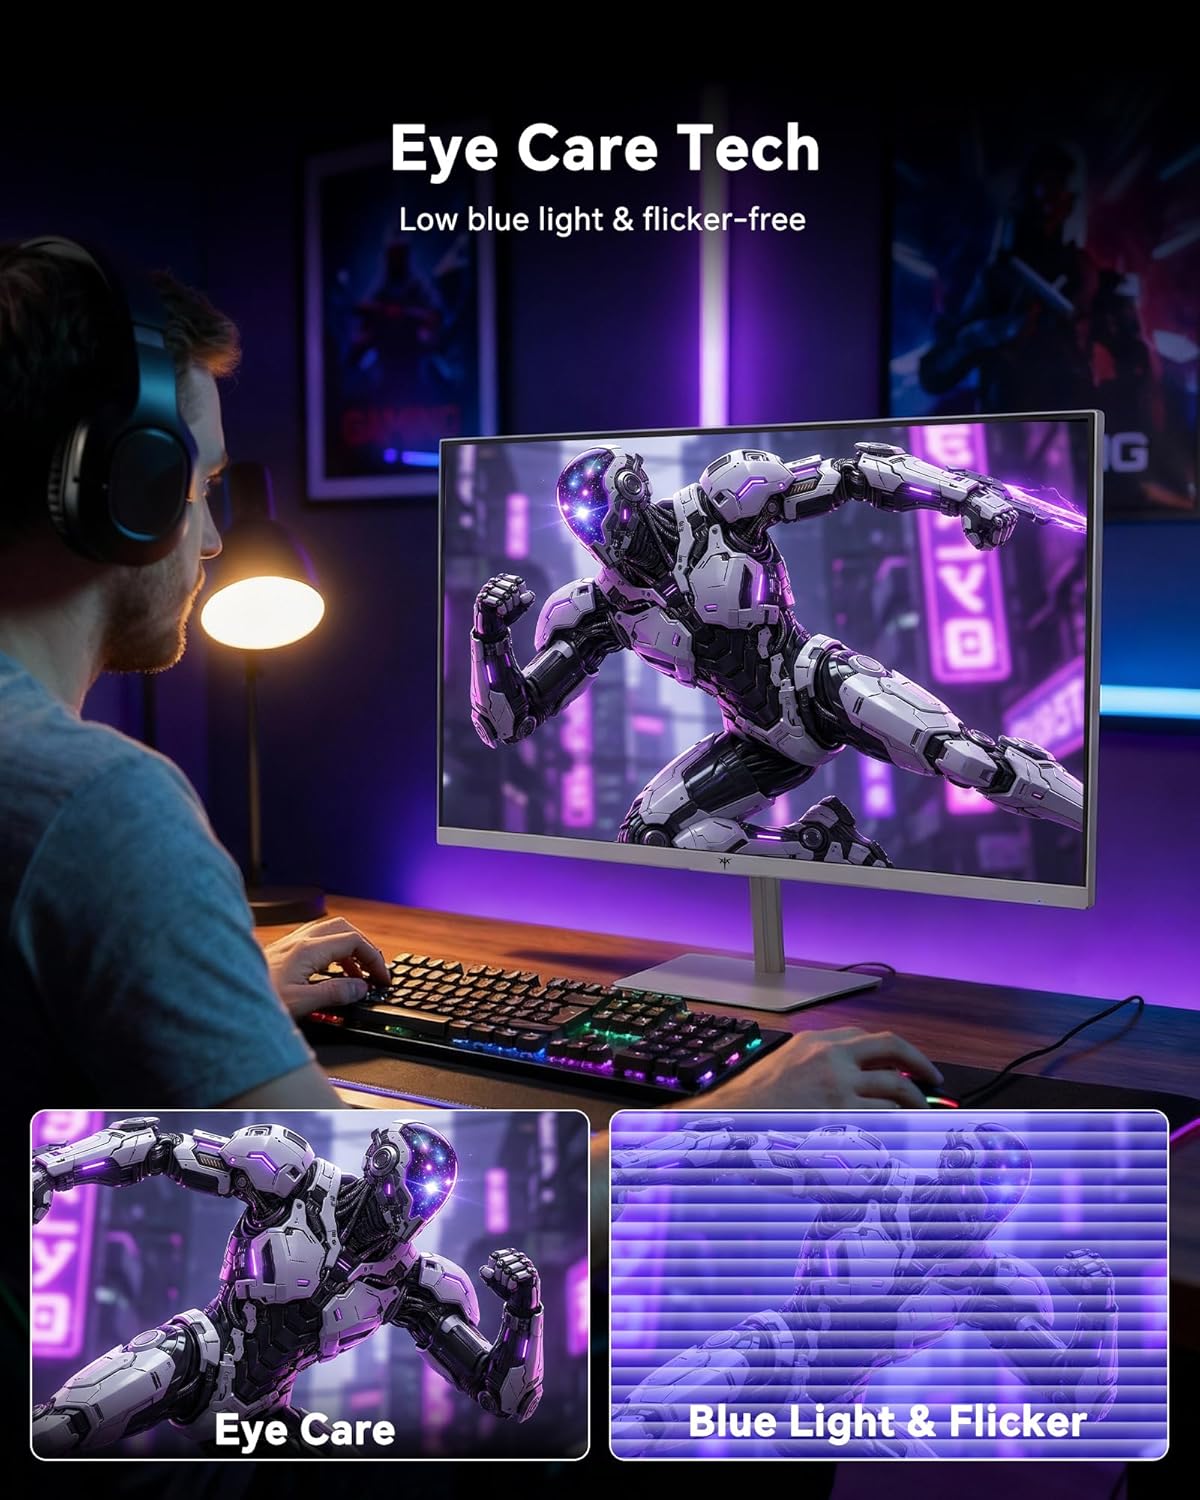
- Tecnología para el cuidado de los ojos: The monitor features low blue light and flicker-free technology to reduce eye strain during prolonged use. These settings can typically be adjusted or enabled within the OSD menu.
2.4 Monitor Tilt Adjustment
The monitor supports tilt adjustment from -5° to 15° (±3°). Gently adjust the monitor panel to your desired viewángulo de ing.
3. Mantenimiento
3.1 Limpieza del monitor
Para limpiar la pantalla del monitor y casing:
- Siempre apague el monitor y desenchufe el cable de alimentación antes de limpiarlo.
- Utilice un paño suave y sin pelusa ligeramente seco.ampLimpiar con agua o un limpiador de pantalla suave, no abrasivo.
- Limpie la pantalla con cuidado para eliminar el polvo y las manchas. Evite aplicar demasiada presión.
- para la casing, use a dry, soft cloth. Do not use alcohol, ammonia, or abrasive cleaners, as these can damage the surface.
3.2 Cuidados generales
- Evite colocar objetos pesados sobre el monitor o sus cables.
- No exponga el monitor a la luz solar directa, calor excesivo o frío extremo.
- Mantenga el monitor alejado de líquidos y humedad alta.
- Asegúrese de que haya una ventilación adecuada alrededor del monitor para evitar el sobrecalentamiento.
4. Solución de problemas
If you encounter issues with your KTC H24F7 monitor, refer to the following common problems and solutions:
| Problema | Posible causa | Solución |
|---|---|---|
| No hay imagen en la pantalla | Power cable disconnected; Video cable disconnected or loose; Incorrect input source selected; Monitor is off. | Ensure power cable is securely connected and monitor is on. Check video cable connections (HDMI/DisplayPort) at both the monitor and computer. Press the input source button on the monitor to cycle through inputs. |
| Imagen parpadeante o rasgada | Adaptive Sync not enabled; Graphics card driver issues; Faulty video cable. | Enable Adaptive Sync in the OSD menu and your graphics card control panel. Update graphics card drivers. Try a different video cable. If using DisplayPort 1, try DisplayPort 2 or HDMI if available, as some units may experience issues with specific ports. |
| Los colores aparecen incorrectos o deslavados | Color settings incorrect; HDR not properly configured; Faulty video cable. | Adjust color settings (brightness, contrast, color temperature) in the OSD menu. Ensure HDR is enabled in both the OSD and your operating system for HDR content. Try a different video cable. |
| El monitor no alcanza los 240 Hz | Graphics card limitations; Incorrect display settings in OS; Cable bandwidth limitations. | Ensure your graphics card supports 240Hz at 1080p. Verify display settings in your operating system (e.g., Windows Display Settings or NVIDIA/AMD control panel) are set to 240Hz. Use the provided HDMI cable or a certified DisplayPort 1.4 cable. |
| Stuck or dead pixels | Defecto de fabricación. | A small number of stuck or dead pixels (typically 1-3) may be considered normal for LCD panels. If the issue is severe or persistent, contact customer support. |
5. Especificaciones
| Característica | Detalle |
|---|---|
| Marca | KTC |
| Número de modelo | H24F7 |
| Tamaño de pantalla | 24 pulgadas |
| Resolución | FHD 1080p (1920 x 1080 píxeles) |
| Tipo de panel | Casi IPS |
| Frecuencia de actualización | 240 Hz |
| Tiempo de respuesta | 1 milisegundo (MPRT) |
| Relación de aspecto | 16:9 |
| Brillo | 400 candelas por metro cuadrado |
| Relación de contraste | 1000:1 |
| Gama de colores | 116 % sRGB |
| Compatibilidad con HDR | HDR400 |
| Sincronización adaptativa | FreeSync, G-Sync Compatible |
| Conectividad | 2x HDMI 2.0, 1x DisplayPort 1.4, 1x USB 2.0, 1x Audio Out (3.5mm) |
| Características del cuidado de los ojos | Low Blue Light, Flicker-Free, Anti-Glare Screen |
| Ajustes | Inclinación (-5° a 15°) |
| Montaje VESA | 100 mm x 100 mm |
| Dimensiones (D x W x H) | 5.39" de profundidad x 21.25" de ancho x 15.74" de alto |
| Peso del artículo | 3.2 kilogramos |
| Color | Blanco |
6. Garantía y soporte
6.1 Información de garantía
The KTC H24F7 monitor comes with a three-year manufacturer warrantyEsta garantía cubre defectos de materiales y mano de obra en condiciones normales de uso.
Conserve su comprobante de compra para reclamos de garantía.
6.2 Atención al cliente
For technical assistance, warranty claims, or any questions regarding your KTC H24F7 monitor, please contact KTC customer support. KTC aims to provide responsive customer support and typically responds within 12 hours.
You can usually find contact information on the official KTC website or through the retailer where you purchased the product. When contacting support, please have your monitor model number (H24F7) and purchase details ready.