
Introducción
This manual provides essential information for the safe and efficient operation of your Vissani 5,000 BTU (DOE) 115-Volt Portable Air Conditioner Unit. Please read all instructions carefully before installation and use, and retain this manual for future reference.
Información de seguridad
ADVERTENCIA: To reduce the risk of fire, electrical shock, or injury, observe the following safety precautions:
- Always use a grounded 3-prong outlet. Do not remove the grounding prong.
- No opere la unidad con un cable de alimentación o enchufe dañado.
- Asegúrese de que la unidad esté colocada sobre una superficie plana y estable para evitar que se vuelque.
- Keep at least 20 inches (50 cm) clearance from walls and other objects for proper airflow.
- No bloquee las entradas ni salidas de aire.
- Desenchufe la unidad antes de limpiarla o repararla.
- No utilizar en zonas húmedas como baños o lavaderos.
Producto terminadoview
The Vissani Portable Air Conditioner is designed to provide cooling, dehumidification, and air circulation for rooms up to 150 sq. ft.
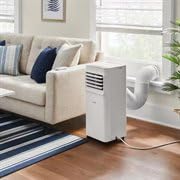
Image: The Vissani portable air conditioner unit positioned in a living room, connected to a window with its exhaust hose.
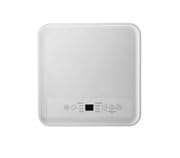
Imagen: Una vista de arriba hacia abajo view of the portable air conditioner's control panel, showing various buttons and a digital display.

Image: A graphic illustrating the 3-in-1 climate control features: Cool, Dehumidify, and Circulate, with corresponding visual representations.
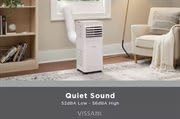
Image: A graphic highlighting the quiet sound operation of the Vissani unit, indicating sound levels of 52dBA Low and 56dBA High.
Configuración
1. Desembalaje
Carefully remove the unit from its packaging. Inspect for any shipping damage. Keep the original packaging for future storage or if servicing is required.
2. Instalación del kit de ventana
The window kit is designed to fit most standard vertical and horizontal windows. Adjust the window slider panel to the width or height of your window opening. Secure the panel in place.
3. Conexión de la manguera de escape
Attach the exhaust hose to the unit and then to the window kit adapter. Ensure a tight seal to prevent hot air from re-entering the room.

Imagen: Un primer plano view of the white exhaust hose securely connected to the window kit, venting air outside.
4. Configuración del drenaje
For continuous drainage in Dehumidifier mode, connect the drain hose (not included) to the continuous drain port at the back of the unit and direct it to a floor drain or suitable container.

Imagen: Un lado view of the portable air conditioner, highlighting the rear panel where the drain port and power cord are located.
5. Conexión de alimentación
Plug the power cord into a grounded 115-Volt, 60 Hz electrical outlet. Do not use extension cords.
Instrucciones de funcionamiento
Panel de control y control remoto
The unit can be operated using the control panel on top of the unit or the included remote control. Ensure the remote control has working batteries.
Modos de funcionamiento
- Modo frío: Press the MODE button until the COOL indicator lights up. Use the UP/DOWN arrows to set the desired temperature.
- Modo de deshumidificación: Press the MODE button until the DRY indicator lights up. The fan speed will be set to low automatically.
- Modo de ventilador: Press the MODE button until the FAN indicator lights up. Use the FAN SPEED button to select desired fan speed (Low, Medium, High).
Ajuste de temperatura
In Cool mode, the temperature can be set between 61°F (16°C) and 89°F (32°C).
Función de temporizador
To set the timer for automatic shut-off or turn-on, press the TIMER button and use the UP/DOWN arrows to select the desired hours (1-24 hours).
Mantenimiento
Limpieza del filtro de aire
The air filter should be cleaned every two weeks or more frequently depending on usage. A dirty filter reduces efficiency. To clean:
- Desconecte la unidad.
- Retire el filtro de la parte posterior de la unidad.
- Lave el filtro con agua tibia y jabón. Enjuáguelo bien.
- Permita que el filtro se seque al aire completamente antes de volver a instalarlo.
Internal Water Tank Drainage
When the internal water tank is full, the unit will stop operating and display an error code (e.g., 'FL'). To drain:
- Desconecte la unidad.
- Coloque una bandeja o recipiente poco profundo debajo del puerto de drenaje en la parte inferior trasera de la unidad.
- Retire el tapón de drenaje para permitir que salga el agua.
- Vuelva a colocar el tapón de drenaje una vez que el tanque esté vacío.
Almacenamiento
Before storing the unit for an extended period, ensure the internal water tank is completely drained. Clean the air filter and store the unit in a dry, upright position.
Solución de problemas
| Problema | Posible causa | Solución |
|---|---|---|
| La unidad no se enciende | Sin energía; el cable de alimentación no está enchufado; el disyuntor se disparó | Verifique la toma de corriente; enchufe el cable de alimentación de forma segura; reinicie el disyuntor |
| La unidad no enfría eficazmente | Dirty air filter; Room too large; Exhaust hose not properly installed; Doors/windows open | Clean air filter; Ensure room size is within specifications; Check exhaust hose connection; Close all doors and windows |
| Fuga de agua | Drain plug loose; Unit not level; Internal water tank full (in Dehumidify mode) | Tighten drain plug; Place unit on a level surface; Drain internal water tank |
| Error Code 'FL' | El tanque de agua interno está lleno | Drene el tanque de agua interno |
Presupuesto
- Número de modelo: VAP05R1AWTFR
- Capacidad de enfriamiento: 5,000 BTU (DOE)
- Volumentage: 115 voltios
- Frecuencia: 60 Hz
- Área de cobertura: Hasta 150 pies cuadrados.
- Funciones: Aire acondicionado, deshumidificador, ventilador
- Color: Blanco
- Código postal: 840296508244
Garantía y soporte
For warranty information or technical support, please refer to the warranty card included with your product or contact Vissani customer service. Keep your purchase receipt as proof of purchase.