1. Producto terminadoview
The KOHLER Clicker Drain is designed to complete your faucet installation, providing a reliable and durable drainage solution for sinks without an overflow. This pop-up drain features a brass tailpiece and a standard 1-1/4-inch connection, ensuring compatibility with many standard lavatory sinks.
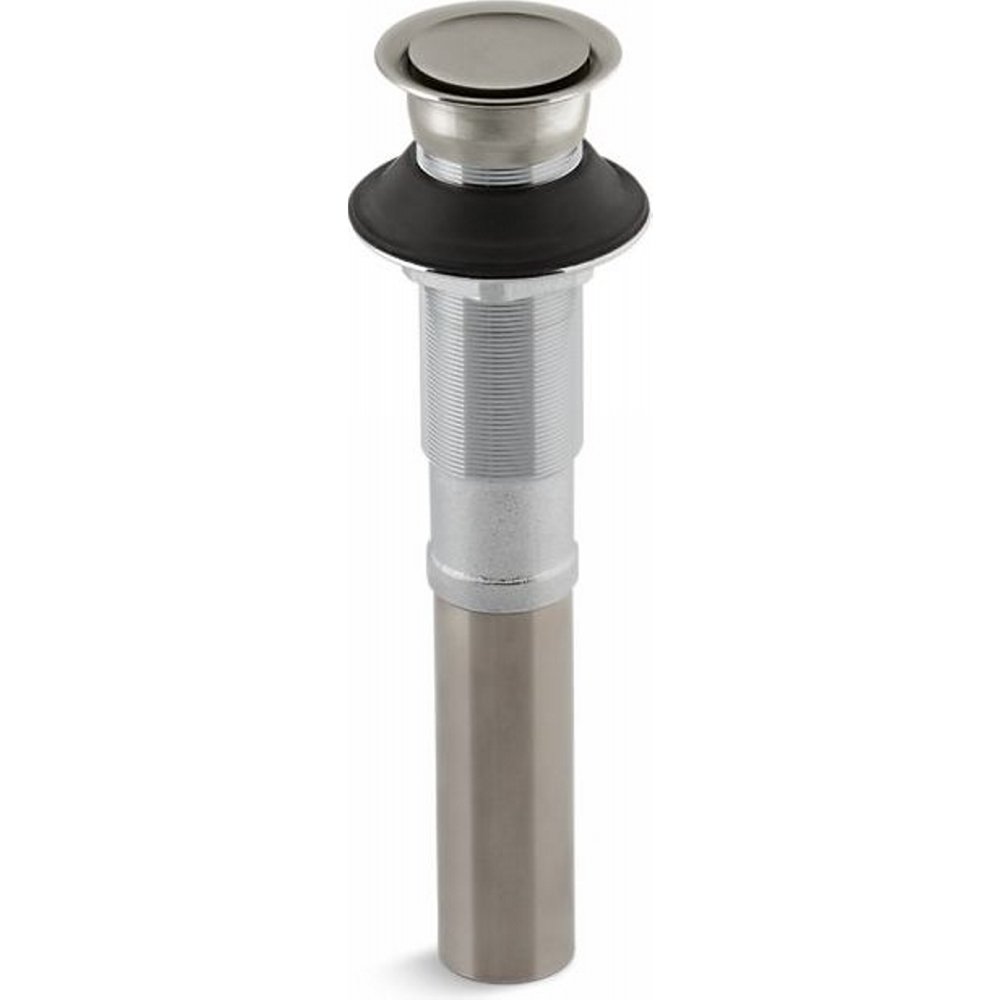
Image 1.1: Assembled KOHLER Clicker Drain without overflow. This image displays the complete drain unit, including the top clicker mechanism and the lower tailpiece, ready for installation.
Características principales:
- Construcción de latón macizo: Ensures durability and long-term reliability.
- Without Overflow: Specifically designed for sinks that do not have an overflow hole.
- 1-1/4-inch Connection: Standard size for broad compatibility with plumbing systems.
- Fluid Design Lines: Facilitates ease of cleaning and maintenance.
2. Instrucciones de instalación
Proper installation is crucial for the optimal performance of your KOHLER Clicker Drain. Follow these steps carefully.
Herramientas y materiales necesarios:
- Llave ajustable o Basin Llave inglesa
- Masilla de plomero o sellador de silicona
- Clean Cloths
- Cubo (para recoger agua)
- Gafas de seguridad

Imagen 2.1: Desmontado view of the KOHLER Clicker Drain components. This image shows the individual parts of the drain, including the top clicker cap, upper flange, gaskets, and tailpiece, which are assembled during installation.
Pasos de instalación:
- Prepare la abertura del fregadero: Ensure the sink drain opening is clean and free of old sealant or debris.
- Apply Sealant to Flange: Apply a thin bead of plumber's putty or silicone sealant around the underside of the drain flange (the top part that sits in the sink).
- Insert Drain Flange: Insert the drain flange through the sink opening from the top. Press firmly to create a seal.
- Ensamblar desde abajo: From underneath the sink, slide the rubber gasket, then the friction washer, and finally the locknut onto the drain body.
- Tighten Locknut: Hand-tighten the locknut, then use an adjustable wrench to tighten it further. Do not overtighten, as this can damage the sink or drain. Ensure the drain is centered and straight.
- Connect Tailpiece: Attach the brass tailpiece to the bottom of the drain body. Ensure all connections are secure and properly sealed.
- Connect to P-Trap: Connect the drain tailpiece to your existing P-trap assembly. Use appropriate washers and tighten connections to prevent leaks.
- Prueba de fugas: Fill the sink with water and then release it, carefully checking all connections for any signs of leakage. Tighten connections as needed.
3. Operación
The KOHLER Clicker Drain features a simple push-button mechanism for opening and closing the drain.
- Para cerrar el drenaje: Press down firmly on the top cap of the drain. The mechanism will click, and the drain will seal, allowing the sink to hold water.
- Para abrir el drenaje: Press down firmly on the top cap of the drain again. The mechanism will click, and the drain will open, allowing water to flow out.
4. Mantenimiento y cuidado
Regular cleaning and maintenance will help preserve the finish and functionality of your KOHLER Clicker Drain.
Limpieza:
- Utilice un paño suave y seco.amp cloth and mild soap to clean the visible parts of the drain.
- Evite el uso de limpiadores abrasivos, estropajos o productos químicos fuertes, ya que pueden dañar el acabado.
- For stubborn mineral deposits, use a solution of white vinegar and water, applied with a soft cloth, then rinse thoroughly.
- Periodically remove the clicker cap (it usually unscrews) to clean any hair or debris that may accumulate in the drain body.
Inspección regular:
- Periodically check under the sink for any signs of leaks around the drain connections.
- Ensure the clicker mechanism operates smoothly. If it becomes stiff, cleaning the internal components may be necessary.
5. Solución de problemas
Consulte la siguiente tabla para conocer los problemas más comunes y sus posibles soluciones.
| Asunto | Posible causa | Solución |
|---|---|---|
| Drenaje lento | Hair or debris accumulation in the drain body or P-trap. | Remove the clicker cap and clear any obstructions. Clean the P-trap if necessary. |
| Drain Leaks Under Sink | Loose connections or improperly seated gaskets. | Tighten locknut and tailpiece connections. Inspect and reseat gaskets if damaged, replace if necessary. |
| Clicker Mechanism Not Working | Debris under the clicker cap or worn mechanism. | Remove and clean the clicker cap and its housing. If the issue persists, the internal mechanism may need replacement. |
| Water Not Sealing (Drain Won't Hold Water) | Debris preventing the stopper from sealing or a faulty stopper gasket. | Clean the stopper and the drain opening thoroughly. Inspect the stopper's gasket for damage and replace if needed. |
6. Especificaciones del producto
Detailed specifications for the KOHLER Clicker Drain Without Overflow, Model 7124-BN.
| Especificación | Detalle |
|---|---|
| Número de modelo | 7124-BN |
| Material | Latón |
| Acabado exterior | Brass, Nickel (Vibrant Brushed Nickel) |
| Tamaño de la conexión de entrada | 1.25 pulgadas |
| Tipo de conexión de entrada | Con rosca |
| Tamaño de conexión de salida | 1.25 pulgadas |
| Tipo de conexión de salida | TNP |
| Dimensiones del producto (L x An x Al) | 9.75 x 4.75 x 4 pulgadas |
| Peso del artículo | 1 libra |
| Método de instalación | Lavatory Sink |
| Código Postal | 650531422910 |
7. Información de garantía
This KOHLER product is covered by a Lifetime Limited Warranty. For specific terms, conditions, and details of the warranty, please refer to the official Kohler website or contact Kohler customer service. The warranty typically covers defects in material and workmanship under normal residential use.
8. Atención al cliente
For further assistance, technical support, or to inquire about replacement parts, please contact Kohler customer service. You can find contact information, FAQs, and additional resources on the official Kohler websitio:


