1. Introducción
The Hormann Emergency Release NET 2 is an essential safety device designed for sectional garage doors equipped with an automatic opener. This system allows for manual operation of the garage door from the outside in the event of a power failure or a malfunction of the electric opener. It is particularly crucial for garages that lack an alternative entry point, ensuring continuous access to your property.
2. Contenido del paquete
Please verify that all components listed below are present in your package. Refer to the image for visual identification of each part.
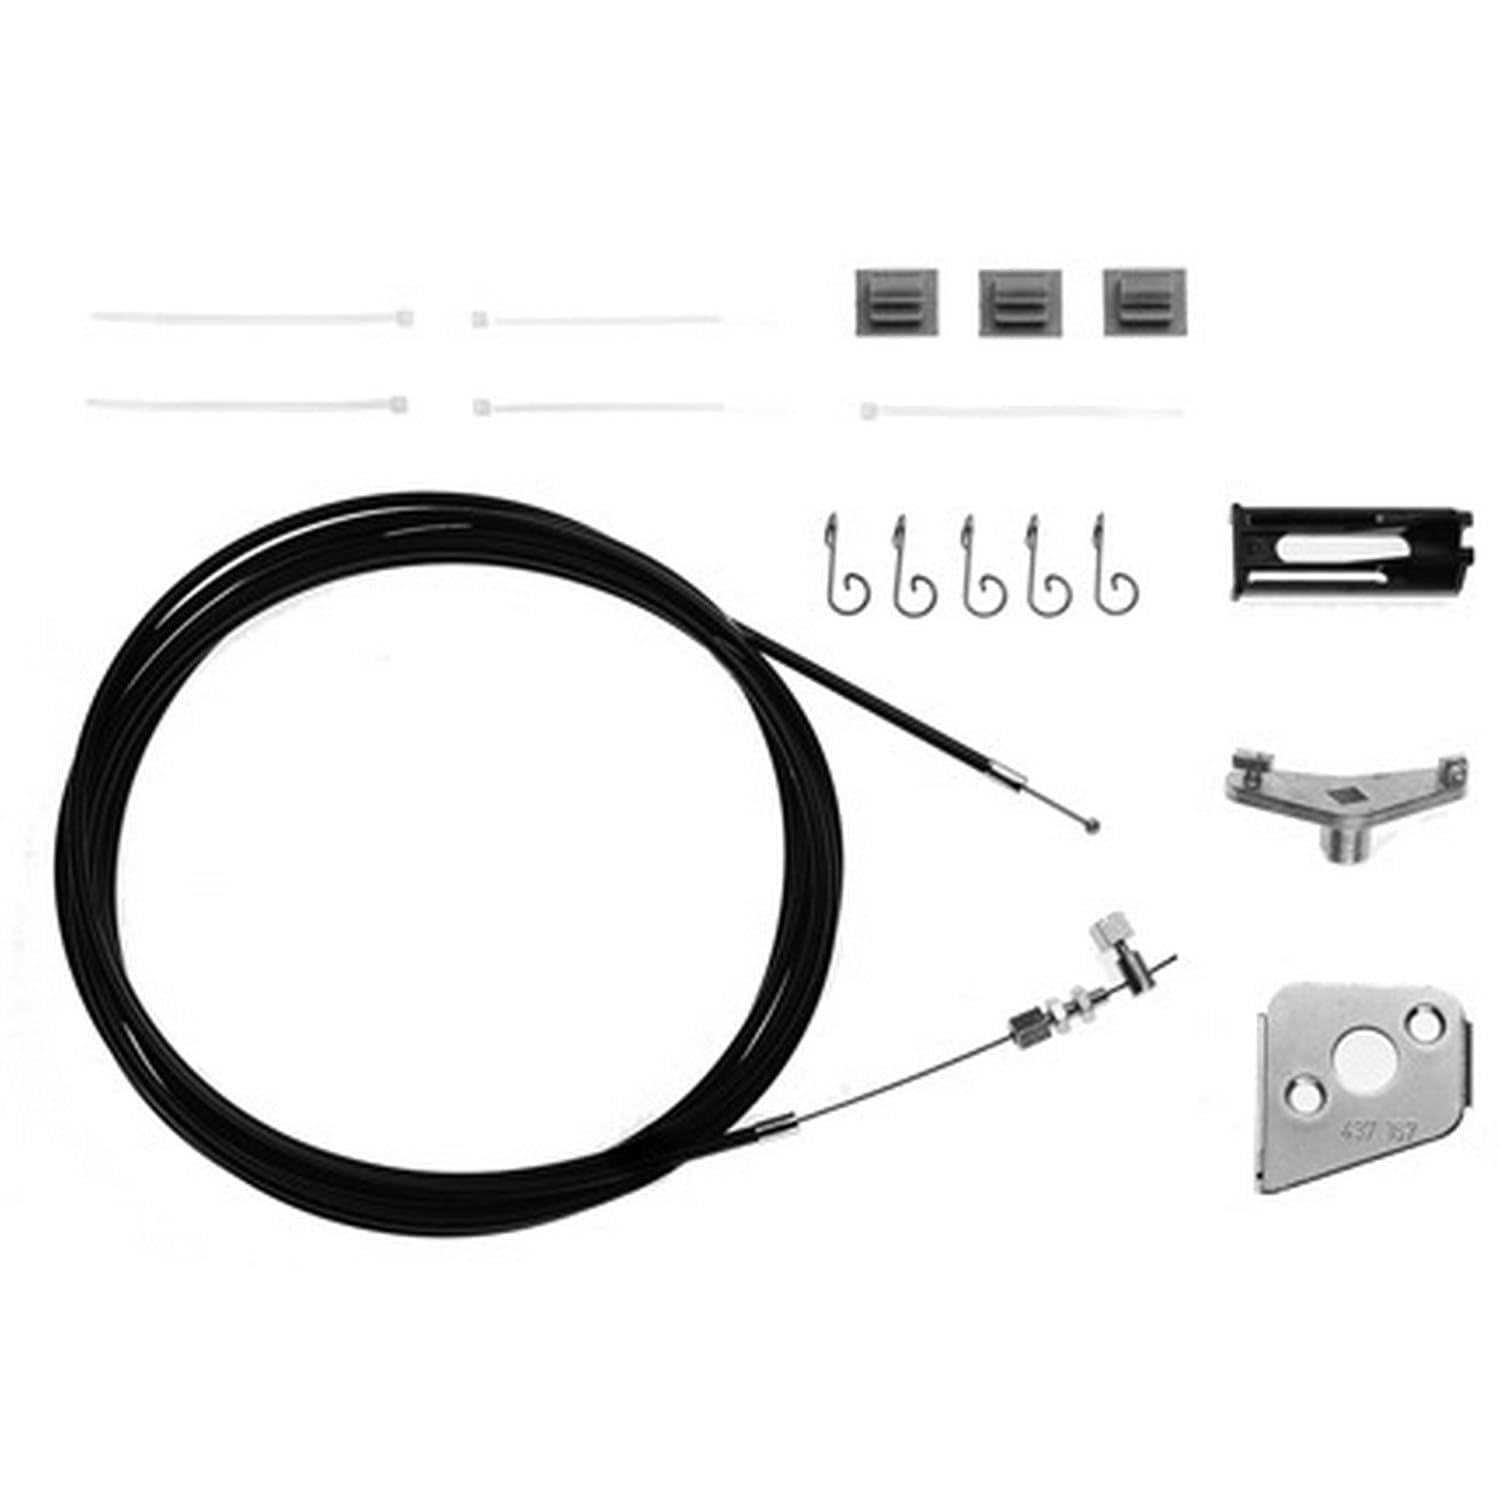
Imagen 2.1: Encimaview of the Hormann Emergency Release NET 2 components. This image displays all parts included in the kit: a long black cable assembly with an inner wire, a metal mounting bracket (part number 437 187 visible), a triangular metal adapter, several white plastic cable ties, small metal hooks, grey plastic cable guides, and a black plastic lock cylinder housing.
- Emergency Release Cable Assembly: A long, flexible black cable with an inner wire, designed to connect the external lock to the garage door opener's release mechanism.
- External Lock Cylinder Housing: A black plastic component that houses the key-operated lock cylinder (key and cylinder not always included, check product specifics).
- Soporte de montaje: A metal plate (marked 437 187) used to secure the lock cylinder housing to the garage door.
- Triangular Cable Adapter: A small metal piece used for connecting the release cable to the opener's disengagement lever.
- Bridas para cables: White plastic straps for securing the cable neatly along the garage door structure.
- Cable Guides/Clips: Grey plastic clips for routing and holding the cable in place.
- Small Hooks: Metal hooks, typically used for securing the cable or other small components.
3. Instrucciones de seguridad
- Lea siempre y comprenda todas las instrucciones antes de la instalación y el funcionamiento.
- Ensure the garage door opener is disconnected from the power supply before beginning any installation or maintenance work.
- Mantenga las manos y la ropa alejadas de las partes móviles de la puerta del garaje y del abridor.
- Do not allow children to play with or near the garage door or its controls.
- Si no está seguro de alguna parte del proceso de instalación, consulte con un técnico calificado.
- Regularly inspect the emergency release system for any signs of wear or damage.
4. Configuración e instalación
Installation of the Hormann Emergency Release NET 2 requires basic tools and adherence to these steps. It is recommended to have a second person assist during certain stages.
- Determine la ubicación de montaje: Choose a suitable location on the outside of your garage door, typically in one of the upper panels, where the lock cylinder will be accessible and discreet. Ensure there are no structural elements behind the chosen spot that would obstruct drilling.
- Drill Hole for Lock Cylinder: Carefully drill a hole of the appropriate diameter (refer to the lock cylinder housing for exact size) through the garage door panel at the chosen location. Deburr the edges of the hole.
- Install Lock Cylinder Housing: Insert the external lock cylinder housing through the drilled hole from the outside. Secure it using the provided mounting bracket and fasteners from the inside of the garage door. Ensure it is firmly attached.
- Route the Release Cable: Guide the emergency release cable from the installed lock cylinder housing towards the garage door opener's trolley or carriage. The cable should be routed along the garage door structure, avoiding any moving parts that could pinch or damage it. Use the provided cable guides/clips and cable ties to secure the cable neatly.
- Connect to Opener Release Mechanism: Locate the manual release lever on your garage door opener's trolley. This lever typically disengages the door from the opener's drive mechanism. Connect the end of the emergency release cable, possibly using the triangular cable adapter, to this lever. Ensure the connection allows for a full pull on the cable to disengage the opener.
- Ajustar la tensión del cable: Adjust the cable tension so that it is taut but does not accidentally activate the release mechanism under normal conditions. Test the mechanism by pulling the cable from the outside to ensure it disengages the opener.
- Comprobaciones finales: Verify that the garage door can be manually opened and closed after disengaging the opener. Ensure all fasteners are tight and the cable is securely routed and free from obstructions.
5. Instrucciones de funcionamiento
To use the Hormann Emergency Release NET 2 during a power outage or opener malfunction:
- Insertar clave: Insert the appropriate key into the external lock cylinder.
- Turn and Pull: Turn the key and gently pull the lock cylinder outwards. This action will pull the emergency release cable, disengaging the garage door from the automatic opener's trolley.
- Manually Open Door: Once disengaged, the garage door can be manually lifted and opened. Exercise caution as the door may be heavy.
- Re-enganchar el abridor: To re-engage the garage door with the opener after power is restored or the issue is resolved, push the lock cylinder back into its housing. Then, manually move the garage door until the trolley automatically re-engages with the door's attachment point. Alternatively, some openers require a manual re-engagement of the lever on the trolley. Consult your garage door opener's manual for specific re-engagement procedures.
6. Mantenimiento
Regular maintenance ensures the longevity and reliable operation of your emergency release system.
- Inspección anual: At least once a year, inspect the entire cable assembly for signs of fraying, kinks, or corrosion. Check the lock cylinder for smooth operation.
- Lubricación: Apply a small amount of silicone-based lubricant to the lock cylinder mechanism if it becomes stiff. Avoid oil-based lubricants that can attract dirt.
- Funcionalidad de prueba: Periodically test the emergency release mechanism to ensure it disengages the garage door opener correctly.
- Limpieza: Keep the external lock cylinder free from dirt, debris, and ice, especially in harsh weather conditions.
7. Solución de problemas
If you encounter issues with your Hormann Emergency Release NET 2, consider the following:
- Release Not Disengaging Opener:
- Check if the cable is properly connected to the opener's release lever.
- Ensure there are no obstructions preventing the cable from pulling freely.
- Verify that the cable tension is adequate to activate the release.
- Key Not Turning/Lock Stiff:
- Aplique una pequeña cantidad de polvo de grafito o lubricante de silicona en el ojo de la cerradura.
- Asegúrese de que la llave esté completamente insertada y sea la correcta para la cerradura.
- Door Difficult to Open Manually After Release:
- Verifique si hay obstrucciones físicas en el camino de la puerta.
- Inspect the garage door springs; a properly balanced door should be relatively easy to lift manually. If not, consult a garage door technician.
8. Especificaciones
| Característica | Detalle |
|---|---|
| Marca | Hormona |
| Nombre del modelo | NETO 2 |
| Número de pieza | 437183 |
| Dimensiones del producto | Approximately 10 x 10 x 10 cm (packaging/overall kit size); 100 grams |
| Material | Plastic (housing), Metal (cable, bracket, adapter) |
| Compatibilidad | Designed for Hormann sectional garage doors with automatic openers. |
| Componentes incluidos | Emergency release cable assembly, external lock cylinder housing, mounting bracket, cable adapter, cable ties, cable guides, small hooks. |
9. Información de garantía
Warranty details for the Hormann Emergency Release NET 2 are not explicitly specified in the provided product data. Please refer to the manufacturer's official website or contact your point of purchase for specific warranty terms and conditions.
10. Soporte
For further assistance, technical support, or inquiries regarding the Hormann Emergency Release NET 2, please contact Hormann customer service or visit their official website. Contact information can typically be found on the product packaging or on the manufacturer's global websitio.
You may also consult your authorized Hormann dealer or installer for professional advice and service.


