1. Introducción
The SPL 2Control is a compact and user-friendly stereo monitor controller designed to provide comprehensive control over your digital audio workstation's (DAW) monitoring functions. It ensures high-quality audio reproduction through both studio monitors and headphones, allowing you to hear every detail of your mix. Key features include a precise speaker volume potentiometer, active circuitry for sound integrity, and a unique Crossfeed control for accurate headphone monitoring that simulates a stereo speaker image.
2. Instrucciones de seguridad
- Lea estas instrucciones detenidamente antes de utilizar el dispositivo.
- Conserve este manual para futuras consultas.
- No exponga la unidad a la lluvia ni a la humedad para evitar incendios o descargas eléctricas.
- Asegúrese de que haya una ventilación adecuada; no bloquee ninguna abertura de ventilación.
- Utilice únicamente accesorios especificados por el fabricante.
- Desconecte el cable de alimentación durante tormentas eléctricas o cuando no vaya a utilizarlo durante períodos prolongados.
- Deje todo servicio a personal de servicio calificado.
- Evite colocar la unidad cerca de fuentes de calor como radiadores, rejillas de calefacción, estufas u otros aparatos (incluidos ampificadores) que producen calor.
3. Contenido del paquete
Al desembalar, verifique que se incluyan los siguientes elementos:
- 1 x SPL 2Control Module
- 1 x Cable de Alimentación
- Este manual de usuario
4. Producto terminadoview
4.1 Controles e indicadores del panel frontal
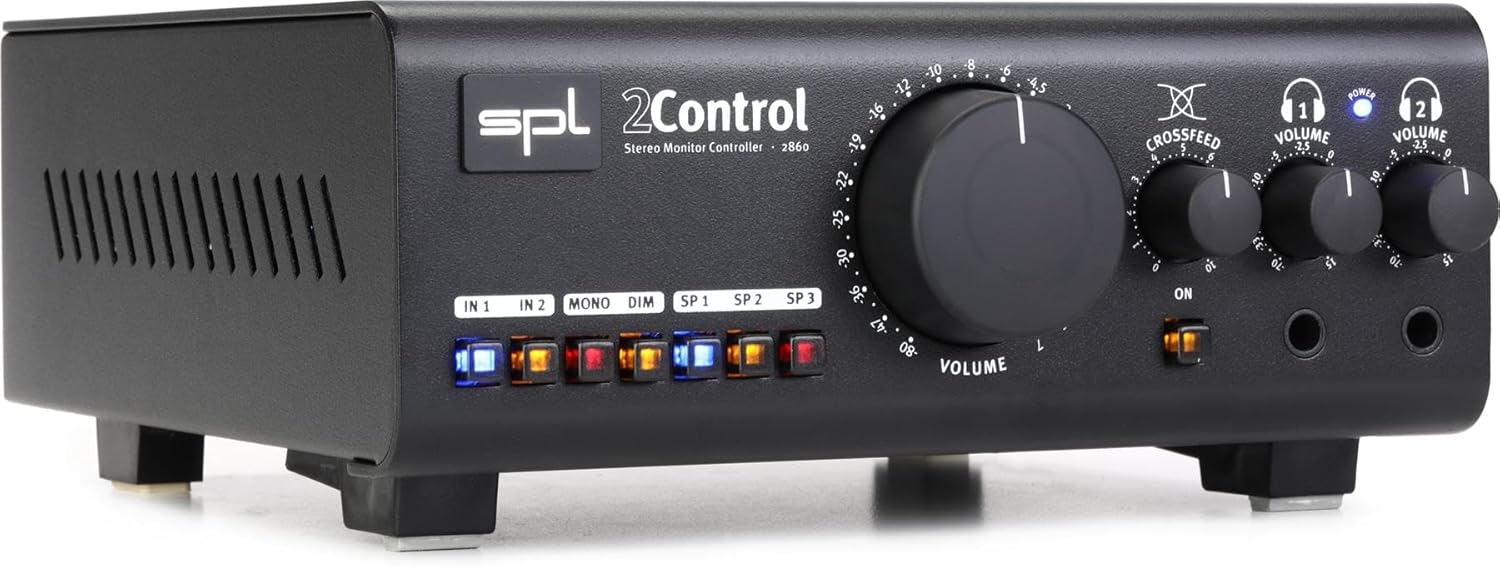
Figura 1: Front Panel of the SPL 2Control Stereo Monitor Controller.
This image displays the front panel of the SPL 2Control. From left to right, it features input selection buttons (IN 1, IN 2), function buttons (MONO, DIM), speaker output selection buttons (SP 1, SP 2, SP 3), a large central master VOLUME knob, a CROSSFEED knob, and two individual headphone VOLUME knobs with corresponding headphone output jacks. A power indicator LED is visible above the headphone controls.
- IN 1 / IN 2 Buttons: Selects the active stereo input source.
- MONO Button: Sums the stereo signal to mono for compatibility checking.
- Botón Atenuar: Reduces the output volume by a fixed amount (e.g., -20dB) for temporary level reduction.
- SP 1 / SP 2 / SP 3 Buttons: Selects the active stereo speaker output pair.
- Perilla de VOLUMEN: Master volume control for selected speaker outputs.
- CROSSFEED Knob: Adjusts the stereo panorama for headphone monitoring to simulate a speaker listening environment.
- HEADPHONE VOLUME 1 / 2 Knobs: Independent volume controls for the two headphone outputs.
- HEADPHONE 1 / 2 Jacks: 1/4-inch stereo headphone outputs.
- LED DE ALIMENTACIÓN: Indica que la unidad está encendida.
4.2 Rear Panel Connections (Inferred)
The rear panel typically houses the audio input and output connections, as well as the power input. Based on common audio equipment and product specifications, you can expect:
- Entradas analógicas: Balanced XLR or TRS inputs for connecting your audio interface or mixer.
- Salidas de altavoz: Multiple sets of balanced XLR or TRS outputs for connecting up to three pairs of studio monitors.
- Entrada de energía: Connector for the included power cord.
5. Configuración
- Colocación: Position the SPL 2Control on a stable, flat surface, ensuring adequate ventilation around the unit.
- Conexión de energía: Connect the provided power cord to the power input on the rear panel of the 2Control and then to a suitable AC power outlet.
- Conexiones de entrada: Connect the stereo outputs of your audio interface, mixer, or other audio source to the IN 1 and/or IN 2 inputs on the rear panel using balanced XLR or TRS cables.
- Conexiones de altavoz: Connect your studio monitors to the SP 1, SP 2, and/or SP 3 outputs on the rear panel using balanced XLR or TRS cables. Ensure correct left and right channel connections.
- Conexiones de auriculares: Plug your headphones into the HEADPHONE 1 and/or HEADPHONE 2 jacks on the front panel.
- Encendido inicial: Ensure all volume controls are set to their minimum positions before powering on the unit. Then, connect the power cord to the wall outlet. The POWER LED on the front panel will illuminate.
6. Instrucciones de funcionamiento
- Seleccionar una entrada: Presione cualquiera de los dos EN 1 or EN 2 button to select your desired audio source. The active button will illuminate.
- Selecting Speaker Outputs: Presione el SP 1, SP 2, o SP 3 button to route the audio to the corresponding pair of studio monitors. Only one speaker output can be active at a time.
- Adjusting Master Volume: Slowly turn the large VOLUMEN knob clockwise to increase the listening level for the selected speaker outputs. Turn counter-clockwise to decrease.
- Suma mono: Presione el MONONUCLEOSIS INFECCIOSA button to sum the stereo signal to mono. This is useful for checking phase compatibility and mix balance. Press again to return to stereo.
- Función de atenuación: Presione el OSCURO button to temporarily reduce the output volume. This is useful for quick conversations or when you need to lower the volume without losing your main volume setting. Press again to restore the original volume.
- Monitoreo de auriculares:
- Plug your headphones into the desired headphone jack (HEADPHONE 1 or 2).
- Ajustar el individuo HEADPHONE VOLUME 1 or 2 knob to set the listening level for your headphones.
- Utilice el Crossfeed knob to adjust the stereo image for headphone listening. Turning it clockwise increases the crossfeed, simulating a more natural speaker-like stereo field by blending the left and right channels slightly.
7. Mantenimiento
- Limpieza: Utilice un paño suave y seco para limpiar el exterior de la unidad. No utilice limpiadores líquidos ni disolventes.
- Ventilación: Ensure that the ventilation slots are kept clear of dust and debris to prevent overheating.
- Almacenamiento: Si va a almacenar la unidad durante un período prolongado, desconéctela de la alimentación y guárdela en un lugar fresco y seco.
8. Solución de problemas
| Problema | Posible causa | Solución |
|---|---|---|
| No hay sonido de los altavoces. |
|
|
| No hay sonido en los auriculares. |
|
|
| Audio distorsionado. |
|
|
9. Especificaciones
| Característica | Detalle |
|---|---|
| Nombre del modelo | 2 Control (also known as 2860) |
| Marca | SPL |
| Tipo de altavoz | Monitor |
| Usos recomendados | Control, Volume for Monitors |
| Dispositivos compatibles | Monitors, Speakers |
| Configuración de canales de sonido envolvente | 2.0 |
| Color | Negro |
| Componentes incluidos | 1 x SPL Control Module |
| Dimensiones del producto (Pr. x An. x Al.) | 8.66" x 8.46" x 3.15" |
| Peso del artículo | 7.06 libras (aprox. 3.2 kg) |
| Fuente de poder | Eléctrico con cable |
| Tecnología de conectividad | TRS, XLR |
| Modo de salida de audio | Estéreo |
| Tipo de montaje | Montaje de mesa |
| Fabricante | Sound Performance Lab |
10. Garantía y soporte
The SPL 2Control Monitor Controller comes with a limited warranty. For specific warranty terms, duration, and conditions, please refer to the documentation provided with your purchase or visit the official SPL website. For technical support, service, or inquiries, please contact the manufacturer, Sound Performance Lab, or your authorized dealer.
Fabricante: Sound Performance Lab


