1. Introducción
This manual provides detailed instructions for the installation, operation, maintenance, and troubleshooting of the Altronix AL175X220 Power Supply. Please read this manual thoroughly before attempting to install or operate the unit to ensure proper functionality and safety.
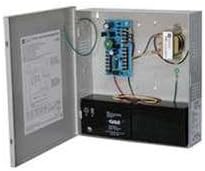
Figure 1: Altronix AL175X220 Power Supply with enclosure open.
This image displays the Altronix AL175X220 Power Supply unit. The metal enclosure is open, showing the internal circuit board, transformer, and a black battery located at the bottom. Wiring connects the components within the enclosure.
2. Configuración e instalación
Proper installation is crucial for the safe and efficient operation of the AL175X220. Ensure all local and national electrical codes are followed.
2.1 Montaje
- Select a suitable mounting location that is dry, well-ventilated, and protected from extreme temperatures and moisture.
- Securely mount the power supply enclosure to a wall or other stable surface using appropriate fasteners.
2.2 Cableado
- Potencia de entrada: Connect the 220V AC input power to the designated terminals on the power supply board. Ensure the power source is de-energized before making connections.
- Potencia de salida: Connect your devices requiring 12VDC or 24VDC to the appropriate output terminals. Verify correct polarity.
- Batería de respaldo (opcional): If using battery backup, connect a compatible 12V or 24V battery to the battery terminals. Observe correct polarity (+ to + and - to -).
- Toma de tierra: Asegúrese de que la unidad esté correctamente conectada a tierra de acuerdo con los códigos eléctricos locales.
WARNING: Disconnect all power before servicing the unit.
3. Instrucciones de funcionamiento
Once installed, the AL175X220 operates automatically. Follow these steps for initial power-up.
- After all wiring connections are complete and verified, apply 220V AC power to the unit.
- Observe the status indicator LEDs (if present) on the circuit board. Refer to the product's technical specifications for LED meanings.
- The unit will begin providing regulated 12VDC or 24VDC output to connected devices and will charge the connected backup battery (if installed).
4. Mantenimiento
The AL175X220 is designed for reliable operation with minimal maintenance. However, periodic checks can help ensure longevity and performance.
- Inspección anual: Annually inspect the unit for any signs of physical damage, loose connections, or corrosion.
- Comprobación de la batería (si corresponde): If a backup battery is installed, check its condition and charge level periodically. Replace batteries every 3-5 years or as recommended by the battery manufacturer.
- Limpieza: Keep the enclosure clean and free of dust and debris. Use a soft, dry cloth for cleaning. Do not use liquid cleaners.
5. Solución de problemas
If the AL175X220 is not functioning as expected, refer to the following common issues and solutions.
- Sin potencia de salida:
- Check the 220V AC input power source.
- Verifique que todas las conexiones del cableado sean seguras y correctas.
- Check for blown fuses or tripped circuit breakers within the unit or external power circuit.
- La batería no se carga:
- Asegúrese de que la batería esté conectada correctamente con la polaridad correcta.
- Check the battery's condition; it may be faulty or at the end of its life.
- Verify AC input power is present.
- Condición de sobrecarga:
- If the unit shuts down or indicators suggest an overload, disconnect some load devices.
- Ensure the total current draw of connected devices does not exceed the power supply's rated output (1.5AMP).
If problems persist after attempting these solutions, contact Altronix technical support.
6. Especificaciones
| Especificación | Valor |
|---|---|
| Modelo | AL175X220 |
| Vol de entradatage | 220 V CA |
| Vol de salidatage | 12VDC / 24VDC (selectable) |
| Corriente de salida | 1.5 AMP |
| Fabricante | ALTRONIX |
| ASIN | B002PNC9HC |
| Fecha de primera disponibilidad | 12 de febrero de 2012 |
7. Información de garantía
Altronix products are designed for high reliability. For detailed warranty terms and conditions, please refer to the official Altronix webSitio web o la tarjeta de garantía incluida en el embalaje del producto. Conserve el comprobante de compra para reclamaciones de garantía.
8. Soporte técnico
For technical assistance, product inquiries, or service, please contact Altronix customer support through their official websitio o la información de contacto proporcionada en la documentación de su producto.
Altronix Official Websitio: www.altronix.com (Tenga en cuenta: este es un marcador de posición genérico) URL as specific support links were not provided.)


