Introducción
Welcome to the Greenlee DM-810A True RMS Digital Multimeter user manual. This document provides essential information for the safe and effective operation, maintenance, and troubleshooting of your device. The DM-810A is designed for accurate measurement of AC/DC voltage, AC/DC current, resistance, capacitance, frequency, and continuity, making it a versatile tool for electrical professionals.
Información de seguridad
Para garantizar un funcionamiento y servicio seguros del medidor, siga estas instrucciones. El incumplimiento de estas advertencias puede provocar lesiones graves o la muerte.
- Always read and understand the entire instruction manual before using the meter.
- No exceda los límites máximos de entrada para ninguna función.
- Tenga cuidado al trabajar con vol.tages superior a 30 V CA RMS, 42 V pico o 60 V CC. Estos volúmenestagPueden suponer un riesgo de descarga eléctrica.
- Always use the proper terminals, function, and range for your measurements. The DM-810A features a Beep-Jack audible and visible warning to guard against improper A and mA terminal plug-in.
- Inspeccione los cables de prueba para detectar daños en el aislamiento o metal expuesto antes de cada uso. Reemplácelos si están dañados.
- No utilice el medidor si parece dañado o si la caja está abierta.
- Asegúrese de que la tapa de la batería esté bien cerrada antes de utilizarla.
- Adhere to local and national safety codes. Use personal protective equipment (PPE) such as approved safety glasses and electrically insulated gloves when necessary.
Producto terminadoview
This section identifies the key parts and controls of your Greenlee DM-810A multimeter.

Figura 1: Frente view of the Greenlee DM-810A Digital Multimeter, showing the display, function selector dial, and input jacks.
- Mostrar: Large LCD for clear readings, often with dual display capability.
- Dial selector de funciones: Used to select the desired measurement function (e.g., V~, V-, A~, A-, Ω, CAP, Hz, Continuity).
- Tomas de entrada:
- DE: Entrada común (negativa) para todas las mediciones.
- VΩHz: Entrada positiva para voltagMediciones de e, resistencia, frecuencia y capacitancia.
- mAμA: Entrada positiva para miliampere y microampallí mediciones actuales.
- A: Positive input for ampallí mediciones actuales.
- Botones:
- SELECCIONAR: Toggles between functions on a single dial position (e.g., AC/DC voltage, diodo/continuidad).
- GAMA: Manually selects measurement range or returns to auto-ranging.
- △: Delta function for relative measurements.
- MANTENER: Congela la lectura de la pantalla actual.
Configuración
Instalación de la batería
The Greenlee DM-810A requires batteries for operation. Refer to the back of the meter for the battery compartment. Use a screwdriver to open the compartment, insert the specified batteries (typically AA or 9V, check the compartment label), observing correct polarity, and then securely close the cover.
Conexión de cables de prueba
Always ensure test leads are properly connected before taking measurements.
- Inserte el cable de prueba negro en el COM conector de entrada (común).
- Insert the red test lead into the appropriate positive input jack based on the measurement you intend to make:
- Por voltage, resistance, capacitance, or frequency, use the VΩHz Jacobo.
- Para miliampere o microampere current, use the mAμA Jacobo.
- Para ampere current, use the A Jacobo.
- El medidor Beep-Jack feature will provide an audible and visible alert if the function selector is set to a current measurement (A or mA) but the test lead is incorrectly plugged into a voltage/resistance jack, or vice-versa. This helps prevent damage to the meter and ensures correct setup.
Instrucciones de funcionamiento
This section details how to perform various measurements with your DM-810A multimeter.
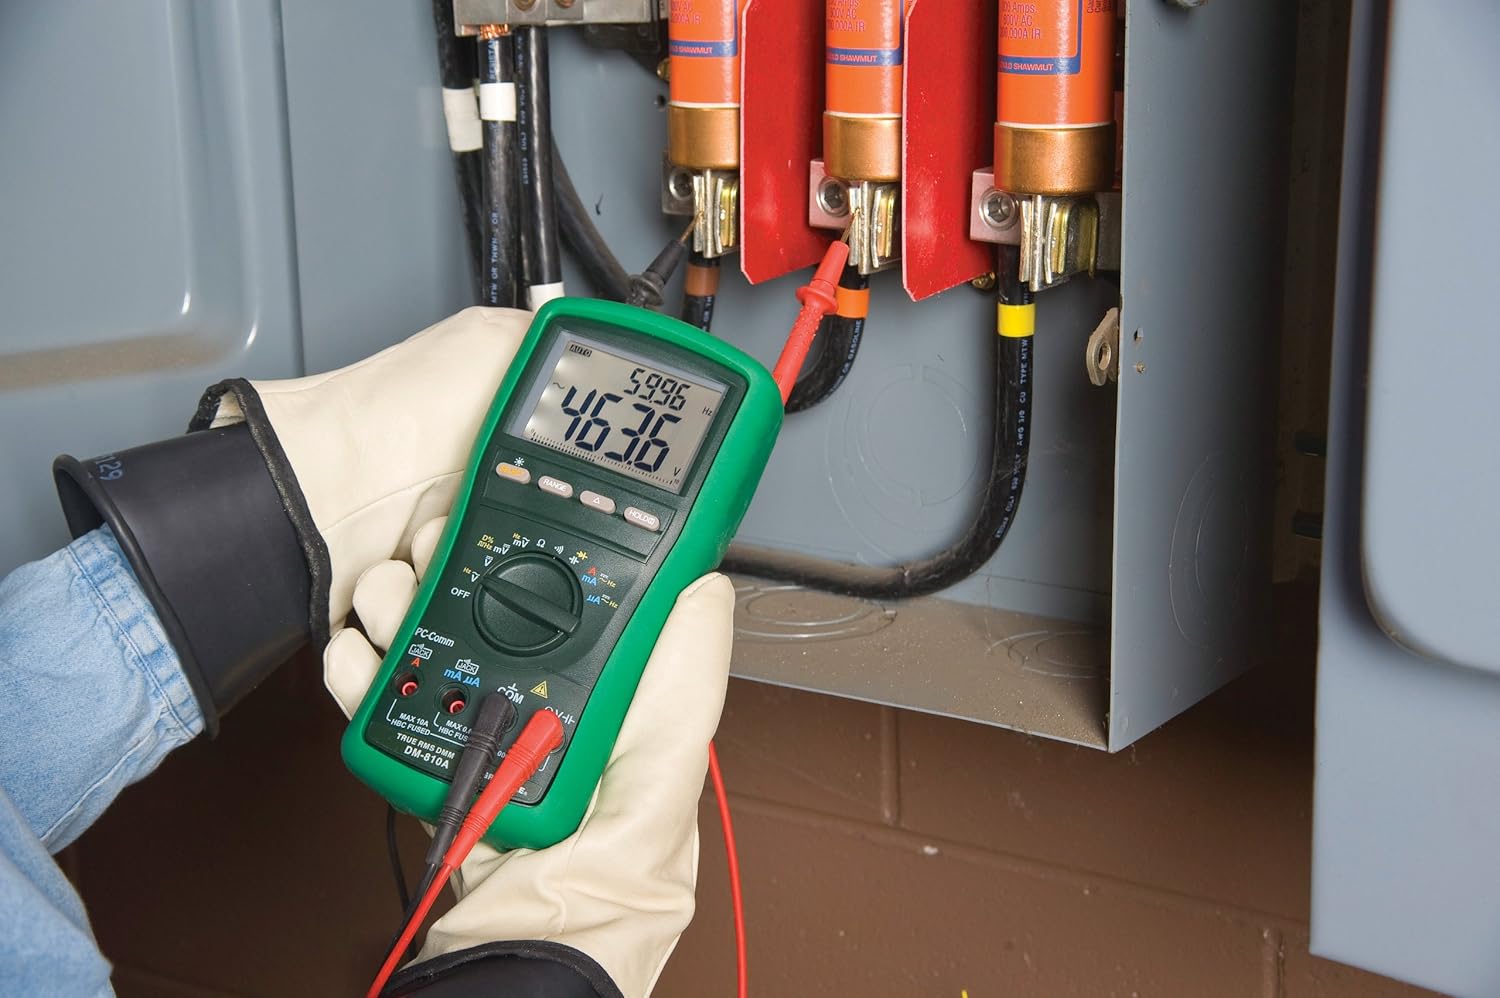
Figura 2: The Greenlee DM-810A Digital Multimeter being used to take measurements within an electrical panel, demonstrating practical application.
Medición del volumen de CA/CCtage
- Set the function selector to V~ (AC Voltage) o V- (Volumen CCtage). Use the SELECT button to toggle if both are on one position.
- Conecte el cable de prueba negro a COM y el cable de prueba rojo a VΩHz.
- Conecte las sondas de prueba en paralelo a través del circuito o componente que se va a medir.
- Leer el vol.tage valor en la pantalla.
Medición de corriente CA/CC
Importante: Para medir la corriente, el medidor debe estar conectado en serie con el circuito. Asegúrese de que el circuito esté desenergizado antes de conectar el medidor.
- Desenergice el circuito.
- Set the function selector to A~ (AC Current) or A- (DC Current), or mA~ / mA-.
- Conecte el cable de prueba negro a COM. Connect the red test lead to mAμA for small currents or A for larger currents (up to 10A). The Beep-Jack warning will activate if leads are in the wrong jacks for the selected function.
- Open the circuit where the current is to be measured and connect the meter in series.
- Vuelva a energizar el circuito y lea el valor actual.
- Desactive la energía del circuito antes de desconectar el medidor.
Medición de la resistencia (Ω)
- De-energize the circuit or component.
- Set the function selector to Ω.
- Conecte el cable de prueba negro a COM y el cable de prueba rojo a VΩHz.
- Conecte las sondas de prueba a través del componente.
- Lea el valor de la resistencia.
Measuring Capacitance (CAP)
- Asegúrese de que el condensador esté completamente descargado antes de realizar la medición.
- Set the function selector to CAP.
- Conecte el cable de prueba negro a COM y el cable de prueba rojo a VΩHz.
- Conecte las sondas de prueba a través de los terminales del capacitor.
- Lea el valor de capacitancia.
Measuring Frequency (Hz)
- Set the function selector to Hz.
- Conecte el cable de prueba negro a COM y el cable de prueba rojo a VΩHz.
- Conecte las sondas de prueba a la fuente de señal.
- Lea el valor de frecuencia.
Prueba de continuidad
- De-energize the circuit or component.
- Set the function selector to the continuity symbol (often shared with diode test, use SELECT to toggle).
- Conecte el cable de prueba negro a COM y el cable de prueba rojo a VΩHz.
- Conecte las sondas de prueba a lo largo de la ruta del circuito o del componente.
- Un pitido audible indica continuidad (baja resistencia). La pantalla mostrará el valor de resistencia.
Mantenimiento
Limpieza
Limpie el medidor con publicidadamp Paño y detergente suave. No utilice abrasivos ni disolventes. Asegúrese de que el medidor esté completamente seco antes de usarlo.
Reemplazo de batería
When the battery indicator appears on the display, replace the batteries immediately to ensure accurate readings. Follow the battery installation steps outlined in the Setup section.
Reemplazo de fusibles
If the current measurement functions cease to work, the internal fuses may need replacement. Refer to the meter's internal diagram (usually accessible by opening the battery compartment or back casing) for fuse specifications and replacement instructions. Always replace fuses with those of the specified type and rating to maintain safety and performance.
Solución de problemas
This section provides solutions for common issues encountered during the operation of your DM-810A multimeter.
| Problema | Posible causa | Solución |
|---|---|---|
| Sin pantalla o pantalla tenue | Baterías agotadas o bajas | Reemplace las baterías. |
| Lecturas incorrectas | Incorrect function/range selected; Damaged test leads; External interference | Verify function and range; Inspect and replace test leads; Move away from strong electromagnetic fields. |
| La medición actual no funciona | Blown fuse; Incorrect lead connection | Check and replace fuses; Ensure leads are in the correct A or mA jacks. |
| Beep-Jack warning active | Test leads connected to incorrect input jacks for the selected function | Adjust test lead connections to match the selected function on the dial. |
| La prueba de continuidad no emite pitidos | Open circuit; High resistance | Ensure the circuit is closed; Check for breaks in the circuit or component. |
Especificaciones técnicas
The following table outlines the key technical specifications for the Greenlee DM-810A Digital Multimeter.
| Característica | Valor |
|---|---|
| Marca | Verde Lee |
| Modelo | DM-810A |
| Tipo de medida | Multímetro digital RMS verdadero |
| Fuente de poder | Funciona con pilas |
| Estilo | Digital |
| Peso del artículo | 16 onzas (1 libra) |
| Dimensiones del producto (L x An x Al) | 10 x 10 x 12 pulgadas |
| Certificaciones | CE, CSA, UL |
| Código Postal | 783310087434 |
Garantía y soporte
Información de garantía
The Greenlee DM-810A Digital Multimeter comes with a Garantía del fabricante de 1 añosEsta garantía cubre defectos de materiales y mano de obra en condiciones normales de uso. Conserve su comprobante de compra para reclamaciones de garantía.
Atención al cliente
For technical assistance, warranty service, or to inquire about replacement parts, please contact Greenlee customer support. Refer to the official Greenlee websitio o embalaje del producto para obtener la información de contacto más actualizada.


