1. Introducción
This manual provides comprehensive instructions for the installation, operation, and maintenance of your Jensen AWM965 AM/FM|CD|DVD|MP3/USB Wallmount Stereo. The AWM965 is a versatile 12-volt unit designed for wall mounting, featuring an AM/FM electronic tuner, CD and DVD player, and a front USB input for MP3, WMA, and JPEG file playback. It also includes three stereo high-level speaker output zones and a remote control for convenient operation.

Figura 1.1: Frente view of the Jensen AWM965 Wallmount Stereo, showing the display, control knobs, and various buttons.
2. Información de seguridad
Please read all safety instructions carefully before operating the unit. Failure to follow these instructions may result in injury or damage to the unit. Keep this manual for future reference.
- Fuente de alimentación: This unit operates on a 12V DC negative ground power supply. Ensure correct voltage and polarity during installation.
- Instalación: Professional installation is recommended. Ensure all wiring is secure and properly insulated to prevent short circuits.
- Humedad: No exponga la unidad a la lluvia ni a la humedad para evitar incendios o descargas eléctricas.
- Limpieza: Utilice un paño suave y seco para limpiar. Evite limpiadores abrasivos o disolventes.
- Servicio: No intente reparar esta unidad usted mismo. Encargue cualquier reparación a personal cualificado.
3. Lista de empaque
Verifique que todos los elementos estén presentes en el paquete antes de continuar con la instalación.
- Jensen AWM965 Wallmount Stereo Unit
- Mando a distancia con pila
- 20-Pin Power/A/B Speaker Mating Pigtail
- Aux Audio/Video Cable
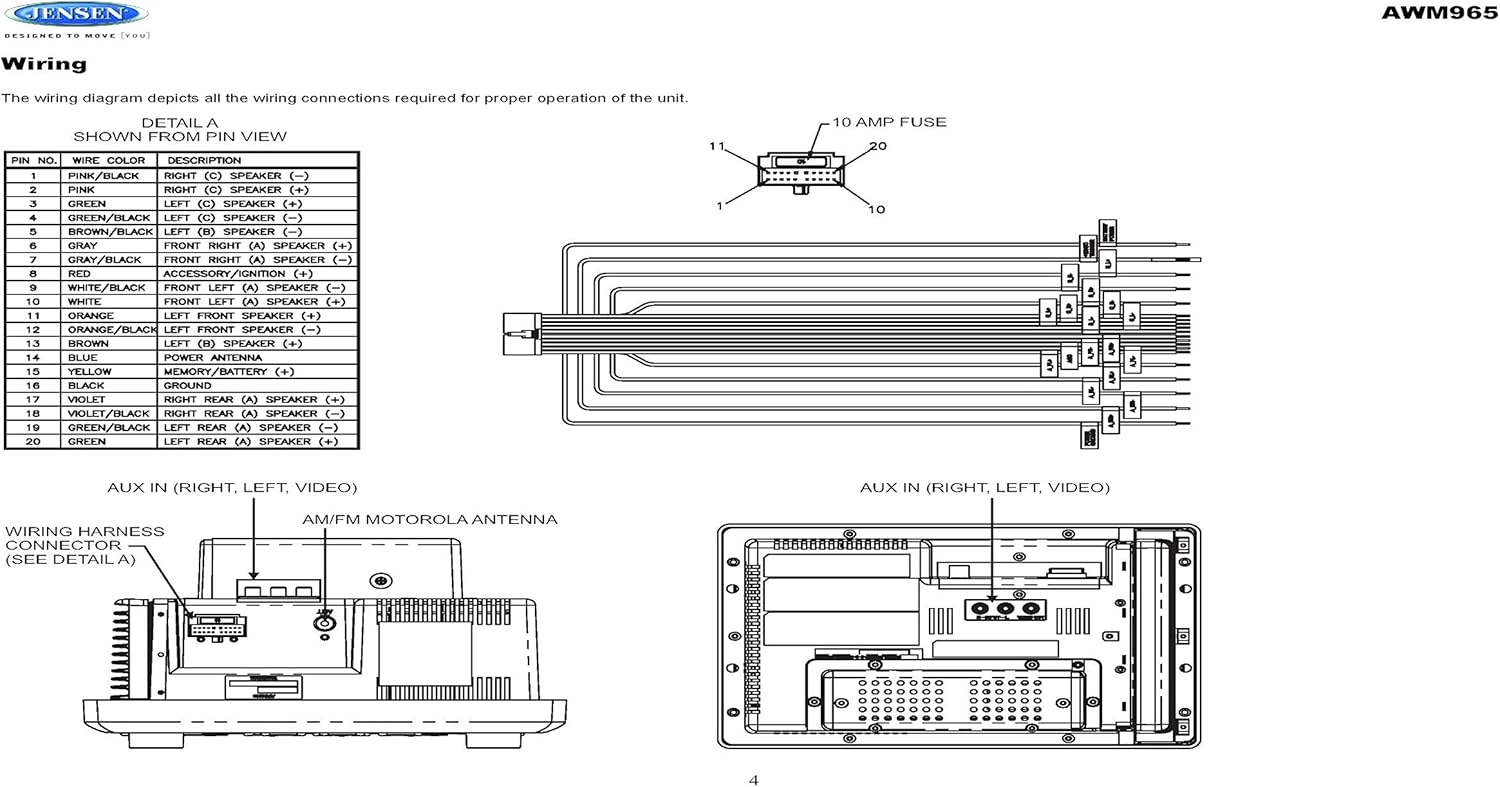
Figure 3.1: Diagram illustrating the components included in the Jensen AWM965 package, including the main unit, remote control, wiring harness, and auxiliary cables.

Figure 3.2: Image showing the included remote control, 20-pin wiring harness, and auxiliary audio/video cable.
4. Configuración
4.1 Selección de la ubicación de montaje
It is important to select an appropriate mounting location for the AWM965 to ensure optimal performance and longevity. Consider the following:
- Avoid places exposed to heat-radiating appliances such as electric heaters.
- Do not mount adjacent to other equipment that radiates significant heat.
- Ensure the location is well-ventilated and not dusty.
- Evite lugares húmedos o húmedos.
4.2 Preparing the Opening
Use the provided mounting hole diagram to measure and cut an opening in the mounting surface. After cutting, mount the unit using four M3x20mm screws.
4.3 Montaje de la radio
Route the power, speaker, and antenna cables through the hole. Connect them to the unit as outlined in the wiring diagram. After ensuring correct connections, perform a test operation.
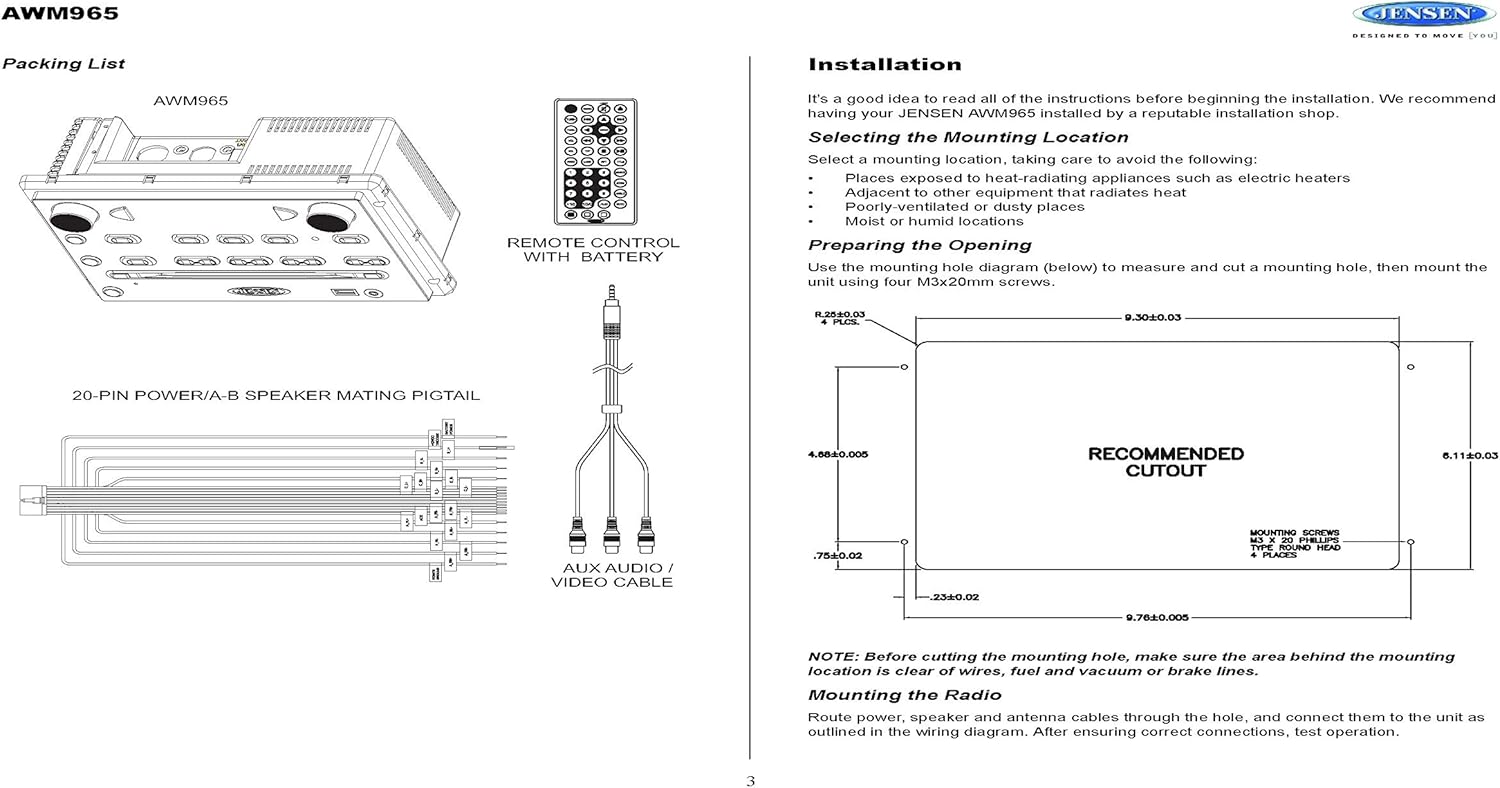
Figure 4.1: Detailed diagram showing the product dimensions (10.43"W x 7.01"H x 5"D) and the recommended cutout dimensions for installation (9.30"W x 6.11"H).
4.4 Cableado
The wiring diagram below depicts all the connections required for proper operation of the unit. Ensure all connections are secure and correctly matched to prevent damage.
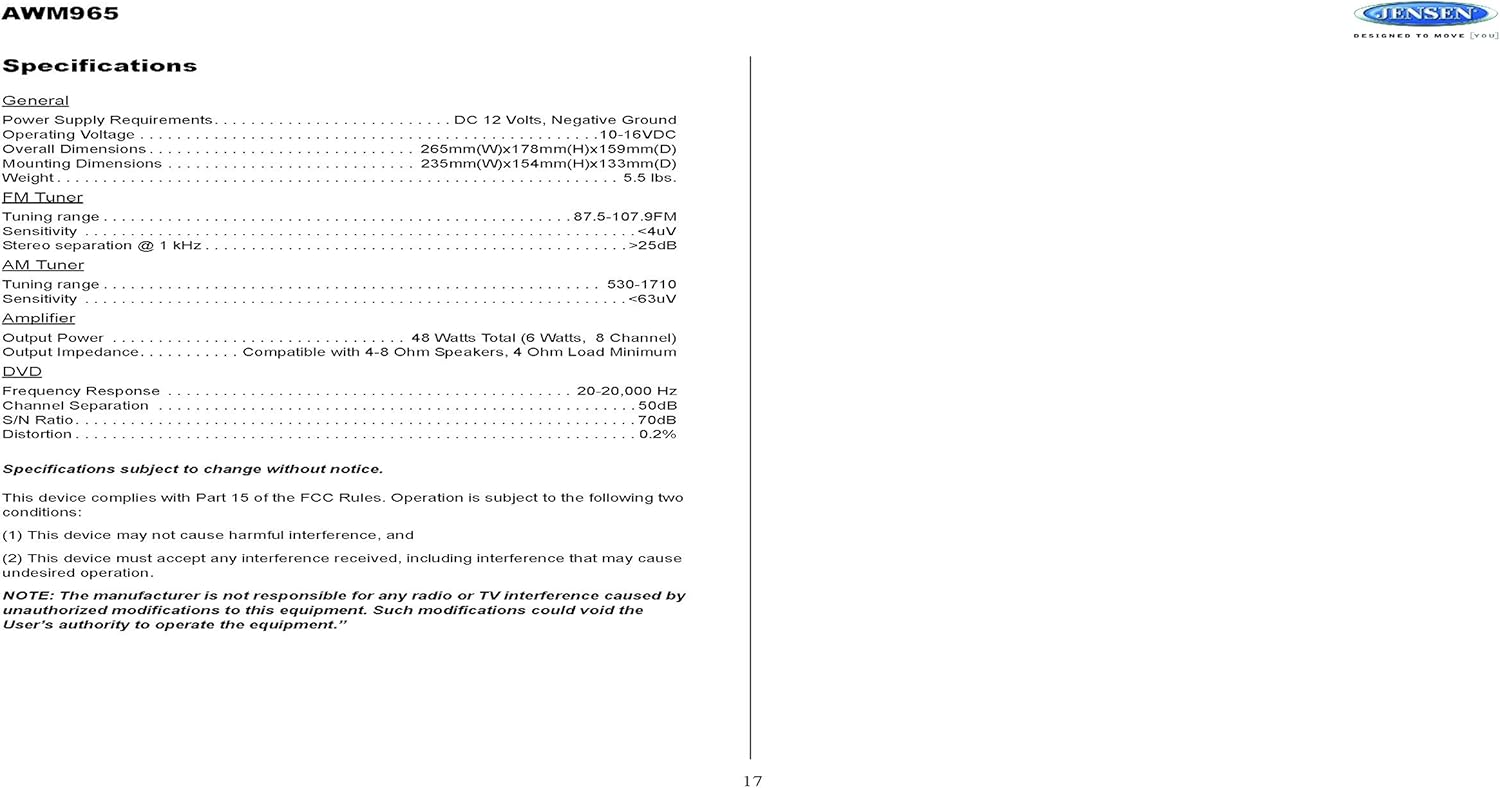
Figure 4.2: Detailed wiring diagram for the Jensen AWM965, showing the 20-pin connector pin assignments for power, ground, accessory, antenna, and speaker outputs (Right/Left, Front/Rear, A/B/C zones).
Wiring Harness Pin Details:
| Pin No. | Color del cable | Descripción |
|---|---|---|
| 1 | ROSA / NEGRO | ALTAVOZ DERECHO (C) (-) |
| 2 | ROSA | ALTAVOZ DERECHO (C) (+) |
| 3 | VERDE | ALTAVOZ IZQUIERDO (C) (+) |
| 4 | VERDE / NEGRO | ALTAVOZ IZQUIERDO (C) (-) |
| 5 | MARRÓN / NEGRO | ALTAVOZ IZQUIERDO (B) (-) |
| 6 | MARRÓN | ALTAVOZ IZQUIERDO (B) (+) |
| 7 | GRIS NEGRO | ALTAVOZ DELANTERO DERECHO (A) (-) |
| 8 | ROJO | ACCESSORY / IGNITION (+) |
| 9 | BLANCO NEGRO | ALTAVOZ DELANTERO IZQUIERDO (A) (-) |
| 10 | BLANCO | ALTAVOZ DELANTERO IZQUIERDO (A) (+) |
| 11 | NARANJA | ALTAVOZ DELANTERO IZQUIERDO (+) |
| 12 | NARANJA / NEGRO | ALTAVOZ DELANTERO IZQUIERDO (-) |
| 13 | MARRÓN | ALTAVOZ DERECHO (B) (+) |
| 14 | AZUL | ANTENA DE PODER |
| 15 | AMARILLO | MEMORY / BATTERY (+) |
| 16 | NEGRO | SUELO |
| 17 | VIOLETA | ALTAVOZ TRASERO DERECHO (A) (+) |
| 18 | VIOLET / BLACK | ALTAVOZ TRASERO DERECHO (A) (-) |
| 19 | VERDE / NEGRO | ALTAVOZ TRASERO IZQUIERDO (A) (-) |
| 20 | VERDE | ALTAVOZ TRASERO IZQUIERDO (A) (+) |
5. Instrucciones de funcionamiento
5.1 Controles del panel frontal
Familiarize yourself with the controls on the front panel for easy operation.

Figura 5.1: Primer plano view of the Jensen AWM965 front panel, highlighting the display, volume knob, power button, tuning/track buttons, and various function buttons for AUX, AS/PS, speaker zones, and media playback.
- Perilla VOL (Volumen): Rotate to adjust volume. Push to access audio menu.
- Botón de encendido: Presione para encender o apagar la unidad.
- T/F CLOCK Button: Press to display or set the clock.
- TUN/TRK (Tune/Track) Buttons: Use for tuning radio stations or navigating tracks on media.
- Botón AUX: Selects the auxiliary input source.
- AS/PS (Auto Store/Preset Scan) Button: Automatically stores strong radio stations or scans through presets.
- A, B, C (Speaker Zone) Buttons: Activates or deactivates speaker output zones.
- Botón ENTER: Confirma selecciones.
- Botón LOUD: Activates/deactivates loudness compensation.
- Botón de silencio: Silencia o activa el sonido de la salida de audio.
- Botones 1-6: Radio station presets, track functions (RPT, RDM, G.LANG).
- ALARM SET / ON/OFF Buttons: Sets and activates/deactivates the alarm clock.
- DVD MENU Button: Accede al menú del DVD.
- Botón de expulsión del disco: Ejects a loaded disc.
- Puerto USB: Conecte dispositivos USB para reproducción de medios y carga.
5.2 Funcionamiento básico
- Encendido/apagado: Presione el FUERZA botón.
- Ajuste de volumen: Girar el VOL perilla.
- Selección de fuente: Presione el MODO button (if available, or cycle through sources using a dedicated button or menu).
5.3 Funcionamiento de la radio (AM/FM)
- Sintonización: Presione el TUN/TRK buttons to manually tune or hold to seek.
- Estaciones preestablecidas: Press and hold a numbered button (1-6) to store the current station. Press briefly to recall.
- Auto Store / Preset Scan: Utilice el AS/PS button for automatic station management.
5.4 CD/DVD/MP3/USB Playback
- Cargando discos: Insert a disc into the slot with the label side up. The unit will automatically begin playback.
- Reproducción USB: Insert a compatible USB flash drive into the front USB port. The unit supports MP3, WMA, and JPEG formats.
- Controles de reproducción: Utilice el TUN/TRK buttons for track navigation (skip forward/backward). Use numbered buttons for repeat (RPT) or random (RDM) playback.
- Menú de DVD: Presione el MENÚ DVD button to access the disc's menu.
- Carga USB: The front USB port supports charging of iPod and other USB-based devices.
5.5 Clock and Alarm Features
- Ajuste del reloj: Mantenga pulsado el T/F CLOCK button to enter clock setting mode. Use the TUN/TRK botones para ajustar horas y minutos, y INGRESAR Para confirmar.
- Despertador: Utilice el SET DE ALARMAS button to configure the alarm time and the ENCENDIDO/APAGADO Botón para activarlo o desactivarlo.
- Tiempo de dormir: Refer to the full manual for detailed instructions on setting the sleep timer.
5.6 Entrada auxiliar
Connect external audio/video devices to the front 3.5mm line-level input using the provided Aux Audio/Video Cable. Press the Auxiliar button to select this source.
5.7 control remoto
The included wireless remote control provides convenient access to most functions. Ensure the battery is correctly installed.
Figure 5.2: Image of the Jensen AWM965 remote control, showing buttons for power, menu, tune, volume, enter, source, program, language, repeat, title, zoom, angle, and numeric keypad.
6. Mantenimiento
6.1 Limpieza de la unidad
Wipe the front panel and cabinet with a soft, dry cloth. For stubborn stains, dampen the cloth lightly with water. Never use harsh chemicals, abrasive cleaners, or solvents as they may damage the finish.
6.2 Cuidado del disco
Sujete los discos por los bordes para evitar dejar huellas dactilares. Manténgalos limpios y sin rayones. Guárdelos en sus estuches cuando no los use.
7. Solución de problemas
If you experience problems with your AWM965, consult the following common issues and solutions before contacting support.
- Sin energía: Check the 12V DC power connection and ensure the unit's fuse (10 AMP) is not blown. Verify proper grounding.
- Sin sonido: Check speaker connections and ensure speaker zones (A, B, C) are activated. Verify volume level and mute status.
- Disc Error: Asegúrese de que el disco esté limpio, sin rayones y correctamente insertado. Pruebe con otro disco.
- Mala recepción de radio: Check the antenna connection. Ensure the antenna is fully extended and positioned for best reception.
- Dispositivo USB no reconocido: Asegúrese de que el dispositivo USB esté formateado correctamente y contenga archivos compatibles. files (MP3, WMA, JPEG). Try a different USB device.
8. Especificaciones
Detailed technical specifications for the Jensen AWM965 unit.
| Categoría | Especificación |
|---|---|
| Fuente de alimentación | 12 VCC, tierra negativa |
| Vol de funcionamientotage | 10-16 V CC |
| Dimensiones generales | 265mm(W) x 178mm(H) x 159mm(D) / 10.4"W x 7"H x 5"D |
| Dimensiones de montaje | 235mm(W) x 154mm(H) x 133mm(D) / 9.25"W x 6.06"H x 5.25"D |
| Peso | 0.9 libras (aprox.) |
| Rango de sintonización de FM | 87.5-107.9 MHz |
| Sensibilidad FM | <4uV |
| FM Stereo Separation @ 1 kHz | >25dB |
| Rango de sintonización AM | 530-1710 kHz |
| Sensibilidad AM | <63uV |
| AmpPotencia de salida más duradera | 48 Watts Total (8 Channel) |
| Impedancia de salida | Compatible with 4-8 Ohm Speakers |
| DVD Frequency Response | 20-20,000 Hz |
| DVD Channel Separation | 50 dB |
| DVD S/N Ratio | 70 dB |
| DVD Distortion | 0.2% |
| Formatos de disco compatibles | CD, CD-R, CD-RW, MP3, DVD, DVD+/-RW |
| Características especiales | Adjustable LCD Dimmer, Front USB (MP3/WMA/JPEG, Charging), Front 3.5mm Line-Level Video/Audio Input, 1 Composite Video Out, 1 Stereo Audio Input |
Las especificaciones están sujetas a cambios sin previo aviso.
8.1 Cumplimiento de la FCC
Este dispositivo cumple con la Parte 15 de las Normas de la FCC. Su funcionamiento está sujeto a las dos condiciones siguientes:
- Este dispositivo no puede causar interferencias dañinas.
- Este dispositivo debe aceptar cualquier interferencia recibida, incluida aquella que pueda provocar un funcionamiento no deseado.
NOTE: The manufacturer is not responsible for any radio or TV interference caused by unauthorized modifications to this equipment. Such modifications could void the user's authority to operate the equipment.
9. Información de garantía
Jensen products are designed and manufactured to the highest quality standards. This product is covered by a limited warranty against defects in materials and workmanship. The specific terms and duration of the warranty are typically provided with the product packaging or can be found on the manufacturer's official webSitio web. Conserve su comprobante de compra para reclamaciones de garantía.
10. Soporte
If you require further assistance or encounter issues not covered in this manual, please contact Jensen customer support. You can typically find contact information (phone number, email, or support portal) on the official Jensen websitio o en el embalaje del producto.
When contacting support, please have your product model number (AWM965) and a detailed description of the issue ready.


