1. Instrucciones de seguridad importantes
Please read these instructions carefully before operating the unit and retain them for future reference. Following these guidelines will ensure safe and proper use of your GPX R602B radio.
- Agua y humedad: Do not use this apparatus near water. Avoid exposure to rain or moisture.
- Fuentes de calor: No lo instale cerca de fuentes de calor como radiadores, rejillas de calefacción, estufas u otros aparatos (incluidos ampificadores) que producen calor.
- Ventilación: Asegúrese de que haya una ventilación adecuada. No bloquee ninguna abertura de ventilación.
- Fuentes de energía: Opere únicamente con el tipo de fuente de alimentación indicado en la etiqueta de marcado.
- Limpieza: Limpiar únicamente con un paño seco.
- Archivos adjuntos: Utilice únicamente accesorios especificados por el fabricante.
- Servicio: Encargue todas las tareas de mantenimiento a personal técnico cualificado. Se requiere realizar el mantenimiento cuando el aparato haya sufrido algún daño, como por ejemplo si el cable de alimentación o el enchufe están dañados, si se ha derramado líquido o han caído objetos en el interior del aparato, si el aparato ha estado expuesto a la lluvia o la humedad, si no funciona con normalidad o si se ha caído.
Seguridad de la batería
- No mezcle pilas viejas y nuevas.
- No mezcle pilas alcalinas, estándar (carbono-zinc) o recargables (níquel-cadmio).
- Insert batteries correctly, observing the + and - polarities.
- Retire las baterías agotadas de inmediato.
- Deseche las baterías correctamente. No incinerar.
2. Características
The GPX R602B Portable AM/FM Radio offers a range of features designed for convenience and versatility:
- Portable AM/FM radio with a built-in handle for easy transport.
- Integrated speakers with analog volume control and durable metal grills.
- Digital clock with user-friendly setting buttons.
- Operates using the built-in AC power cable.
- Can also be powered by 3 C batteries (sold separately) for portable use.
- 3.5mm audio line input jack for connecting external audio devices.
- Telescopic antenna for improved FM reception.
- Stereo headphone jack for private listening.

Figure 2.1: Key features and connection points of the GPX R602B radio.
3. Contenido del paquete
Upon unpacking your GPX R602B radio, please ensure all the following items are present:
- GPX R602B Portable AM/FM Radio Unit
- Manual del propietario
- Built-in AC Power Adapter
4. Controles e indicadores
Familiarize yourself with the controls and indicators on your radio for optimal operation.
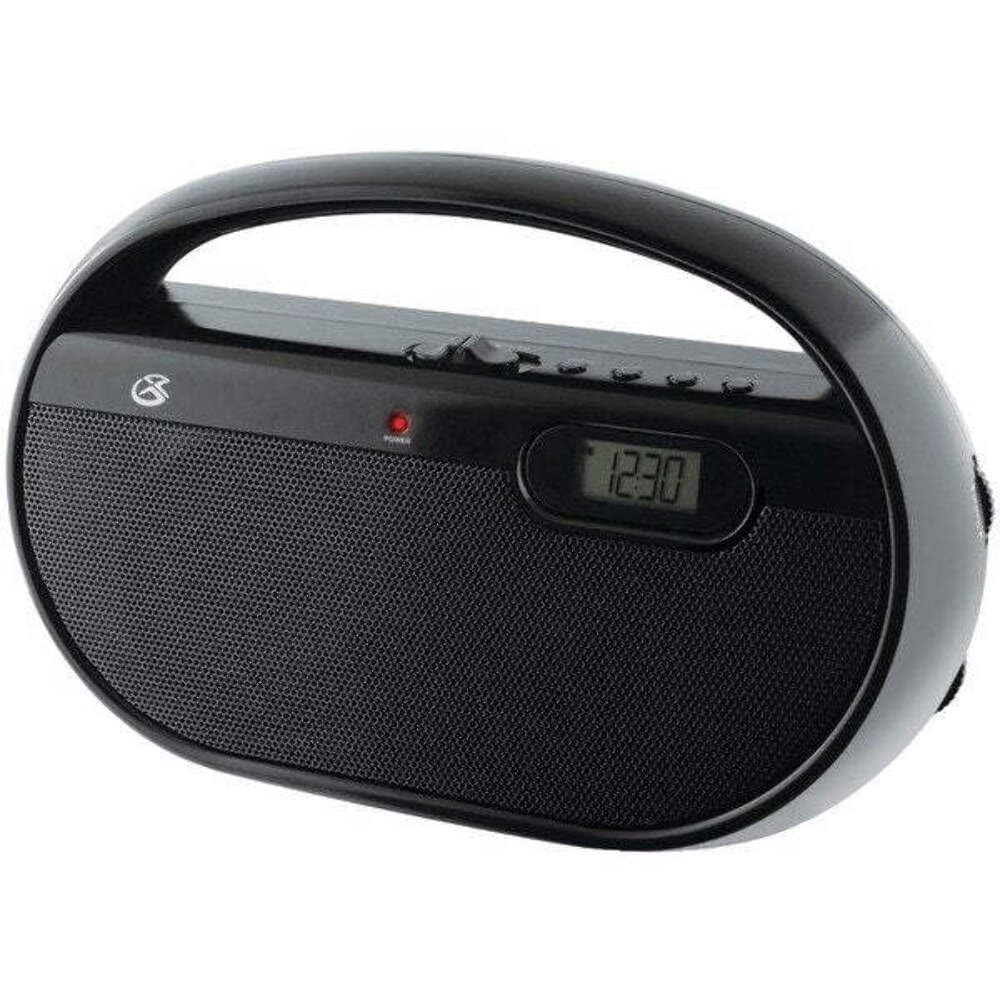
Figura 4.1: Frente view of the GPX R602B radio.
Control Layout (Refer to Figure 4.1)
- Perilla de encendido/volumen: Rotates to turn the unit ON/OFF and adjust the volume level.
- Perilla de sintonización: Rotates to select AM or FM radio stations.
- Interruptor selector de banda: Slides to select between AM and FM radio bands.
- Pantalla digital: Shows the current time or radio frequency.
- Botón Establecer hora: Used in conjunction with H/M buttons to set the clock.
- H/M Buttons: Used to adjust hours and minutes when setting the clock.
- Display Time Button: Briefly shows the time when the radio is playing.
- Aux In Jack (3.5mm): Conecte dispositivos de audio externos.
- Toma de auriculares (3.5 mm): Conecte auriculares para escuchar en privado.
- Telescopic FM Antenna: Extienda y ajuste para una recepción FM óptima.
5. Encendido de la unidad
The GPX R602B radio can be powered by either AC power or batteries.
Operación de energía CA
- Locate the built-in AC power cord. This cord is typically stored in the battery compartment when not in use.
- Plug the AC power cord into a standard wall outlet (120V AC, 60Hz).
- La unidad ya está lista para funcionar.
Funcionamiento con batería
For portable use, the radio requires 3 'C' size batteries (not included).
- Abra la tapa del compartimiento de la batería ubicada en la parte posterior de la unidad.
- Insert 3 'C' size batteries, ensuring the correct polarity (+ and -) as indicated inside the compartment.
- Cierre bien la tapa del compartimento de la batería.
- The unit is now ready for battery-powered operation.

Figure 5.1: Power options for the GPX R602B radio.
6. Configuración y funcionamiento básico
Configuración inicial
- Conexión de energía: Connect the radio to AC power or insert batteries as described in Section 5.
- Ajuste de la antena: For FM reception, extend the telescopic antenna fully. For AM reception, the unit has a built-in antenna, so no external adjustment is needed. Position the unit for best AM reception.
Operación de la radio
- Encender: Rotate the Power/Volume knob clockwise until it clicks and the unit powers on.
- Seleccionar banda: Slide the Band Selector switch to either AM or FM.
- Sintonizar estación: Rotate the Tuning knob to find your desired radio station. The frequency will be displayed on the digital screen.
- Ajustar el volumen: Gire la perilla de Encendido/Volumen para ajustar el nivel de sonido.
- Apagar: Rotate the Power/Volume knob counter-clockwise until it clicks and the unit powers off.
Using the Line Input (Aux In)
You can connect external audio devices, such as smartphones or MP3 players, to play audio through the radio's speakers.
- Connect a 3.5mm audio cable (not included) from the headphone jack or line-out jack of your external device to the Aux In jack on the radio.
- Turn on the radio and your external device.
- Adjust the volume on both the radio and your external device for optimal sound.

Figure 6.1: Devices compatible with the Aux In feature.
Uso de auriculares
For private listening, plug standard 3.5mm headphones (not included) into the Headphone Jack. The internal speakers will automatically mute.
Ajuste del reloj digital
The digital clock can be set when the radio is turned off.
- Ensure the radio is turned OFF using the Power/Volume knob.
- Mantenga presionadas las teclas Establecer hora botón y el H/M botón simultáneamente.
- Mientras sostiene el Establecer hora button, repeatedly press the H/M button to adjust the hour and then the minutes.
- Liberar el Establecer hora button once the desired time is set.
- A view the time while the radio is playing, press the Hora de visualización button. The time will appear briefly on the digital display.
7. Mantenimiento
Proper care and maintenance will ensure the longevity of your GPX R602B radio.
- Limpieza: Limpie el exterior de la unidad con un paño suave y seco. No utilice limpiadores abrasivos, ceras ni disolventes.
- Reemplazo de batería: If using batteries, replace all three 'C' batteries when the unit's performance diminishes. Always replace with new batteries of the same type.
- Almacenamiento: If storing the unit for an extended period, remove the batteries to prevent leakage and corrosion.
8. Solución de problemas
If you encounter issues with your GPX R602B radio, refer to the following common problems and solutions:
| Problema | Posible causa | Solución |
|---|---|---|
| Sin poder | AC cord not plugged in; Batteries exhausted or incorrectly inserted. | Ensure AC cord is securely plugged into a live outlet. Replace batteries with new ones, checking polarity. |
| Mala recepción de radio | Antenna not extended (FM); Unit poorly positioned (AM); Weak signal. | Extend and adjust the telescopic FM antenna. For AM, rotate the unit for better reception. Try moving the radio to a different location. |
| No hay sonido de los altavoces | Volumen demasiado bajo; Auriculares conectados. | Increase the volume using the Power/Volume knob. Disconnect headphones if not desired. |
| Clock not setting correctly | Secuencia de botones incorrecta. | Ensure the radio is OFF. Press and hold both 'Set Time' and 'H/M' buttons simultaneously, then repeatedly press 'H/M' to adjust. Release 'Set Time' when done. |
| Sonido distorsionado o poco claro | Volume too high; Poor reception; External device volume too high. | Lower the volume. Adjust antenna or unit position for better reception. If using Aux In, adjust volume on the external device. |
9. Especificaciones
Detailed technical specifications for the GPX R602B Portable AM/FM Radio:
- Número de modelo: R602B
- Dimensiones del producto (L x An x Al): 9.62 x 3.74 x 6.3 pulgadas (24.43 x 9.50 x 16.00 cm)
- Peso del artículo: 1.76 libras (0.80 kg)
- Fuente de energía: AC 120V, 60Hz or 3 x 'C' size batteries (not included)
- Tecnología de sintonizador: Radio AM/FM
- Bandas de radio compatibles: 2-Band (AM/FM)
- Tecnología de conectividad: Radio, 3.5mm Aux In
- Características especiales: Built-In AM Antenna, Built-In Clock, Portable, Telescopic FM Antenna, 3.5mm Headphone Jack
- Color: Negro
- Fabricante: Productos digitales internacionales, inc.
- Fecha de primera disponibilidad: 5 de junio de 2012
10. Garantía y soporte
For warranty information and customer support regarding your GPX R602B radio, please refer to the warranty card included with your purchase or visit the official GPX webSitio. Conserve su recibo de compra como comprobante de compra para cualquier reclamación de garantía.
If you require technical assistance or have questions not covered in this manual, please contact GPX customer service directly. Contact details are typically available on the manufacturer's websitio o en el embalaje del producto.


