Producto terminadoview
The AIMS Power PICOGLF10W12V120VR is a 1000 Watt continuous, 3000 Watt surge, 12 VDC input to 120 VAC output pure sine inverter charger. This heavy-duty unit is designed to provide reliable backup power for essential household appliances during outages, or for use in RVs, boats, campsites, and other off-grid applications. It features an integrated 35A smart battery charger capable of handling 8 different battery technologies, including Lead, Gel, AGM, and LiFePO4.
The inverter charger can accept 120V AC power from various sources, such as a gas or diesel generator, shore power, or a standard wall outlet, to charge connected batteries. Its low frequency design allows for a significant 3000 watt surge capacity for up to 20 seconds, accommodating high startup current demands from appliances.
Información de seguridad
WARNING: This product may contain materials cautioned by California Proposition 65. Always follow all local and national electrical codes during installation and operation.
- Read all instructions before operating the inverter charger.
- No exponga la unidad a la lluvia, nieve, rocío o agua de sentina.
- Asegure una ventilación adecuada alrededor de la unidad para evitar el sobrecalentamiento.
- Do not operate the inverter charger if it has received a sharp blow, been dropped, or otherwise damaged.
- No desmonte la unidad. Solicite el mantenimiento a personal cualificado.
- To reduce the risk of electric shock, disconnect the inverter charger from the battery and AC power before attempting any maintenance or cleaning.
- Asegúrese de que todo el cableado tenga el tamaño correcto y las terminaciones adecuadas.
- Install appropriate overcurrent protection for both DC and AC circuits.
Características y componentes del producto
Sobre el panel frontalview

This image displays the front panel of the AIMS Power Inverter Charger. Key components visible include the standard 120V AC output socket (GFCI outlet) for connecting appliances, and the AC input socket for connecting to shore power or a generator. Also visible are the circuit breaker buttons for charger input and inverter output protection.
Sobre el panel traseroview
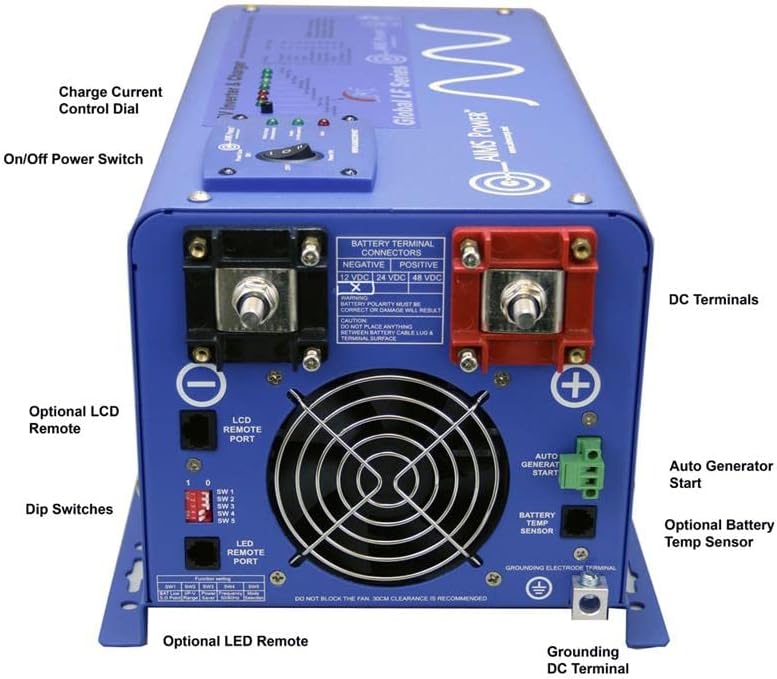
Esta imagen proporciona una visión detallada view of the rear panel of the AIMS Power Inverter Charger, highlighting various connection points and controls. Labeled components include the DC Terminals (positive and negative) for battery connection, the Charge Current Control Dial, On/Off Power Switch, Dip Switches for configuration, LCD Remote Port, LED Remote Port, Auto Generator Start terminal, Battery Temp Sensor port, and the Grounding DC Terminal.
- Potencia continua de 1000 W: Provides stable 1000 watts of pure sine wave AC power.
- Capacidad de sobretensión de 3000 W: Handles high startup loads for up to 20 seconds.
- 12VDC Input to 120VAC Output: Converts 12-volt DC battery power to standard 120-volt AC household power.
- Integrated 35A Smart Battery Charger: Supports 8 battery technologies (Lead, Gel, AGM, LiFePO4, etc.).
- Interruptor de transferencia automática: Seamlessly switches between inverter power and incoming AC power (shore/generator).
- Protecciones: Includes overload, over temperature, high/low voltage, short circuit, and internal fusing.
- Salida GFCI: Provides ground fault circuit interrupter protection for connected devices.
- Dial de control de corriente de carga: Allows adjustment of the battery charging current.
- Interruptores DIP: Configurable settings for various operational priorities and modes.
- Auto Gen Start: Feature to automatically start a compatible generator when battery voltage es bajo.
- Modo ahorro de energía: Reduces idle power consumption.
- Sensor de temperatura de la batería: Optimizes charging based on battery temperature.
Configuración e instalación
Proper installation is crucial for the safe and efficient operation of your AIMS Power Inverter Charger. It is recommended that installation be performed by a qualified electrician or technician.
1. Mounting the Inverter Charger
- Elija un lugar seco, fresco y bien ventilado.
- Mount the unit horizontally on a flat, non-combustible surface.
- Ensure at least 30cm (12 inches) of clear space around the cooling fan and vents for proper airflow.
- Evite montarlo bajo la luz solar directa o cerca de fuentes de calor.
2. DC Wiring (Battery Connection)
Connect the inverter charger directly to your 12V battery bank using appropriately sized cables. Use heavy-gauge, low-resistance cables to minimize voltage drop y garantizar una transferencia de potencia eficiente.
- Connect the positive (+) terminal of the inverter to the positive (+) terminal of the battery bank.
- Connect the negative (-) terminal of the inverter to the negative (-) terminal of the battery bank.
- Install a properly rated DC fuse or circuit breaker (e.g., 300A for this 1000W model) as close to the battery positive terminal as possible.
- Ensure all connections are clean, tight, and secure.

Image showing the rear of the inverter charger with the large red (positive) and black (negative) battery terminals for DC input.
3. AC Wiring (Input and Output)
The inverter charger has both an AC input and AC output. The AC input is used for charging batteries and passing through AC power, while the AC output provides 120V AC power to your loads.
- Entrada de CA: Connect a 120V AC source (shore power, generator) to the AC input socket.
- Salida de CA: Connect your AC appliances or distribution panel to the GFCI outlet on the front panel.
- Ensure all AC wiring adheres to local electrical codes and uses appropriate wire gauges.
Image showing the front of the inverter charger with the AC output socket (GFCI) and AC input socket.
4. Puesta a tierra
- Connect the grounding electrode terminal on the inverter charger to a reliable earth ground.
- For mobile applications (RV, boat), ensure proper chassis grounding.
5. Conexiones opcionales
- Mando a distancia: Connect an optional LCD or LED remote control unit to the respective ports for convenient monitoring and control.
- Sensor de temperatura de la batería: Connect the battery temperature sensor to the battery bank and the designated port on the inverter for optimized charging.
- Arranque automático del generador: Connect compatible generator control wiring to the Auto Gen Start terminal if using this feature.
Instrucciones de funcionamiento
1. Encendido inicial
- Asegúrese de que todas las conexiones del cableado sean seguras y correctas.
- Turn on the DC circuit breaker or fuse connected to the battery bank.
- Flip the On/Off Power Switch on the inverter charger to the "ON" position.
- The unit will perform a self-test, and indicator lights will illuminate.
2. Inverter Mode (DC to AC Conversion)
- When no AC input is present, the inverter will draw power from the battery bank and convert it to 120V AC for connected loads.
- Supervise el volumen de la bateríatage to prevent over-discharge. The inverter has a low voltage alarm and shutdown feature.
3. Charger Mode (AC to DC Charging)
- When a 120V AC source is connected to the AC input, the unit will automatically switch to charger mode.
- The integrated 35A smart charger will begin charging the connected battery bank.
- Adjust the Charge Current Control Dial to set the desired charging current.
- The unit will also pass through the incoming AC power to the AC output, powering connected loads directly from the AC source.
4. Transfer Switch Operation
- The auto transfer switch ensures a seamless transition between inverter power and incoming AC utility/generator power.
- When AC input is detected, the unit prioritizes the external AC source.
- When AC input is lost, the unit automatically switches back to inverter mode.
5. Configuración del interruptor DIP
The dip switches on the rear panel allow for customization of various operational parameters, such as battery type, charge voltage settings, and power save mode. Refer to the detailed manual for specific configurations.
Mantenimiento
El mantenimiento regular garantiza la longevidad y el rendimiento óptimo de su cargador inversor.
- Limpieza: Periodically clean the exterior of the unit with a dry cloth. Ensure vents and cooling fan are free from dust and debris. Do not use liquid cleaners.
- Conexiones: Annually inspect all electrical connections (DC and AC) for tightness and corrosion. Loose connections can cause overheating and poor performance.
- Mantenimiento de la batería: Follow the battery manufacturer's recommendations for maintenance. Ensure batteries are properly charged and maintained to prolong their lifespan.
- Ventilación: Asegúrese de que el área de instalación permanezca bien ventilada y libre de obstrucciones.
Solución de problemas
This section provides solutions to common issues. For problems not listed here, contact AIMS Power technical support.
| Problema | Posible causa | Solución |
|---|---|---|
| El inversor no se enciende. | No DC input power; loose battery connections; blown DC fuse/breaker; unit fault. | Check battery connections; verify battery voltage; check DC fuse/breaker; ensure power switch is ON. |
| Sin salida de CA | Sobrecarga; cortocircuito; volumen de batería alto/bajotage; thermal shutdown; tripped GFCI. | Reduce load; check for short circuits; check battery voltage; allow unit to cool; reset GFCI outlet. |
| Las baterías no se cargan. | No AC input; AC input breaker tripped; incorrect charger settings (dip switches); battery fault. | Verify AC input power; reset AC input breaker; check dip switch settings for battery type and charge parameters; inspect batteries. |
| La unidad se sobrecalienta y se apaga. | Insufficient ventilation; excessive load; fan malfunction. | Ensure adequate airflow around the unit; reduce connected load; check if cooling fan is operating. |
Presupuesto
| Parámetro | Valor |
|---|---|
| Nombre del modelo | PICOGLF10W12V120VR |
| Wat continuotage | 1000 vatios |
| Wat de sobretensióntage | 3000 vatios (durante 20 segundos) |
| Vol. De entrada de CCtage | 12 voltios CC |
| Vol. De salida de CAtage | 120 Volts AC (Pure Sine Wave) |
| Frecuencia de salida de CA | 60 Hz |
| Corriente del cargador de batería | 35 Amps |
| Dimensiones del producto | 15 x 8.59 x 7.05 pulgadas |
| Peso del artículo | 39 libras |
| Usos recomendados | Home, Office, RV, Vehicle, Cabin |
Garantía y soporte
AIMS Power has been in business for over 20 years, providing reliable power solutions. All technical assistance and warranty support are handled directly from their facility in Nevada, USA.
For technical inquiries, troubleshooting assistance, or warranty claims, please contact AIMS Power directly. Refer to the official AIMS Power webSitio para obtener la información de contacto más actualizada y los detalles de la política de garantía.
Note: Warranty terms and conditions may vary. Keep your proof of purchase for warranty service.


