1. Introducción
This manual provides essential instructions for the safe and efficient operation of your SINGER Start 1306 Sewing Machine. Please read it thoroughly before using the machine to ensure proper setup, usage, and maintenance. The SINGER Start 1306 is designed for home sewing projects, featuring 6 built-in stitches, easy threading, and a 4-step buttonhole function.

Imagen 1.1: Frente view of the SINGER Start 1306 Sewing Machine.
2. Información de seguridad
Siga siempre las precauciones básicas de seguridad al utilizar aparatos eléctricos para reducir el riesgo de incendio, descarga eléctrica o lesiones.
- Lea todas las instrucciones antes de usar la máquina.
- Mantenga la máquina alejada del agua o de superficies mojadas.
- Desenchufe la máquina del tomacorriente eléctrico cuando no esté en uso, cuando la esté reparando o cuando cambie accesorios.
- Nunca opere la máquina si tiene un cable o enchufe dañado, si no funciona correctamente o si se ha caído o dañado.
- Mantenga los dedos alejados de todas las piezas móviles. Se requiere un cuidado especial alrededor de la aguja de la máquina de coser.
- Utilice únicamente accesorios recomendados por el fabricante.
- Nunca deje caer ni inserte ningún objeto en ninguna abertura.
3. Configuración
3.1 Desembalaje y contenido
Carefully remove the machine from its packaging. Retain all packaging materials for future transport or storage. Verify that all included components are present:
- Pie multiusos
- Pie para cremalleras
- Pie para ojales
- Placa de zurcir
- Paquete de agujas
- Bobinas
- Spool Pin Felts
- Needle Plate Screwdriver
- Descosedor / Cepillo quitapelusas
- Vinyl Dust Cover
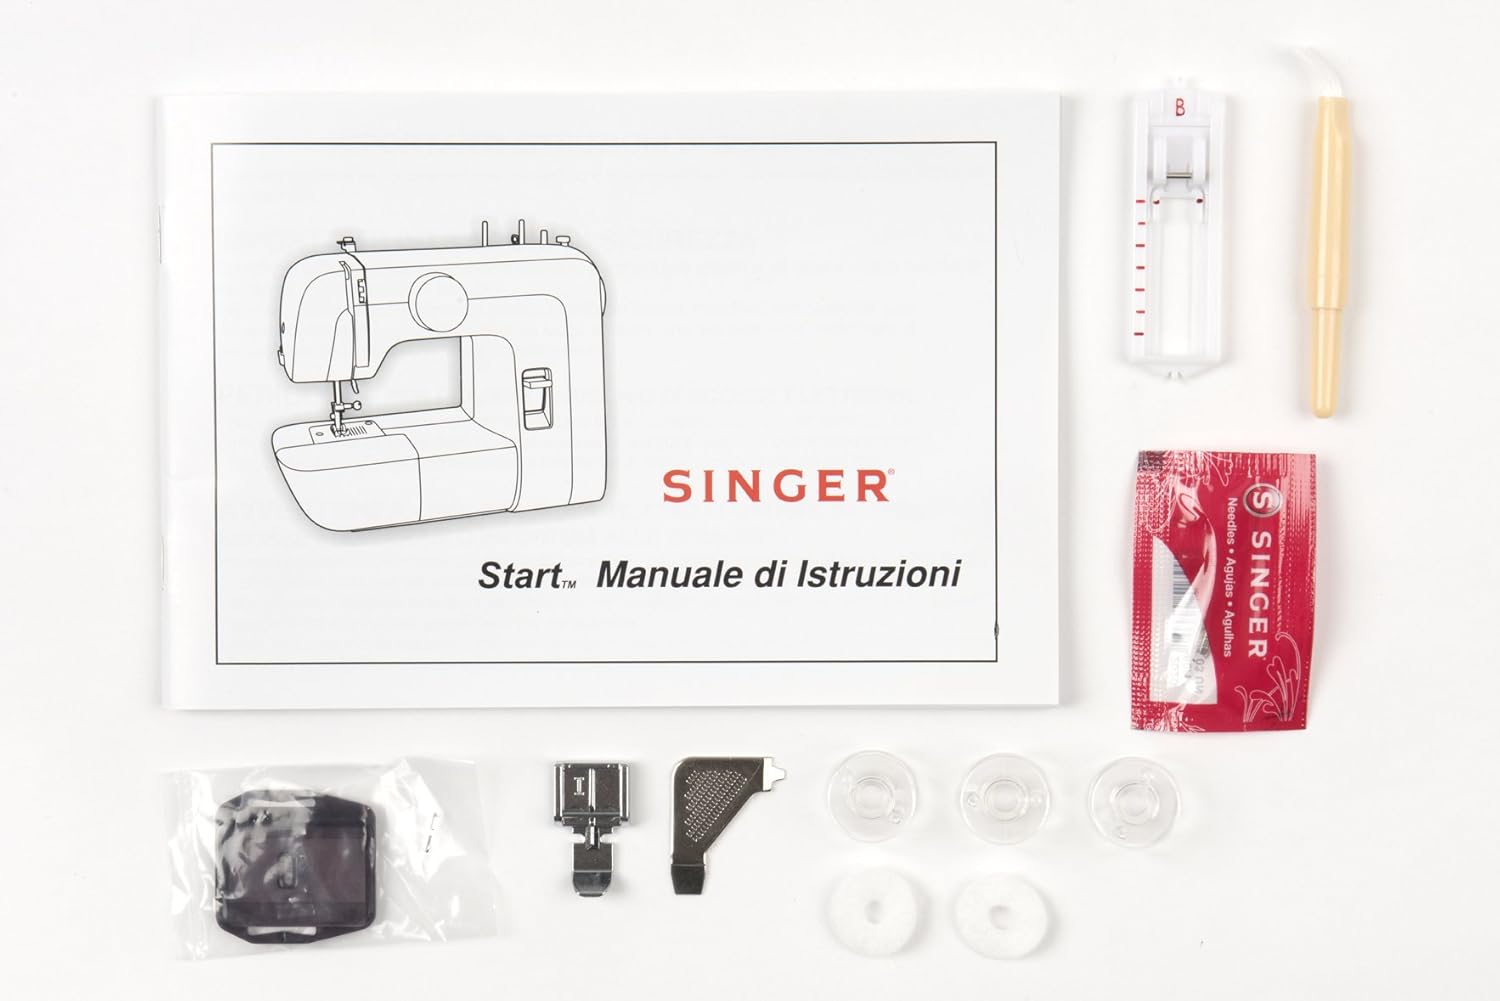
Image 3.1: Included accessories and instruction manual.
3.2 Conexión de alimentación
Connect the power cord to the machine's power input socket and then plug it into a suitable electrical outlet (220V). Ensure the machine is switched off before connecting to power.

Imagen 3.2: Trasera view showing power input and foot pedal connection.
3.3 Enhebrado de la máquina
Correct threading is crucial for proper stitch formation.
3.3.1 Bobinado de la bobina
- Coloque un carrete de hilo en el portacarrete.
- Pase el hilo a través de la guía del hilo superior.
- Wrap the thread clockwise around the bobbin winding tension disc.
- Inserte el hilo a través del pequeño orificio de la bobina desde adentro hacia afuera.
- Coloque la bobina en el eje del bobinador y empuje el eje hacia la derecha.
- Hold the thread end and press the foot pedal. Wind a few turns, then trim the excess thread.
- Continue winding until the bobbin is full. The winder will stop automatically.
- Empuje el eje del bobinador hacia la izquierda y retire la bobina.
3.3.2 Inserción de la bobina
- Abra la placa de cubierta de la bobina.
- Inserte la bobina enrollada en la caja de la bobina con el hilo desenrollándose en sentido antihorario.
- Guide the thread into the tension spring slot and pull it firmly until it snaps into place.
- Cierre la placa de cubierta de la bobina.
3.3.3 Roscado superior
- Levante la aguja a su posición más alta utilizando el volante.
- Suba el alzador del prensatelas.
- Coloque un carrete de hilo en el portacarrete.
- Pase el hilo a través de la guía del hilo superior.
- Bring the thread down through the right channel, then up through the left channel, ensuring it passes through the take-up lever.
- Enhebre la aguja de adelante hacia atrás.

Image 3.3: Illustration of the upper threading path.
3.4 Instalación de la aguja
To install or replace a needle:
- Gire el volante para subir la aguja a su posición más alta.
- Afloje la aguja clamp tornillo.
- Retire la aguja vieja.
- Insert the new needle with the flat side facing the back of the machine. Push it up as far as it will go.
- Apriete el cierre de la aguja.amp atornillar de forma segura.

Image 3.4: Close-up of the needle and presser foot area.
4. Instrucciones de funcionamiento
4.1 Selección de puntadas
The SINGER Start 1306 offers 6 built-in stitch patterns. Turn the stitch selector dial to choose your desired stitch. The available stitches include 4 basic, 1 decorative, and 1 buttonhole stitch.

Image 4.1: Stitch selector dial with various stitch patterns.
4.2 Conceptos básicos de costura
4.2.1 Starting a Seam
- Coloque la tela debajo del prensatelas, alineando el borde con una guía de costura en la placa de la aguja.
- Bajar el pie prensatela.
- Gire el volante para bajar la aguja hacia la tela en el punto de inicio.
- Press the foot pedal gently to begin sewing.
4.2.2 Finishing a Seam
- Sew to the end of your seam.
- Press the reverse stitch lever to sew a few stitches backward to secure the seam.
- Levante la aguja a su posición más alta.
- Levante el pie prensatela.
- Pull the fabric away from the machine, then cut the threads using the thread cutter on the machine.
4.3 4-Step Buttonhole Function
The machine features a 4-step buttonhole function for creating buttonholes. Refer to the markings on the stitch selector dial for each step (1, 2, 3, 4). Use the buttonhole foot for best results.
4.4 Zipper Insertion
Attach the zipper foot to the machine. This foot allows you to sew close to the zipper teeth, ensuring a neat finish. Follow standard zipper insertion techniques, adjusting the needle position as needed.
4.5 Free Arm Usage
The removable free arm provides access to difficult-to-reach areas such as collars, sleeves, cuffs, and pant hems. To use, slide off the accessory storage compartment to expose the free arm.
5. Mantenimiento
5.1 Limpieza
La limpieza regular ayuda a mantener el rendimiento de la máquina. Desenchufe siempre la máquina antes de limpiarla.
- Eliminación de pelusa: Utilice el cepillo quitapelusas provisto para quitar pelusas y polvo del área de la bobina y de los dientes de arrastre.
- Limpieza exterior: Limpie las superficies exteriores con un paño suave y seco. No utilice productos químicos agresivos ni limpiadores abrasivos.
5.2 Reemplazo de la aguja
Replace needles regularly, especially when sewing different fabric types or if the needle becomes bent or dull. A damaged needle can cause skipped stitches or fabric damage. Refer to section 3.4 for needle installation instructions.
6. Solución de problemas
Esta sección aborda problemas comunes que podrías encontrar. Si tienes problemas que no aparecen aquí, contacta con atención al cliente.
| Problema | Posible causa | Solución |
|---|---|---|
| Puntadas saltadas | Aguja incorrecta, aguja doblada, enhebrado incorrecto. | Reemplace la aguja, vuelva a enhebrar la máquina y asegúrese de que el tipo de aguja sea el correcto para la tela. |
| Rotura de hilo | Enhebrado incorrecto, tensión demasiado fuerte, aguja dañada, hilo de mala calidad. | Re-thread, adjust tension, replace needle, use good quality thread. |
| Atasco del hilo de la bobina | Bobina mal enrollada, inserción incorrecta de la bobina, pelusa en la caja de la bobina. | Re-wind bobbin, re-insert bobbin correctly, clean bobbin area. |
| La máquina no arranca | Power cord not connected, machine switched off, foot pedal not connected. | Check power connections, ensure switch is ON, connect foot pedal. |
7. Especificaciones
| Característica | Detalle |
|---|---|
| Marca | SINGER |
| Número de modelo | Inicio 1306 |
| Peso del artículo | 4.3 kilogramos |
| Dimensiones del producto (LxAnxAl) | 35 x 18 x 29 cm |
| Volumentage | 220 V |
| Quétage | 70 vatios |
| Puntadas incorporadas | 6 (4 basic, 1 decorative, 1 buttonhole) |
| Tipo de ojal | automático de 4 paso |
| Material del marco | Metal de alta resistencia |
| Componentes incluidos | All Purpose Foot, Zipper Foot, Buttonhole Foot, Darning Plate, Pack of Needles, Bobbins, Spool Pin Felts, Needle Plate Screwdriver, Seam Ripper / Lint Brush, Vinyl Dust Cover |

Image 7.1: Product dimensions of the SINGER Start 1306 Sewing Machine.
8. Garantía y soporte
Your SINGER Start 1306 Sewing Machine comes with a manufacturer's warranty. Please refer to the warranty card included with your product for specific terms, conditions, and duration. For technical assistance, service, or to inquire about replacement parts, please contact SINGER customer support through their official websitio o la información de contacto proporcionada en la documentación de su garantía.


