1. Introducción
Thank you for choosing the NuWave 6.5 Quart Stainless Steel Pressure Cooker. This manual provides essential information for the safe and effective use of your appliance. Please read all instructions carefully before first use and retain for future reference.
Información importante de seguridad
- Always ensure the lid is properly sealed before operating.
- No llene demasiado la olla a presión.
- Nunca fuerce la tapa para abrirla mientras la olla esté presurizada.
- Allow pressure to release completely before opening.
- Keep hands and face away from the steam release valve during operation and pressure release.
- Tenga cuidado al manipular superficies calientes.
- Este aparato no está diseñado para que lo utilicen personas con capacidades físicas, sensoriales o mentales reducidas, a menos que estén supervisadas.
2. Producto terminadoview y componentes
The NuWave 6.5 Quart Stainless Steel Pressure Cooker is designed for efficient cooking. Familiarize yourself with its main components:

Figura 2.1: The NuWave 6.5 Quart Stainless Steel Pressure Cooker, showcasing its main body and lid.
Componentes clave:
- Olla principal: Construcción en acero inoxidable.
- Tapa: Features a sealing gasket, pressure indicator, and steam release valve.
- Mango principal: Ergonomic handle for safe handling and lid locking mechanism.
- Mango auxiliar: For two-handed lifting.
- Válvula de liberación de presión: Controls steam release and pressure levels.
- Indicador de presión: Visual cue for internal pressure status.

Figura 2.2: Close-up of the lid handles and the red locking button, which secures the lid to the pot.

Figura 2.3: Arriba view of the pressure release valve, showing settings for steam release and pressure levels (1 and 2).
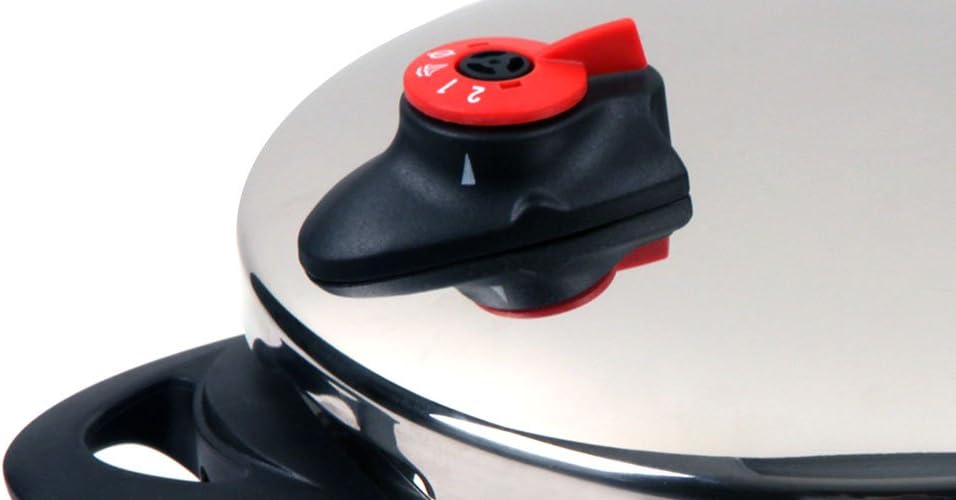
Figura 2.4: Lado view of the pressure release valve, indicating its position on the lid.
3. Configuración y primer uso
3.1 Desembalaje y limpieza inicial
- Remove all packaging materials and labels from the pressure cooker.
- Wash the pot, lid, and all removable parts (sealing gasket, pressure release valve) with warm, soapy water.
- Rinse thoroughly and dry completely before assembly.
3.2 Montaje de la tapa
- Ensure the sealing gasket is correctly seated inside the lid rim.
- Place the pressure release valve onto its designated post on the lid, ensuring it is securely fitted.
4. Instrucciones de funcionamiento
4.1 Llenado de la olla a presión
- Add ingredients and liquid to the pot. Do not fill more than 2/3 full for most foods, and no more than 1/2 full for foods that expand (e.g., rice, beans).
- Ensure there is always a minimum amount of liquid (typically 1 cup) to generate steam.

Figura 4.1: Example of the pressure cooker filled with ingredients such as seafood and vegetables, ready for cooking.

Figura 4.2: The pressure cooker containing various types of rice, demonstrating its capacity for different food preparations.
4.2 Sealing the Lid
- Align the lid with the pot, ensuring the handles are offset.
- Lower the lid onto the pot and rotate the main handle until it locks securely into place with the auxiliary handle. You should hear a click.
- Ensure the pressure release valve is set to the desired pressure setting (e.g., 1 or 2) or to the sealed position, as per your recipe.
4.3 Cocinar bajo presión
- Place the pressure cooker on a suitable heat source (induction, gas, or electric stovetop).
- Heat on high until the pressure indicator rises and steam begins to escape from the valve.
- Reduce heat to maintain a steady, gentle stream of steam or a consistent wobble of the pressure regulator.
- Begin timing your recipe once full pressure is reached.
4.4 Releasing Presión
Hay dos métodos principales para releasing presión:
- Liberación natural: Remove the cooker from heat and allow it to cool down naturally. The pressure indicator will drop on its own. This method is suitable for foods that benefit from additional cooking time, such as stews and roasts.
- Liberación rápida: Carefully turn the pressure release valve to the "steam release" position. Steam will rapidly escape. This method is suitable for delicate foods like vegetables to prevent overcooking. Exercise extreme caution to avoid steam burns.
Abra la tapa únicamente cuando el indicador de presión haya bajado completamente y no salga vapor.
5. Mantenimiento y limpieza
5.1 Limpieza diaria
- After each use, wash the pot and lid with warm, soapy water.
- Remove the sealing gasket and wash it separately. Inspect for cracks or damage.
- Clean the pressure release valve and pressure indicator thoroughly to ensure no food particles obstruct them.
- The pot is dishwasher safe. Hand washing is recommended for the lid and its components to prolong their lifespan.
- Seque todas las piezas por completo antes de guardarlas.
5.2 Almacenamiento
Guarde la olla a presión con la tapa invertida o ligeramente entreabierta para permitir la circulación del aire y evitar olores.
6. Solución de problemas
| Problema | Posible causa | Solución |
|---|---|---|
| La presión no aumenta. | Lid not sealed properly; insufficient liquid; sealing gasket damaged; pressure release valve open. | Ensure lid is locked; add more liquid; inspect/replace gasket; close pressure release valve. |
| Fugas de vapor por la tapa. | Sealing gasket improperly seated or damaged; food debris on rim; lid not closed correctly. | Reposition/replace gasket; clean rim; re-lock lid. |
| La tapa no se puede abrir después de cocinar. | La presión interna todavía está presente. | Do not force. Allow pressure to release fully (natural or quick release) until the pressure indicator drops. |
7. Especificaciones
- Modelo: 31201
- Capacidad: 6.5 cuartos
- Material: Acero inoxidable
- Color: Plata
- Dimensiones: 18 x 16 x 10 pulgadas
- Peso del artículo: 9.48 libras
- Compatibilidad: Electric Stovetop, Gas Stovetop, Induction Compatible Base
- Apto para lavavajillas: Pot only (hand wash lid components)
8. Garantía y soporte
For warranty information and customer support, please refer to the documentation included with your purchase or visit the official NuWave webSitio. Conserve su comprobante de compra para reclamaciones de garantía.


