1. Introducción
This manual provides essential information for the safe and effective operation of your OWON SDS6062 Digital Storage Oscilloscope. Please read this manual thoroughly before using the device to ensure proper setup, operation, and maintenance. The SDS6062 is a 2-channel oscilloscope featuring a 60 MHz bandwidth, 500 MS/s sample rate, and a 10M record length, designed for precise electrical signal analysis.
2. Información de seguridad
Always observe the following safety precautions to prevent injury and avoid damage to the instrument or any connected products. Read these instructions carefully before operation.
- Fuente de energía: Use only the power adapter supplied with the instrument. Ensure the voltage coincide con su fuente de alimentación local.
- Toma de tierra: The oscilloscope must be properly grounded to prevent electric shock.
- Seguridad de la sonda: Do not connect the probe ground lead to a point where a voltage greater than 30V RMS or 42.4V peak is present.
- Ambiente: Operate the device in a well-ventilated area, away from moisture, dust, and direct sunlight. Avoid operating in explosive atmospheres.
- Mantenimiento: Encargue cualquier reparación a personal técnico cualificado. No intente reparar la unidad usted mismo.
3. Contenido del paquete
Verifique que todos los artículos enumerados a continuación estén en su paquete. Si falta algún artículo o está dañado, comuníquese con su proveedor.
- OWON SDS6062 Digital Storage Oscilloscope Unit
- 2 sondas de osciloscopio
- 1 x Cable de Alimentación
- 1 x Probe Adjust Pen
- Cable de datos 1 x USB
- 1 CD de software
- 1 x Manual del usuario (este documento)
4. Producto terminadoview
The OWON SDS6062 is a compact and powerful digital storage oscilloscope. It features an 8-inch (800x600) color TFT-LCD screen for clear waveform display and an intuitive control panel for easy operation. Key features include its 60 MHz bandwidth, 500 MS/s real-time sample rate, and 10M record length, making it suitable for a wide range of applications.
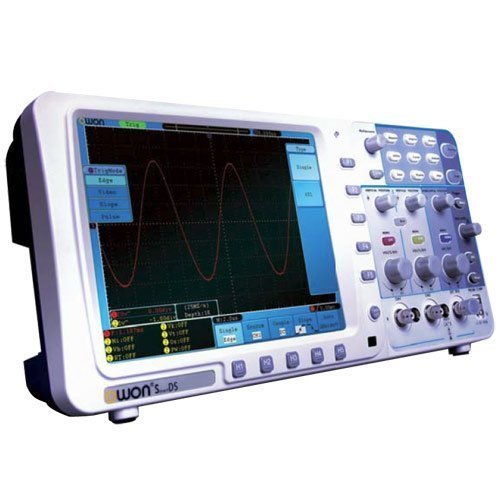
Figura 4.1: Frente view of the OWON SDS6062 Digital Storage Oscilloscope, showing the display, control knobs, and function buttons.
4.1 Controles del panel frontal
The front panel includes the main display, vertical controls (VOLTS/DIV, position), horizontal controls (SEC/DIV, position), trigger controls, and various function buttons for menu navigation, measurement, and utility settings.
4.2 Conexiones del panel posterior
The rear panel provides connectivity options including the power input, USB host and device ports, LAN port for network connectivity, and a VGA port for external display output.
5. Configuración
Follow these steps to set up your OWON SDS6062 oscilloscope for initial use.
5.1 Conexión de la alimentación
- Ensure the oscilloscope is turned off.
- Connect the supplied power cord to the power input on the rear panel of the oscilloscope.
- Conecte el otro extremo del cable de alimentación a una toma de corriente CA con conexión a tierra.
5.2 Conexión de sondas
- Align the BNC connector of the probe with the CH1 or CH2 input on the front panel.
- Push and twist the connector clockwise until it locks into place.
- Attach the probe ground clip to the ground terminal of the circuit under test.
- Set the probe attenuation switch (e.g., 1X or 10X) to match the setting on the oscilloscope's input channel menu.
5.3 Encendido inicial
- Presione el botón de encendido ubicado en el panel frontal.
- The oscilloscope will perform a self-test and display the startup screen.
- After startup, it is recommended to perform a probe compensation adjustment (refer to Section 7.3).
6. Operación del osciloscopio
This section covers basic operation and common functions of the SDS6062.
6.1 Medidas básicas
To display a signal:
- Connect a signal source to CH1 or CH2 using a probe.
- Presione el AJUSTE AUTOMÁTICO button. The oscilloscope will automatically adjust vertical, horizontal, and trigger settings to display a stable waveform.
- Ajustar el VOLTIOS / DIV knob to change the vertical scale (voltage por división).
- Ajustar el SEC/DIV knob to change the horizontal scale (time per division).
- Use the vertical and horizontal POSICIÓN knobs to move the waveform on the screen.
6.2 Sistema de disparo
El sistema de disparo estabiliza formas de onda repetitivas y captura eventos de disparo único.
- Nivel de disparo: Utilice el NIVEL DE DISPARO Perilla para ajustar el volumentage level at which the trigger occurs.
- Modo de disparo: Access the trigger menu to select modes like Edge, Pulse, Video, or Slope.
- Fuente de activación: Select the input channel (CH1, CH2, EXT, AC Line) that will be used for triggering.
6.3 Funciones de medición
The SDS6062 offers various automatic measurement functions.
- Presione el MEDIDA button to display the measurement menu.
- Select desired measurements such as Vpp, Vmax, Vmin, Freq, Period, Rise Time, etc.
6.4 Connectivity (LAN and VGA)
- LAN: Connect an Ethernet cable to the LAN port on the rear panel to connect the oscilloscope to a network. This allows for remote control and data transfer using compatible software.
- VGA: Use the VGA port to connect an external monitor or projector for larger display of waveforms, useful for presentations or collaborative work.
7. Mantenimiento
Un mantenimiento adecuado garantiza la longevidad y la precisión de su osciloscopio.
7.1 Limpieza
Limpie el instrumento periódicamente con un paño suave y húmedo.amp cloth. Do not use abrasive cleaners or solvents that could damage the casing o pantalla. Asegúrese de que el dispositivo esté apagado y desenchufado antes de limpiarlo.
7.2 Almacenamiento
When not in use, store the oscilloscope in a dry, dust-free environment, away from extreme temperatures and direct sunlight. Use the original packaging or a suitable carrying case for protection during transport.
7.3 Probe Compensation Adjustment
Probe compensation should be adjusted to match the oscilloscope's input characteristics. This ensures accurate measurements.
- Connect the probe to CH1 and attach the probe tip to the probe compensation output (usually a square wave test point on the front panel).
- Attach the probe ground clip to the ground terminal.
- Prensa AJUSTE AUTOMÁTICO.
- Use the supplied probe adjust pen to turn the trimmer screw on the probe until the square wave displayed on the screen has flat top and bottom edges (no overshoot or undershoot).
8. Solución de problemas
Esta sección proporciona soluciones a problemas comunes que puede encontrar.
- Sin pantalla: Check power connection, ensure the power button is pressed. Adjust screen brightness if necessary.
- Sin forma de onda: Verify probe connection to the input channel and the circuit under test. Ensure the signal source is active. Press AJUSTE AUTOMÁTICO. Check vertical and horizontal scale settings.
- Forma de onda inestable: Adjust the trigger level. Check trigger mode and source settings. Ensure the signal is within the oscilloscope's bandwidth.
- Medidas inexactas: Perform probe compensation adjustment (Section 7.3). Ensure probe attenuation settings match the oscilloscope.
- El dispositivo no responde: Try restarting the oscilloscope. If the issue persists, contact technical support.
9. Especificaciones
Technical specifications for the OWON SDS6062 Digital Storage Oscilloscope.
| Parámetro | Especificación |
|---|---|
| Número de modelo | SDS6062 |
| Ancho de banda | 60 MHz |
| Canales | 2 + 1 (External Trigger) |
| Sample Rate (Real-time) | 500 MS/s |
| Duración del registro | 10 millones de puntos |
| Mostrar | 8-inch Color TFT-LCD (800x600) |
| Interfaz | USB Host, USB Device, LAN, VGA |
| AutoScale Function | Sí |
| Fabricante | OWON |
10. Garantía y soporte
OWON products are designed for reliability and performance. For warranty information, please refer to the warranty card included with your product or visit the official OWON website. For technical support, troubleshooting assistance, or service inquiries, please contact your local OWON distributor or the OWON customer service department. Keep your purchase receipt as proof of purchase for warranty claims.


