1. Introducción
This manual provides essential information for the safe and efficient operation, installation, and maintenance of your KwiKool KPAC1811-2 Air-Cooled 1.5-ton Portable Spot Cooler. Please read this manual thoroughly before using the unit and retain it for future reference.
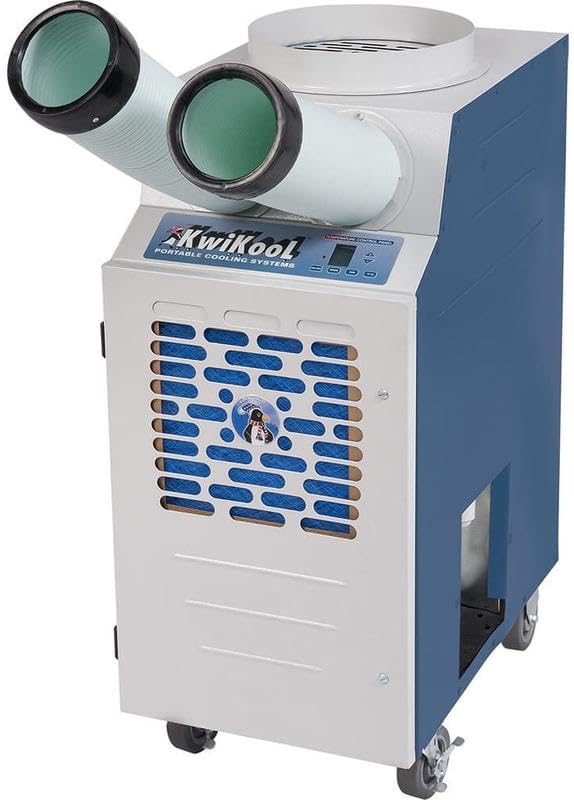
Figure 1: KwiKool KPAC1811-2 Portable Spot Cooler. This image shows the front and side view of the portable air conditioner unit, featuring two flexible cold air supply ducts and a blue and gray casing.
2. Información de seguridad
Observe siempre las precauciones básicas de seguridad al utilizar aparatos eléctricos para reducir el riesgo de incendio, descarga eléctrica y lesiones a las personas.
- Ensure the unit is connected to a properly grounded 115V / 20Amp 1 pH electrical outlet.
- No opere la unidad con un cable o enchufe dañado.
- Do not block air intake or exhaust openings. Maintain adequate clearance around the unit.
- No introduzca objetos en ninguna abertura.
- Mantenga a los niños y las mascotas alejados de la unidad durante su funcionamiento.
- Desconecte la alimentación antes de realizar cualquier mantenimiento o limpieza.
- This unit contains R-410A refrigerant. Servicing should only be performed by qualified personnel.
3. Producto terminadoview
The KwiKool KPAC1811-2 is an air-cooled 1.5-ton (16,800 BTU) portable spot cooler designed for efficient cooling in various environments. It features a self-contained, maintenance-free operation, suitable for both permanent and portable installations.
3.1 componentes clave

Figure 2: Key Components of the KPAC1811-2. This image highlights the Condenser Air Outlet (Hot Air Exhaust), Flexible Air Chutes (5" Cold Air Supply), Cold Air Return (Evaporator Intake), and the Condensate tank (5 gal).
- Condenser Air Outlet: Located at the top, this expels hot air. Exhaust ducting may be required for many applications.
- Flexible Air Chutes: Two 5-inch diameter ducts for directing cold air supply.
- Cold Air Return: The front grille where air is drawn into the evaporator for cooling.
- Tanque de condensado: A 5-gallon tank located at the bottom for collecting condensed water.
3.2 Especificaciones técnicas
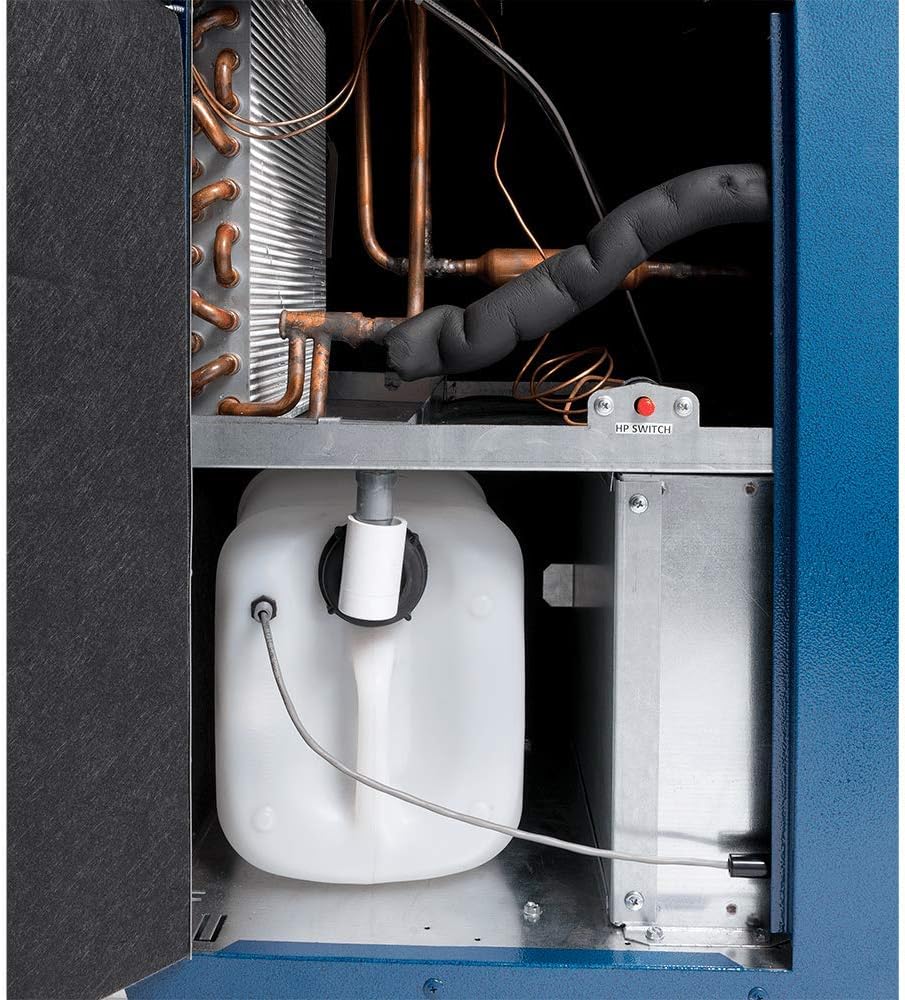
Figure 3: Technical Specifications for KwiKool KPAC1811-2. This image displays a table detailing cooling capacity, compressor data, fan data, electrical data, dimensional data, and safety device data.
| Característica | Especificación |
|---|---|
| Capacidad de enfriamiento | 16,800 BTU (1.5-ton) |
| Volumentage | 115 V |
| Ampanhelo | 14.5 Amps |
| Fase | 1 pH |
| Refrigerante | R-410A |
| Dimensiones del producto (WxDxH) | 16 x 26 x 37 pulgadas |
| Peso del artículo | 157 libras |
| Peso del envío | 260 libras |
| Cobertura del área del piso | Hasta 600 pies cuadrados |
| Condensate Tank Capacity | 5 galones |
| Características especiales | Easy to Install, Energy Efficient |
3.3 Diagrama dimensional
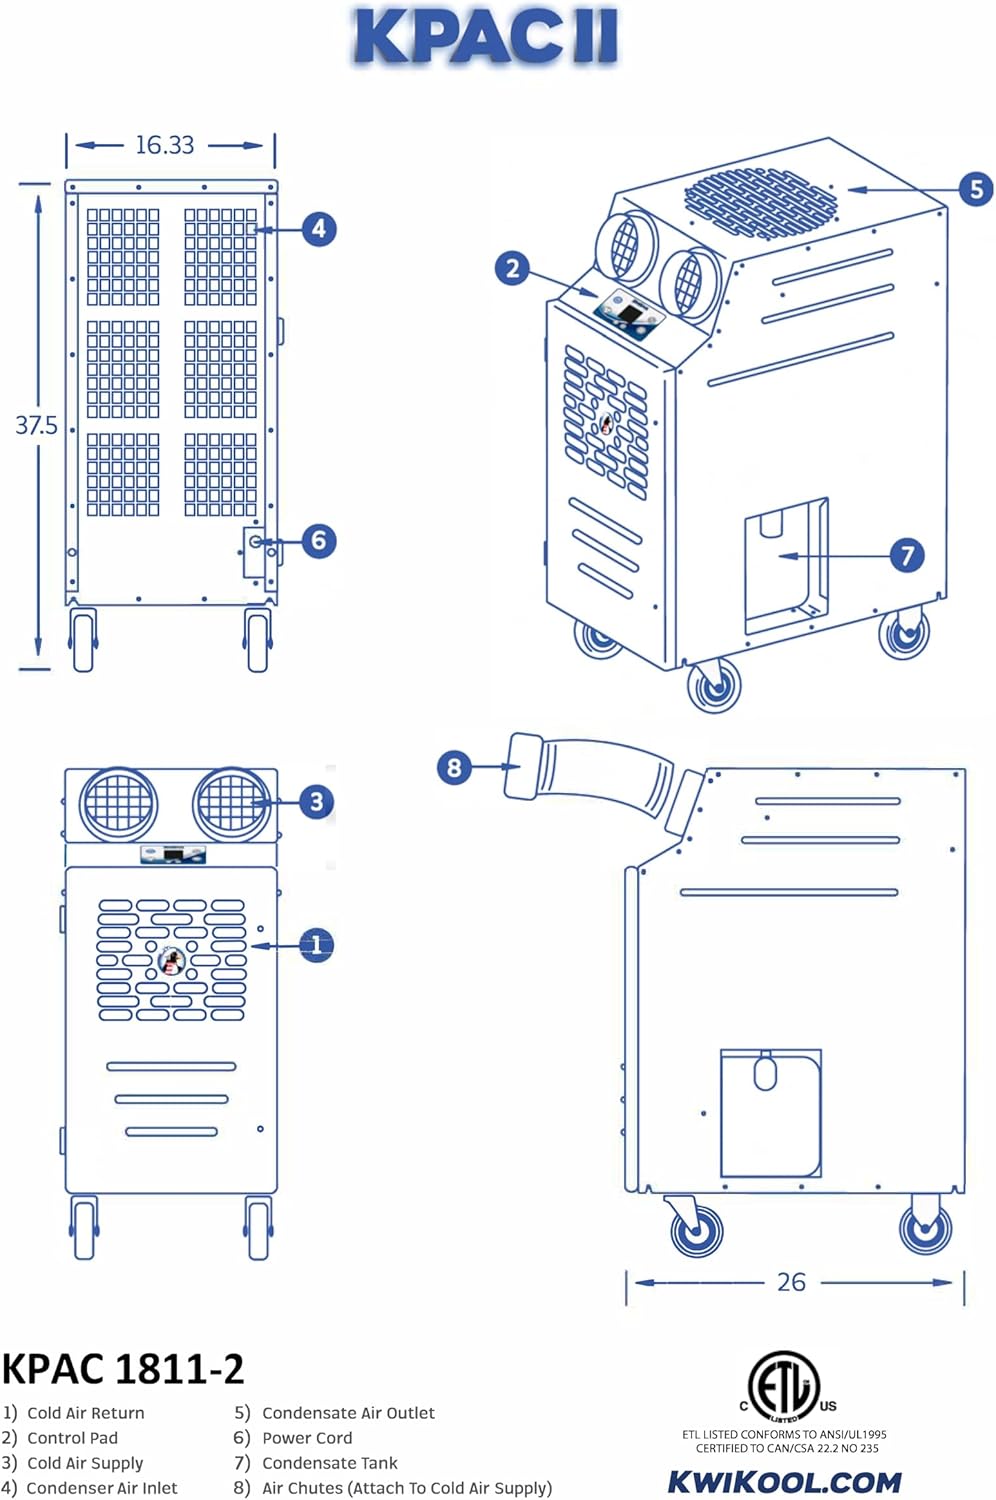
Figure 4: Dimensional Diagram of KPAC1811-2. This diagram provides various views of the unit with measurements and numbered labels for key components: 1) Cold Air Return, 2) Control Panel, 3) Cold Air Supply, 4) Condenser Air Inlet, 5) Condensate Air Outlet, 6) Power Cord, 7) Condensate Tank, 8) Air Chutes (Attach to Cold Air Supply).
4. Configuración e instalación
The KPAC1811-2 is designed for ease of installation. Follow these steps for proper setup:
- Desembalaje: Retire con cuidado la unidad de su embalaje. Inspeccione si presenta daños durante el envío.
- Colocación: Position the unit on a level surface. Ensure adequate clearance around the unit for proper airflow (refer to Figure 4 for condenser air inlet/outlet locations).
- Conexión eléctrica: Connect the power cord (6) to a dedicated 115V / 20Amp 1 pH grounded outlet.
- Cold Air Supply: Attach the flexible air chutes (8) to the cold air supply outlets (3) on the unit. Direct the chutes towards the area requiring cooling.
- Hot Air Exhaust (Optional but Recommended): For optimal performance and to prevent heat recirculation, it is recommended to duct the hot air exhaust from the condenser air outlet (5) to an adjacent room or outdoors.
- Tanque de condensado: Ensure the condensate tank (7) is properly seated inside the unit. The unit will automatically collect condensed water in this tank.
5. Operación
Once installed, operating the KPAC1811-2 is straightforward:
- Encendido: Enchufe la unidad en la toma de corriente adecuada.
- Panel de control: Use the control panel (2) to power on the unit and set the desired temperature. Refer to the specific controls on the unit for detailed temperature adjustment and mode selection.
- Dirección del flujo de aire: Adjust the flexible air chutes (8) to direct the cold air precisely where it is needed.
- Gestión de condensados: The unit will collect condensate in the internal tank. Monitor the tank and empty it when full to prevent automatic shutdown.
6. Mantenimiento
Regular maintenance ensures the longevity and efficient operation of your spot cooler.
- Emptying the Condensate Tank: The condensate tank (7) should be emptied regularly. The frequency depends on humidity levels. The unit may have an indicator or automatic shut-off when the tank is full.
- Limpieza de filtros de aire: The air filters (visible on the front grille, Cold Air Return (1)) should be cleaned periodically to maintain airflow and cooling efficiency. Disconnect power, remove filters, clean with mild detergent and water, dry thoroughly, and reinsert.
- Limpieza de la bobina: Periodically inspect the evaporator and condenser coils for dust and debris. If heavily soiled, professional cleaning may be required.
- Limpieza general: Limpie el exterior de la unidad con un paño suave yamp paño. No utilice productos químicos agresivos ni limpiadores abrasivos.
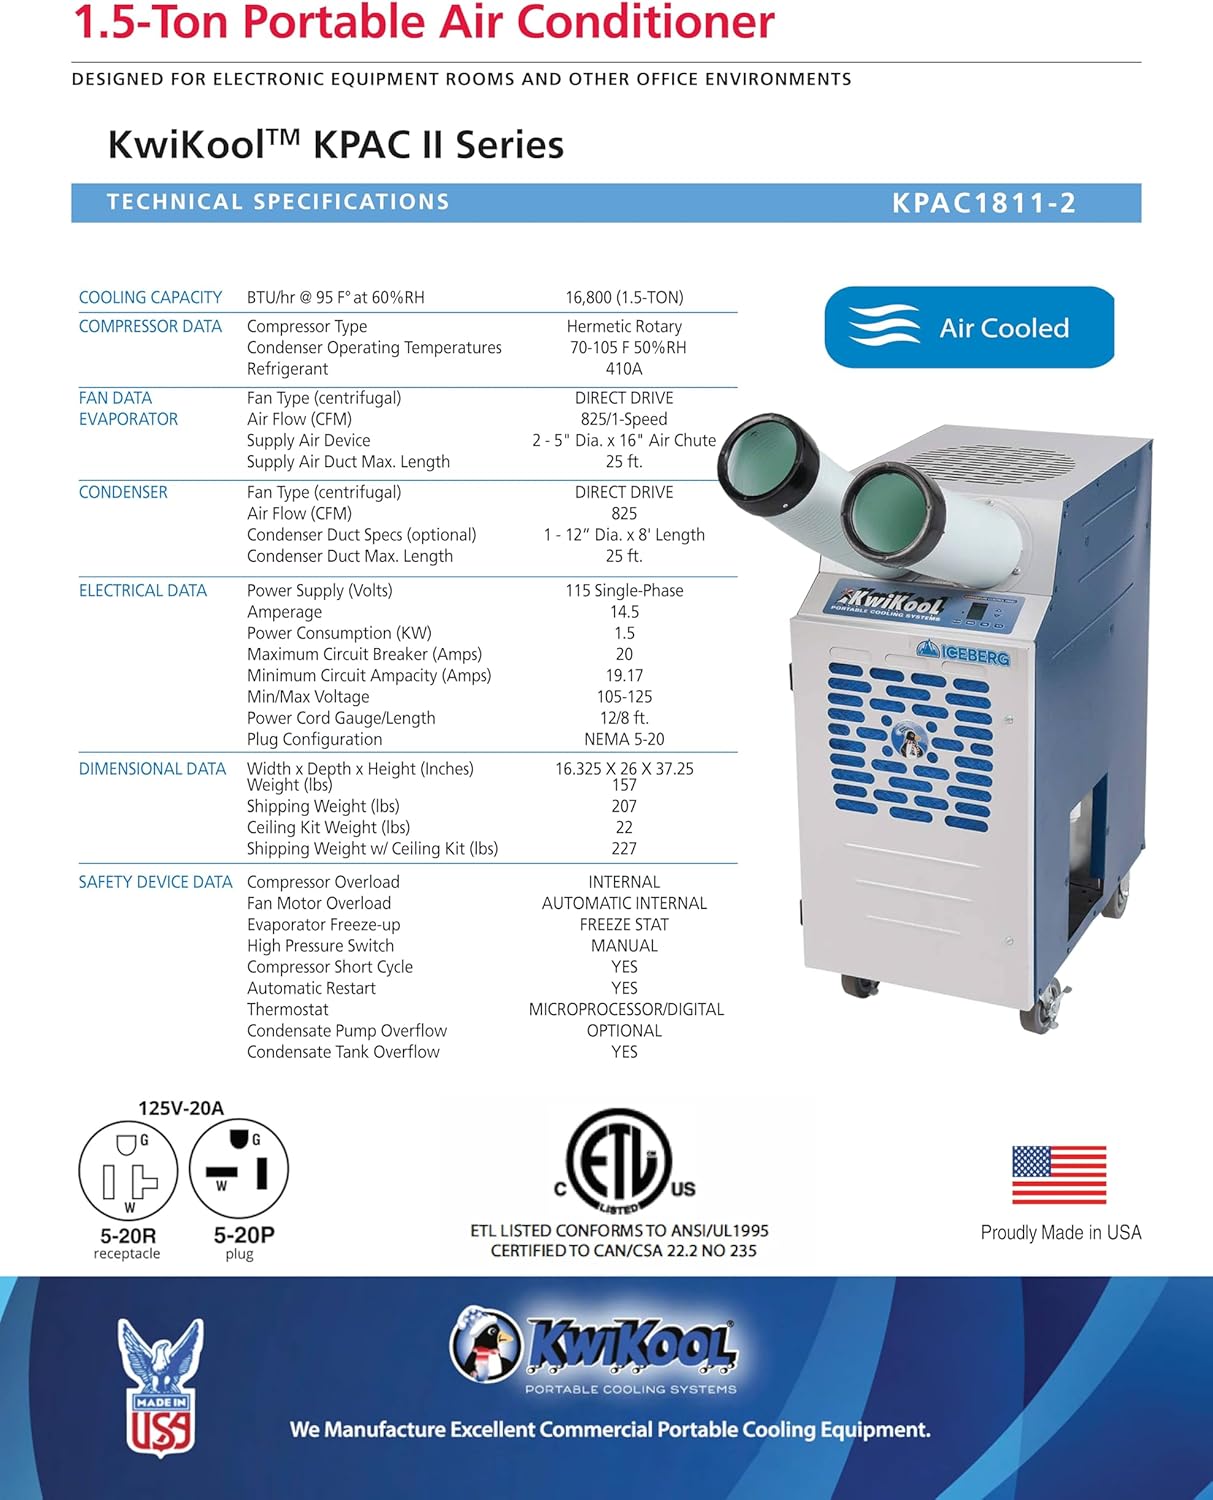
Figura 5: Interna View of KPAC1811-2. This image shows the internal components, including the condensate tank and the HP (High Pressure) switch, which is a safety feature.
7. Solución de problemas
If your unit is not operating correctly, consult the following common issues before contacting support:
- La unidad no se enciende:
- Compruebe si el cable de alimentación está enchufado de forma segura a una toma de corriente activa.
- Verifique que el disyuntor no se haya disparado.
- Ensure the condensate tank is not full; empty if necessary.
- Enfriamiento insuficiente:
- Compruebe que los filtros de aire estén limpios y no obstruidos.
- Ensure cold air supply chutes are directed properly.
- Verify that the hot air exhaust is not recirculating into the cooled space.
- Ensure the room temperature is within the operating range of the unit.
- Fuga de agua:
- Ensure the condensate tank is correctly seated and not overflowing.
- Check for any blockages in the condensate drain line (if applicable).
For issues not resolved by the above steps, contact KwiKool customer support.
8. Garantía y soporte
KwiKool products are manufactured with quality and reliability in mind. For specific warranty details, please refer to the documentation provided at the time of purchase or contact KwiKool directly.
For customer support, inquiries, or service requests, please refer to the contact information provided by your retailer or visit the official KwiKool website. Amazon offers a 30-day easy return policy for this product.


