1. Introducción
The PreSonus AIR10 is a compact and lightweight 2-way active sound-reinforcement loudspeaker designed to deliver rich low-end and natural high-frequency extension. Its enclosure is engineered for portability and versatility, fitting easily into various setups.
Key features of the AIR10 include:
- 10-inch custom low-frequency driver with 2-inch voice coil.
- 1-inch high-frequency compression driver.
- 90° horizontal dispersion x 60° vertical dispersion.
- Hybrid 1,200W power amplifier configuration (Class D for low-end, Class AB for high-frequency).
- Onboard mixer with two combo XLR and ¼” inputs, plus a stereo 1/8” input.
- Easy-to-use Digital Signal Processing (DSP) performance presets.
2. Información de seguridad
Before operating your PreSonus AIR10 loudspeaker, please read and understand all safety instructions. Retain this manual for future reference.
- Fuente de energía: Conecte la unidad únicamente a una fuente de alimentación del tipo descrito en este manual o en la unidad.
- Toma de tierra: Asegúrese de que la unidad esté correctamente conectada a tierra para evitar descargas eléctricas.
- Ventilación: No bloquee las aberturas de ventilación. Haga la instalación conforme a las instrucciones del fabricante.
- Agua y humedad: No utilice este aparato cerca del agua ni lo exponga a goteos o salpicaduras.
- Calor: No lo instale cerca de fuentes de calor como radiadores, rejillas de calefacción, estufas u otros aparatos (incluidos ampificadores) que producen calor.
- Servicio: Refiera todo el servicio a personal de servicio calificado. Se requiere servicio cuando el aparato ha sido dañado de alguna manera.
- Protección auditiva: La exposición prolongada a niveles altos de presión sonora puede causar daño auditivo permanente. Tenga cuidado al ajustar el volumen.
3. Configuración
Proper setup ensures optimal performance and safety for your AIR10 loudspeaker.
3.1 Desembalaje
Carefully remove the AIR10 from its packaging. Inspect the unit for any signs of damage that may have occurred during shipping. If damage is found, contact your dealer or PreSonus immediately.
3.2 Colocación y montaje
The AIR10 is designed for versatile placement, including front-of-house (FOH), floor wedge monitoring, stand mounting, bracket mounting, or flown installations. Location presets optimize performance for these different configurations.

Figura 1: Frente view of the PreSonus AIR10 Active Loudspeaker.

Figura 2: Lado view of the PreSonus AIR10 Active Loudspeaker, showing integrated handles.
3.3 Conexión de alimentación
Connect the provided power cord to the AC inlet on the rear panel of the AIR10 and then to a suitable grounded power outlet. Ensure the voltage selector switch matches your local power supply before powering on the unit.
3.4 Conexiones de entrada
The AIR10 features an onboard mixer with various input options:
- Mic/Line 1 & 2: Two combo XLR and ¼” inputs for microphones or line-level sources.
- Entrada auxiliar: A stereo 1/8” input for connecting portable media players or other consumer-level devices.
- Mezclar: An XLR output for sending the mixed signal to another AIR series loudspeaker or a subwoofer.
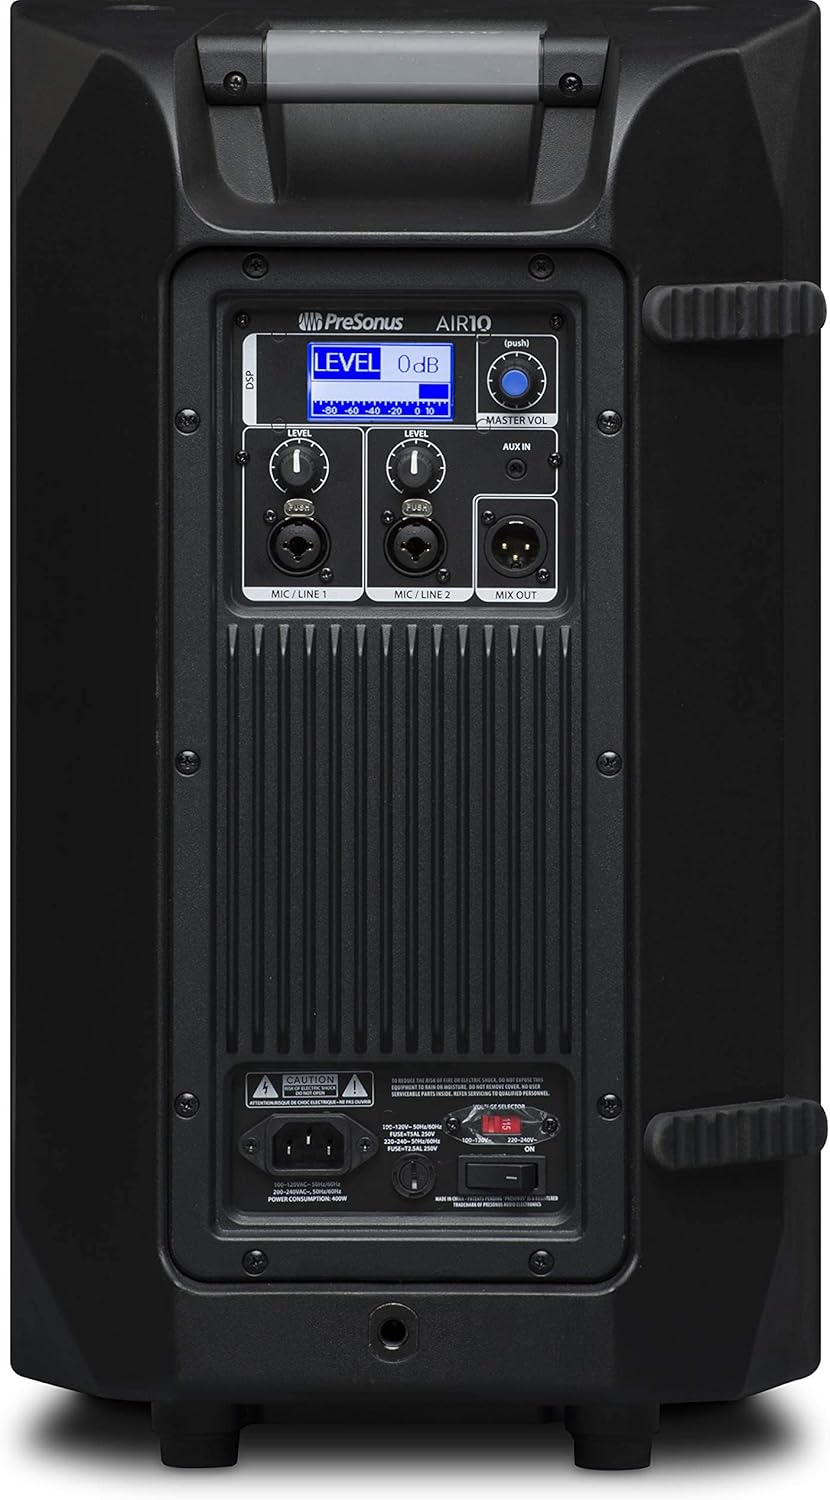
Figure 3: Rear panel of the PreSonus AIR10, showing input/output connections, level controls, DSP display, and power switch.
4. Operando
The AIR10 is designed for straightforward operation with powerful DSP controls.
4.1 Encendido / Apagado
After connecting the power cord, locate the power switch on the rear panel. Flip the switch to the 'ON' position. The front panel LED will illuminate to indicate power. Always power on your AIR10 after connecting all audio sources and power off before disconnecting.
4.2 Level Controls
Adjust the individual LEVEL knobs for Mic/Line 1 and Mic/Line 2 to set the input gain for your sources. The MASTER VOL knob controls the overall output level of the loudspeaker.
4.3 DSP Performance Presets
The AIR10 features easy-to-use DSP presets to optimize its performance for various applications. These presets include options for front-of-house use, floor wedge placement, music playback, enhanced low-end warmth, and improved speech intelligibility. Use the DSP button and display on the rear panel to navigate and select the appropriate preset for your environment.
4.4 Controles de ecualización
The onboard EQ controls allow you to compensate for room anomalies and fine-tune the sound. Access these controls via the DSP menu to adjust frequency response as needed for your specific acoustic space.
4.5 Vídeo terminadoview
Vídeo 1: Un oficial sobreview of the PreSonus AIR series loudspeakers, demonstrating features and sound quality. This video provides a visual guide to the product's capabilities and design.
5. Mantenimiento
Regular maintenance helps prolong the life and performance of your AIR10 loudspeaker.
- Limpieza: Use a soft, dry cloth to clean the exterior of the loudspeaker. Do not use abrasive cleaners, waxes, or solvents.
- Reja: Periodically check the front grille for dust or debris accumulation. Gently clean with a soft brush or vacuum if necessary.
- Almacenamiento: Cuando no vaya a utilizarlo durante períodos prolongados, guarde el altavoz en un entorno seco y con temperatura controlada, idealmente en su embalaje original o en una funda protectora.
6. Solución de problemas
This section addresses common issues you might encounter with your AIR10 loudspeaker.
6.1 Sin energía
- Check that the power cord is securely connected to both the loudspeaker and the power outlet.
- Verifique que la toma de corriente esté activa.
- Asegúrese del volumentagEl interruptor selector en el panel trasero está configurado correctamente para su región.
- Check the fuse on the rear panel. Replace if blown with a fuse of the correct type and rating.
6.2 Sin sonido
- Confirm the loudspeaker is powered on and the front LED is illuminated.
- Check all audio cable connections from your source to the AIR10 inputs.
- Ensure the input LEVEL knobs and the MASTER VOL knob are turned up.
- Verify that your audio source is active and producing sound.
- If using the Mix Out, ensure the connected device is receiving a signal and its volume is adjusted.
6.3 Silbido o ruido
- Reduce the input gain (LEVEL knobs) if the input signal is too strong.
- Asegúrese de que todos los cables estén en buenas condiciones y debidamente protegidos.
- Try connecting the loudspeaker to a different power outlet to rule out ground loop issues.
- Disconnect all inputs and listen for the noise. If the noise persists, the issue may be internal.
7. Especificaciones
| Característica | Especificación |
|---|---|
| Nombre del modelo | Aire 10 |
| Tipo de altavoz | 2-Way Active Sound-Reinforcement Loudspeaker |
| Diámetro del woofer | 10 pulgadas |
| Diámetro del tweeter | 1 pulgadas |
| Vocero AmpTipo de lificación | Active (Hybrid Class D/Class AB) |
| Potencia máxima de salida del altavoz | 1200 vatios |
| Tecnología de conectividad | XLR, 1/4", 1/8" |
| Modo de salida de audio | Estéreo |
| Peso del artículo | 28.7 libras |
| Dimensiones del producto | 14.1 x 14.6 x 24.4 pulgadas |
| Tipo de montaje | Car Mount, Floor Mount, Stand, Bracket, Suspend |
| Método de control | Touch (DSP) |
8. ¿Qué hay en la caja?
Your PreSonus AIR10 package should contain the following items:
- PreSonus AIR10 10" 2-Way Active Sound-Reinforcement Loudspeaker
- Cable de alimentación
- Product Documentation (including this manual)
9. Garantía y soporte
PreSonus provides a limited warranty for the AIR10 loudspeaker. For detailed warranty information, please refer to the warranty card included with your product or visit the official PreSonus websitio.
For technical support, product registration, or to access additional resources, please visit the PreSonus support page or contact their customer service directly. Keeping your product registered can facilitate warranty claims and support.


