Introducción
Thank you for choosing the WOLTU 3-Tier Shoe Rack. This manual provides essential information for the safe assembly, proper use, and effective maintenance of your new shoe organizer. Please read these instructions carefully before assembly and retain them for future reference.
This shoe rack is designed for efficient storage, offering a space-saving solution with its compact dimensions and versatile design. It features high-quality, durable materials for long-lasting use.
Información de seguridad
- Asegúrese de que todos los componentes estén presentes y sin daños antes del montaje. No lo utilice si alguna pieza falta o está rota.
- Monte la unidad sobre una superficie suave y limpia para evitar rayones.
- Do not overload the shoe rack. Refer to the 'Specifications' section for maximum weight capacity.
- Mantenga las piezas pequeñas fuera del alcance de los niños durante el montaje para evitar peligro de asfixia.
- Place the shoe rack on a stable, level surface to prevent tipping.
- Este producto está destinado únicamente para uso en interiores.
Contenido del paquete
Antes de comenzar el montaje, verifique que todos los siguientes componentes estén incluidos en el paquete:
- Side Frames (2 pieces)
- Metal Tubes (multiple pieces for 3 tiers)
- Plastic Connectors (pre-attached to side frames or separate)

Image: All components required for assembly, including side frames and metal tubes.
Instrucciones de instalación y montaje
Assembly of your WOLTU 3-Tier Shoe Rack is designed to be straightforward and does not require special tools. Follow these steps:
- Paso 1: preparar los componentes
Unpack all parts and lay them out on a clean, soft surface. Identify the two side frames and the metal tubes. - Step 2: Attach First Set of Tubes
Insert the ends of the metal tubes into the designated holes on one of the side frames. Ensure they are securely fitted. - Step 3: Connect Second Side Frame
Align the other side frame with the exposed ends of the metal tubes and push them firmly into place until all connections are secure. - Paso 4: verificar la estabilidad
Once all tubes are connected, gently press down on the top of the rack to ensure all connections are tight and the structure is stable.
Image: Visual guide for connecting the metal tubes to the side frames during assembly.
Instrucciones de funcionamiento (uso)
Your WOLTU 3-Tier Shoe Rack is designed for versatile shoe storage and organization. Here's how to use it effectively:
- Standard Shoe Storage: Place shoes directly on the metal tube tiers. The rack can accommodate approximately 12 pairs of standard-sized shoes.
- Adjustable Tier Height: Each tier is approximately 17 cm high. For taller items like boots, you can remove one or more metal tubes from a tier to create more vertical space. This flexibility allows you to customize the rack to fit various shoe types or other items.
- Aplicación en múltiples escenarios: The compact and modern design makes this shoe rack suitable for various locations in your home, including entryways, living rooms, bedrooms, or hallways.

Image: The shoe rack filled with various types of footwear, demonstrating its capacity.

Image: Illustration showing how metal tubes can be disconnected to create more vertical space for boots or other tall items.

Imagen: Examples of the shoe rack being used in various rooms, highlighting its adaptability.
Mantenimiento
To ensure the longevity and appearance of your WOLTU 3-Tier Shoe Rack, follow these simple maintenance guidelines:
- Limpieza: The rack is made from water-resistant and rust-proof materials. Wipe down the metal tubes and plastic frames with a soft, damp paño. Evite limpiadores abrasivos o productos químicos fuertes que puedan dañar el acabado.
- El secado: After cleaning, dry all surfaces thoroughly to prevent water spots or residue buildup.
- Inspección: Revise periódicamente todas las conexiones para asegurarse de que estén bien apretadas y seguras. Vuelva a apretarlas si es necesario.
- Colocación: Avoid prolonged exposure to direct sunlight or extreme humidity, which can affect material integrity over time.
Solución de problemas
If you encounter any issues with your WOLTU 3-Tier Shoe Rack, please refer to the following common solutions:
- Estante tambaleante: Ensure all metal tubes are fully inserted into the plastic connectors on both side frames. Disassemble and reassemble if necessary, making sure each connection is firm.
- Partes faltantes: If you find any parts missing upon unboxing, please contact WOLTU customer support immediately for assistance.
- Dificultad de montaje: Review the 'Setup and Assembly Instructions' section and the accompanying image. Ensure you are applying sufficient, even pressure when connecting the tubes.
Presupuesto
| Característica | Detalle |
|---|---|
| Número de modelo | SR0024cm3 |
| Dimensiones (L x An x Al) | 79 cm x 19.5 cm x 45 cm |
| Material | Alloy Steel (tubes), PP Plastic (connectors/frames) |
| Número de niveles | 3 |
| Capacidad de peso por nivel | Aproximadamente 8 kg (total) |
| Color | Marfil |
| Método de instalación | Freestanding |
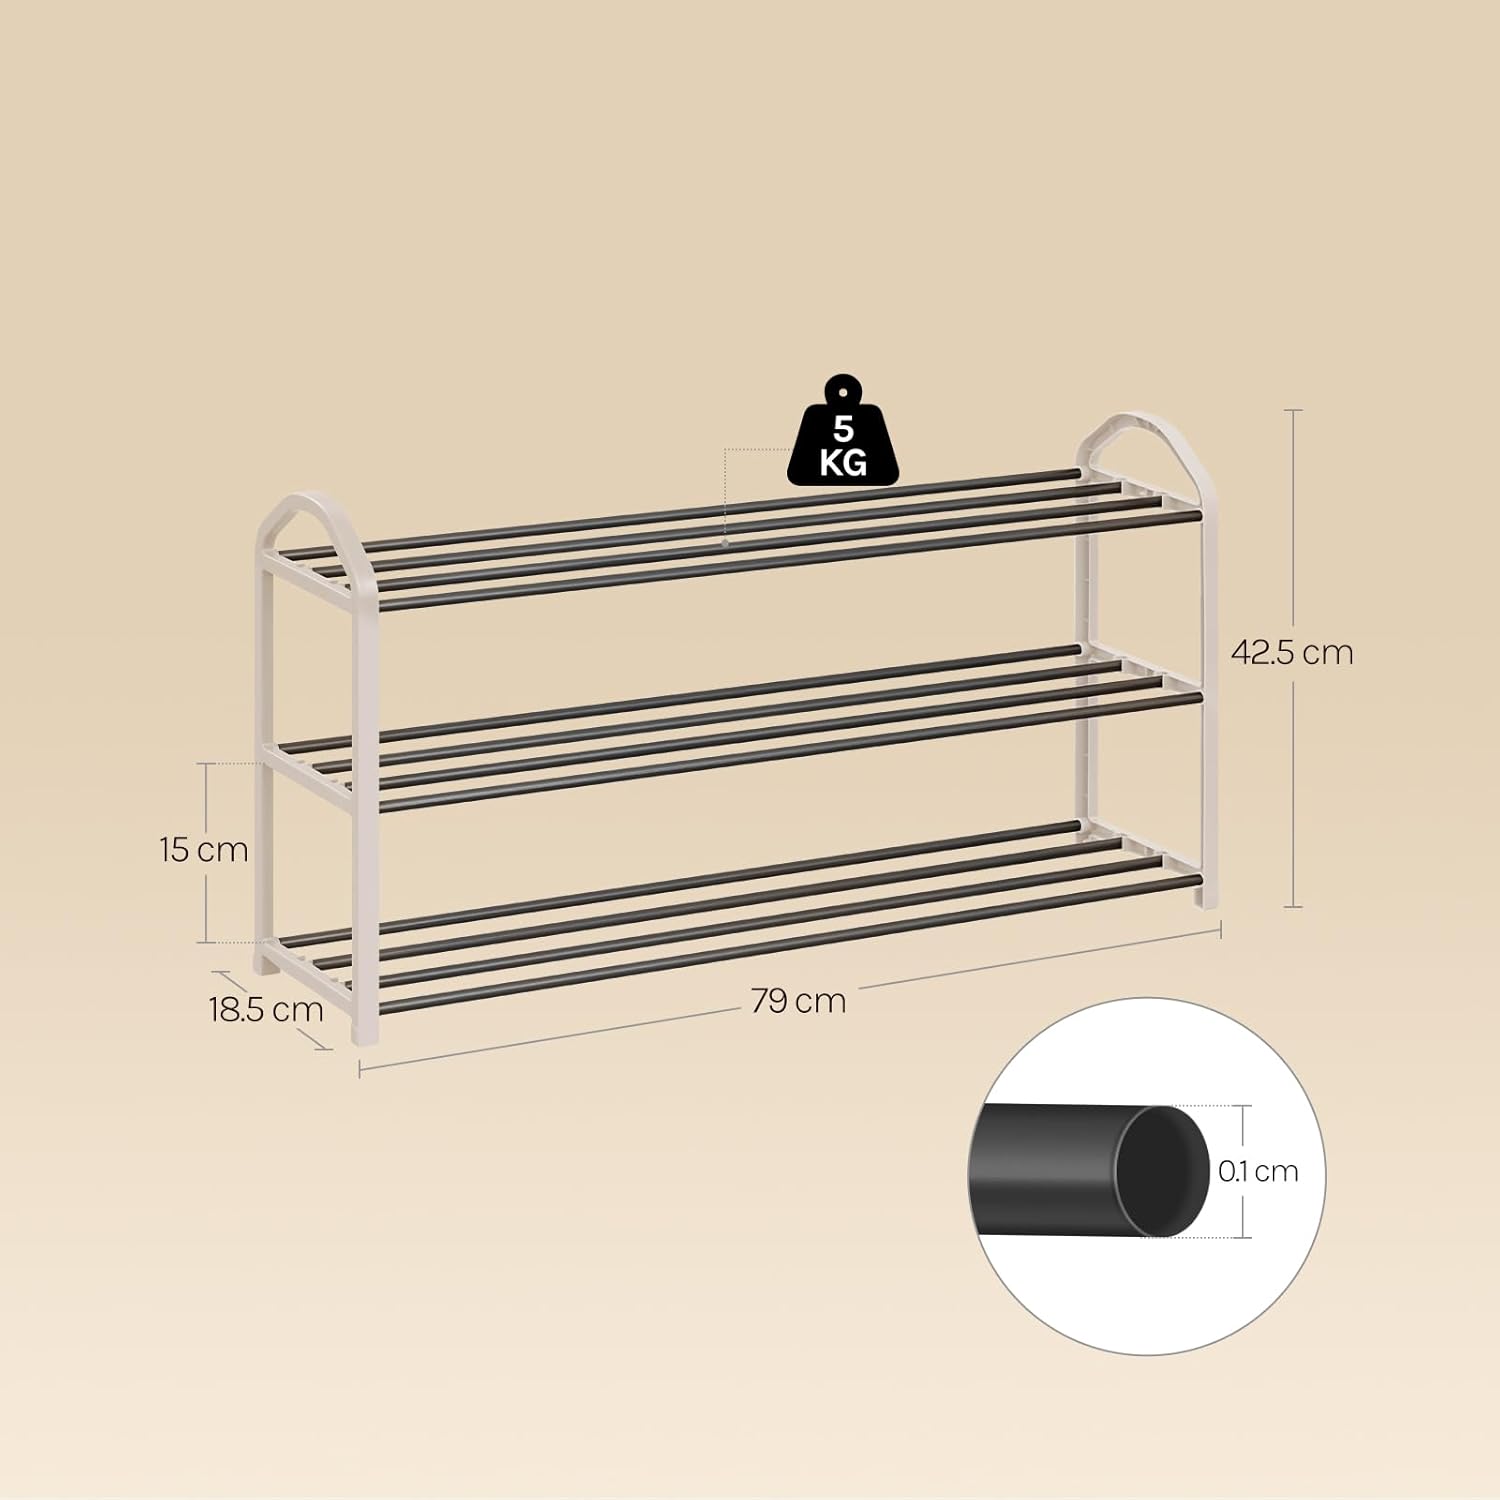
Image: Detailed dimensions of the shoe rack, including height, width, and depth.
Garantía y soporte
WOLTU is committed to providing high-quality products. For any questions, concerns, or support needs regarding your WOLTU 3-Tier Shoe Rack, please contact WOLTU customer service. Please have your model number (SR0024cm3) and purchase information ready when contacting support.
Information regarding specific warranty terms may be available on the official WOLTU website or through your retailer at the time of purchase.


