1. Introducción
This manual provides comprehensive instructions for the safe and effective use of the PCE Instruments PCE-170 A Light Meter. This device is designed for measuring illuminance (lux or foot-candles) in various environments, such as offices, factories, and outdoor settings. It features a wide measurement range, fast response time, and a compact design for ease of use.
Lea este manual detenidamente antes de utilizar el dispositivo y consérvelo para futuras consultas.
2. Información de seguridad
Tenga en cuenta las siguientes precauciones de seguridad para evitar lesiones y evitar daños al dispositivo:
- No exponga el dispositivo a temperaturas extremas, humedad o luz solar directa.
- Evite vibraciones o impactos fuertes.
- No intente abrir ni modificar el dispositivo. Todas las reparaciones deben ser realizadas por personal cualificado.
- Keep the light sensor clean and free from obstructions to ensure accurate readings.
- Retire la batería si el dispositivo no se utilizará durante un período prolongado para evitar fugas.
- Deseche las baterías y el dispositivo de acuerdo con las normativas locales.
3. Producto terminadoview
The PCE-170 A Light Meter consists of a main unit with a display and control buttons, and an integrated light sensor.

Figura 1: Frente view of the PCE-170 A Light Meter, showing the display, control buttons, and light sensor at the top.
3.1 Componentes
- Sensor de luz: Located at the top of the device, protected by a white dome. This silicon photodiode measures incident light.
- Pantalla LCD: A 5-digit display showing measurement values, units (lux/fc), and function indicators (e.g., AUTO RANGE, HOLD, MIN, MAX).
- Botón de encendido (Encendido/Apagado): Enciende o apaga el dispositivo.
- Botón CAL: Used for zero adjustment.
- Botón ESPERA: Congela la lectura actual en la pantalla.
- fc/lx Button: Toggles between foot-candle (fc) and lux (lx) measurement units.
- Botón RANGO: Manually selects measurement ranges or activates auto-ranging.
- Compartimento de la batería: Located at the rear, houses the 9V battery.

Figura 2: De cerca view of the LCD display, showing a reading of "534 lx" and "AUTO RANGE 4 000".
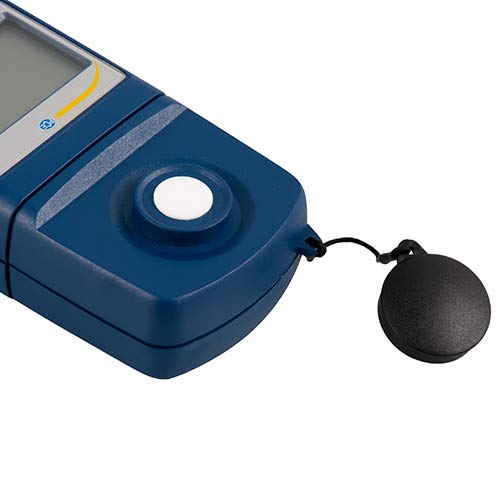
Figura 3: Detallado view of the light sensor at the top of the device, with its protective cap removed.
4. Configuración
4.1 Instalación de la batería
- Localice la tapa del compartimiento de la batería en la parte posterior del dispositivo.
- Slide the cover open or unscrew it, depending on the model.
- Inserte una batería de 9 V, observando la polaridad correcta (+/-).
- Vuelva a colocar la tapa del compartimiento de la batería de forma segura.
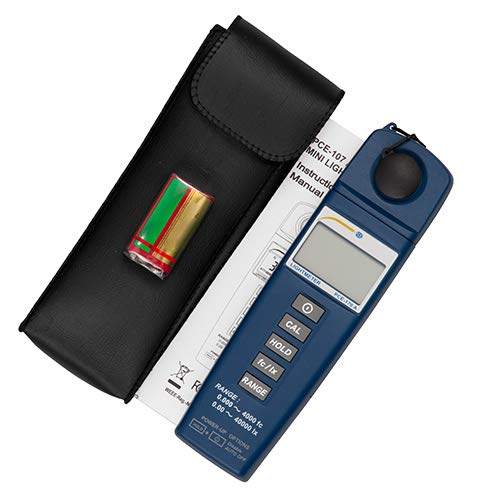
Figura 4: The PCE-170 A Light Meter shown with its carrying case and the included 9V battery, ready for installation.
4.2 Encendido inicial
Presione el Fuerza button to turn on the device. The display will illuminate and show a reading. If the battery symbol appears, replace the battery.
5. Instrucciones de funcionamiento
5.1 Realización de una medición
- Encienda el dispositivo usando el Fuerza botón.
- Asegúrese de que el sensor de luz esté limpio y sin obstrucciones.
- Position the light sensor at the location where illuminance is to be measured. Ensure the sensor is facing the light source directly for accurate readings.
- The current illuminance value will be displayed on the LCD.

Figura 5: A user measuring light levels in an office environment with the PCE-170 A Light Meter.
5.2 Changing Measurement Units (fc/lx)
Presione el fc/lx button to toggle between foot-candles (fc) and lux (lx) units. The selected unit will be indicated on the display.
5.3 Función MANTENER
Presione el SOSTENER Botón para congelar la lectura actual en la pantalla. Presiónelo de nuevo para liberar la retención y reanudar las mediciones en tiempo real.
5.4 Zero Adjustment (CAL)
Para realizar un ajuste a cero:
- Place the light sensor in a completely dark environment (e.g., cover it with the protective cap or place it in a dark box).
- Presione el CALIFORNIA button. The display should show "0.00" or a value very close to zero.
- If the display does not show zero, repeat the process.
5.5 Selección de rango
The device typically operates in auto-ranging mode. To manually select a range or cycle through available ranges, press the GAMA button. The display will indicate the active range. Press and hold the GAMA button to return to auto-ranging mode.
5.6 Min/Max Function (Power-Up Option)
The PCE-170 A supports Min/Max recording. To activate this feature, refer to the power-up options indicated on the device label (e.g., press and hold a specific button during power-on). This function records the minimum and maximum illuminance values detected during a measurement session.
6. Mantenimiento
6.1 Limpieza
Wipe the device with a soft, dry cloth. Do not use abrasive cleaners or solvents. Keep the light sensor clean and free of dust or smudges, as this can affect measurement accuracy.
6.2 Almacenamiento
When not in use, store the PCE-170 A Light Meter in its carrying case in a cool, dry place, away from direct sunlight and extreme temperatures. Remove the battery if storing for extended periods.
7. Solución de problemas
| Problema | Posible causa | Solución |
|---|---|---|
| El dispositivo no se enciende. | Batería muerta o instalada incorrectamente. | Verifique la polaridad de la batería o reemplácela con una batería nueva de 9 V. |
| La pantalla muestra "OL" (Sobrecarga). | Light intensity exceeds the current measurement range. | Switch to a higher measurement range using the GAMA button, or move to a less intensely lit area. |
| Lecturas inexactas. | Dirty sensor, incorrect zero adjustment, or sensor not facing light source correctly. | Clean the sensor, perform zero adjustment in darkness, and ensure the sensor is properly oriented. |
| La pantalla está en blanco o parpadea. | Batería baja. | Reemplace la batería de 9V. |
8. Especificaciones
| Parámetro | Valor |
|---|---|
| Rangos de medición | 0.00 ... 40,000 lux / 0.000 ... 4000 fc |
| Resolución | 0.01 lux / 0.001 fc |
| Exactitud | ±3% of measurement value + 5 digits |
| Indicador de sobrecarga | "OL" |
| Tasa de medición | Cada 2 segundos |
| Temperatura de funcionamiento | 0 ... 40 °C / 32 ... 104 °F |
| Sensor de luz | Silicon photodiode, corrected cosine angle |
| Mostrar | LCD de 5 dígitos |
| Fuente de poder | Batería de 9V (incluida) |
| Dimensiones | 33 x 54 x 196 mm / 1.3 x 2.1 x 7.7 pulgadas |
| Peso | 180 g / <1 lb (approx. 9.17 ounces) |
8.1 alcance de entrega
The standard delivery package includes:
- 1 x PCE-170 A Lux Meter
- 1 pila de 9 V
- 1 x Estuche de transporte
- 1 x Manual de usuario (este documento)
9. Garantía y soporte
PCE Instruments provides a warranty for this product against defects in materials and workmanship. For specific warranty terms and conditions, please refer to the warranty card included with your purchase or visit the official PCE Instruments website. For technical support, service, or calibration inquiries, please contact PCE Instruments customer service.
PCE Instruments US: Visita la tienda


