1. Introducción
This manual provides detailed instructions for the installation, operation, and maintenance of your Hunter 54-inch Contemporary Ceiling Fan. Please read all instructions carefully before beginning installation to ensure safe and proper operation. Retain this manual for future reference.

Figure 1.1: Hunter 54-inch Contemporary Ceiling Fan with remote control.

Figure 1.2: Key features of the Hunter 54-inch Contemporary Ceiling Fan.
2. Información de seguridad
Para reducir el riesgo de descarga eléctrica, incendio o lesiones personales, siga siempre estas precauciones básicas de seguridad:
- Lea todas las instrucciones antes de instalar el ventilador.
- Todo el cableado debe cumplir con los códigos eléctricos nacionales y locales. Si no está familiarizado con el cableado, consulte a un electricista cualificado.
- Before installation, disconnect power by turning off the circuit breakers to the fan's electrical box.
- Ensure the outlet box is securely attached to the building structure and can support the fan's weight (approximately 18.1 lbs).
- No utilice el ventilador si las aspas están dañadas. Reemplace todas las aspas si alguna está dañada.
- Evite colocar objetos en el camino de las aspas del ventilador.
- Este ventilador está diseñado solo para uso en interiores.
3. Contenido del paquete
Verifique que todos los componentes enumerados a continuación estén incluidos en su paquete:
- 1 x Fan Motor Assembly
- 3 x Fan Blades (Reversible: Light Gray Oak / Greyed Walnut)
- 1 x Kit de luces
- 3 x LED Bulbs (E26 Medium Base)
- 1 x 4-inch Downrod
- 1 x 2-inch Downrod (for standard profile montaje)
- 1 x control remoto de mano
- 2 pilas AAA (para control remoto)
- Paquete de hardware (tornillos, arandelas, tuercas para cables, etc.)
4. Configuración e instalación
Se recomienda la instalación profesional. Asegúrese de que el disyuntor esté desconectado antes de continuar.
4.1 Montaje del ventilador
- Securely attach the mounting bracket to the ceiling outlet box. The outlet box must be listed for fan support.
- Select the appropriate downrod (4-inch or 2-inch) for your ceiling height. Insert the downrod through the canopy and connect it to the fan motor assembly.
- Levante con cuidado el conjunto del ventilador y cuélguelo del soporte de montaje.
4.2 conexiones de cableado
- Connect the fan's electrical wires to the household wiring according to local electrical codes. Typically, this involves connecting the black (hot) wire from the fan to the black (hot) wire from the ceiling, the white (neutral) wire from the fan to the white (neutral) wire from the ceiling, and the green (ground) wire from the fan to the bare copper (ground) wire from the ceiling.
- Asegúrese de que todas las conexiones de cables estén seguras utilizando las tuercas para cables provistas.
- Coloque todos los cables cuidadosamente en la caja de salida.
4.3 Instalación de las cuchillas y el kit de iluminación
- Attach the fan blades to the motor housing using the provided screws. Ensure the desired blade finish (Light Gray Oak or Greyed Walnut) is facing downwards.
- Install the light kit to the bottom of the fan motor assembly, following the specific instructions for your model.
- Screw the three E26 Medium Base LED bulbs into the light kit sockets.
- Attach the glass shade to the light kit.

Figura 4.1: Anotado view of fan components and features.

Figura 4.2: Example of the fan installed in a room.
5. Instrucciones de funcionamiento
Your Hunter ceiling fan is operated using the included handheld remote control.
5.1 Funciones de control remoto

Figure 5.1: Handheld Remote Control.
- Fan On/Off & Speed Control: Use the fan speed buttons (up/down arrows) to cycle through the three available fan speeds (low, medium, high) or turn the fan off.
- Light On/Off & Dimming: Press the light bulb button to turn the light on or off. To dim the light, press and hold the light bulb button. Release when the desired brightness is reached.
- Dirección del ventilador (motor reversible): The remote control includes a button to reverse the fan's blade direction. This feature allows for seasonal use:
- Flujo de aire descendente (verano): Creates a cooling effect.
- Flujo de aire ascendente (invierno): Hace circular el aire caliente atrapado cerca del techo.
5.2 Reversible Blades
The fan features reversible blades with Light Gray Oak on one side and Greyed Walnut on the other. You can choose the finish that best complements your room's decor during installation.
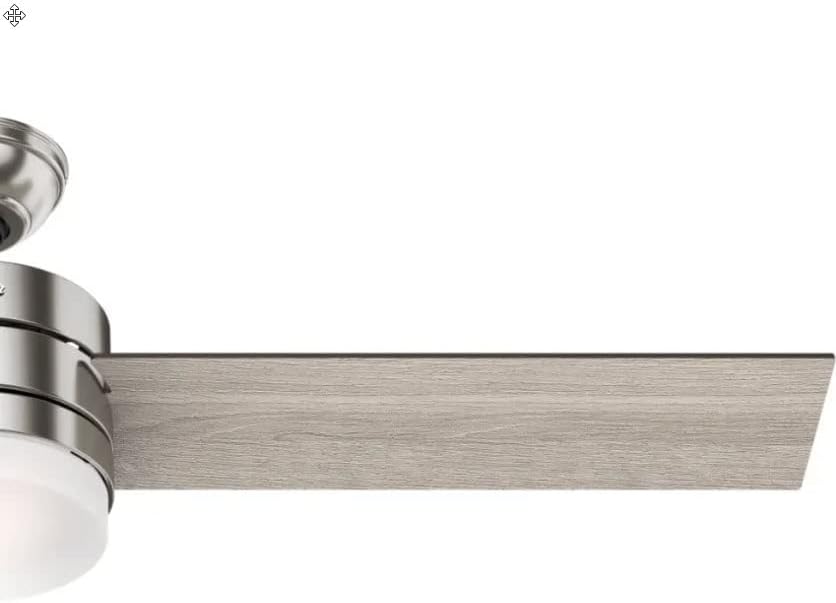
Figura 5.2: Example of the Light Gray Oak blade finish.
6. Mantenimiento
El mantenimiento regular garantiza un rendimiento óptimo y la longevidad de su ventilador de techo.
6.1 Limpieza
- Always turn off the power to the fan before cleaning.
- Utilice un paño suave y seco.amp cloth to clean the fan blades and motor housing. Avoid abrasive cleaners that may scratch the finish.
- Clean the glass shade with a mild glass cleaner.
6.2 Reemplazo de bombillas
The fan uses E26 Medium Base LED bulbs. When replacing, ensure the power is off and allow bulbs to cool before handling.
- Unscrew the glass shade.
- Carefully unscrew the old LED bulb(s) and screw in new ones.
- Vuelva a colocar la pantalla de cristal.
6.3 Equilibrado de cuchillas
If the fan wobbles during operation, ensure all blade screws are tight. A balancing kit (often included with fans, though not explicitly listed here) can be used to correct persistent wobbling.
7. Solución de problemas
Consulte la siguiente tabla para conocer los problemas comunes y sus soluciones.
| Problema | Posible causa | Solución |
|---|---|---|
| El ventilador no arranca | No llega energía al ventilador; conexiones de cables sueltas; batería del control remoto baja. | Verifique el disyuntor; verifique que todas las conexiones de cables estén seguras; reemplace las baterías del control remoto. |
| La luz no funciona | Loose wire connections; Faulty bulb(s); Light switch off. | Check wiring to light kit; Replace bulb(s); Ensure light is turned on via remote. |
| El ventilador se bambolea | Tornillos de cuchilla sueltos; cuchillas desequilibradas; soporte de montaje suelto. | Apriete todos los tornillos de la cuchilla; utilice un kit de equilibrio de cuchillas; asegúrese de que el soporte de montaje esté bien fijado. |
| El control remoto no responde | Baterías bajas o agotadas; el control remoto no está emparejado con el ventilador. | Replace AAA batteries; Refer to remote pairing instructions (usually involves cycling power and pressing a button on the remote). |
8. Especificaciones
| Característica | Detalle |
|---|---|
| Marca | Cazador |
| Número de modelo | CC5C91C61 |
| Tamaño | 54 pulgadas |
| Finalizar | Níquel cepillado |
| Material de la hoja | Wood (Reversible: Light Gray Oak / Greyed Walnut) |
| Tipo de motor | AC Motor, Whisperwind |
| Fuente de luz | Integrated Dimmable LED (3 bulbs) |
| Base de la bombilla | E26 Medio |
| Temperatura de color | 3000 Kelvin |
| Salida de luz | 800 lúmenes |
| Método de control | Mando a distancia |
| Volumentage | 120 voltios |
| Quétage | 44 watts (fan only) |
| Peso del artículo | 18.1 libras |
| Dimensiones del producto | 54" de largo x 54" de ancho x 14.5" de alto |
| Uso en interiores y exteriores | Interior |
| Costo de energía anual estimado | $12 (based on 6.4 hours/day, 12 cents/kWh, excluding lights) |
| Flujo de aire | 3,590 pies cúbicos por minuto |
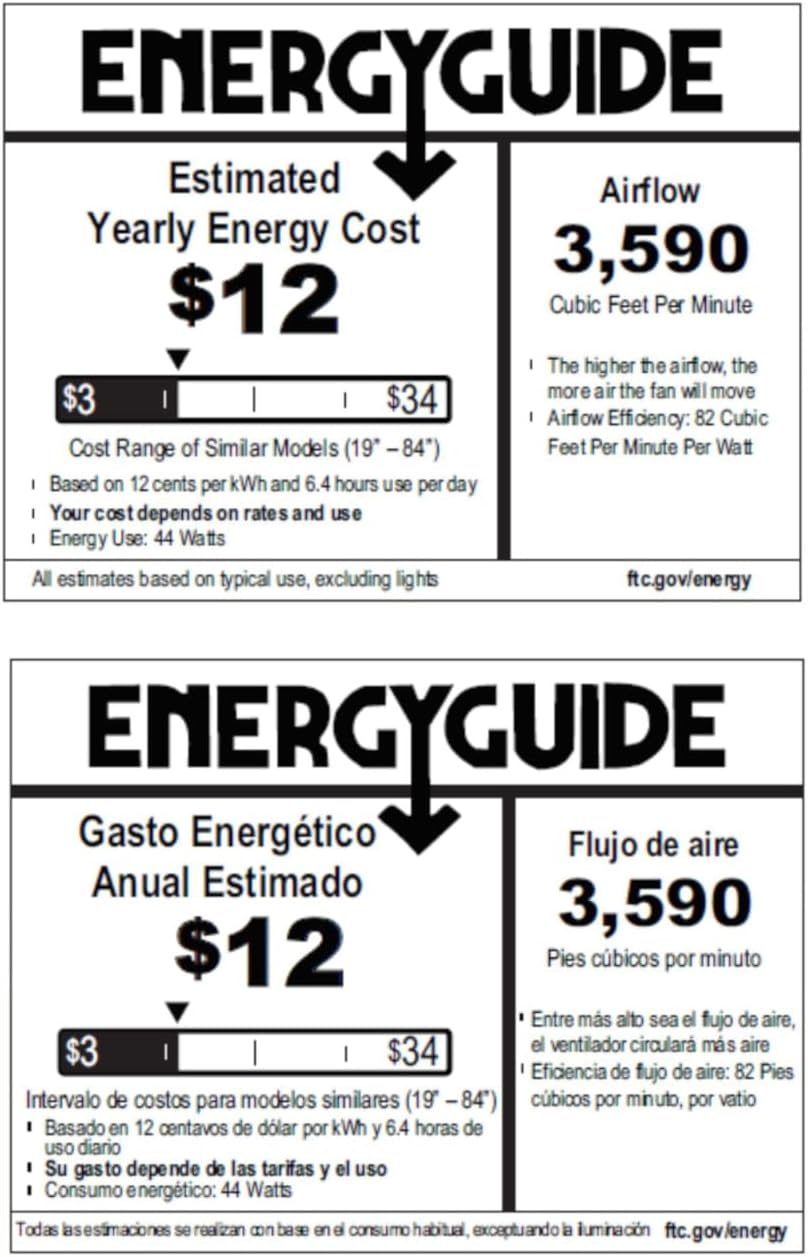
Figure 8.1: Energy Guide for the Hunter 54-inch Ceiling Fan.
9. Garantía y soporte
For warranty information or technical support, please refer to the official Hunter webSitio web o contacte con el servicio de atención al cliente. Conserve su recibo de compra como comprobante para cualquier reclamación de garantía.


