1. Introducción
This manual provides essential information for the safe and effective use of your Vivibright GP90 UP Portable Video Projector. Please read it thoroughly before operating the device and retain it for future reference. The Vivibright GP90 UP is a portable video projector featuring an Android 4.42 operating system, 3200 lumens brightness, and 1280x800 native resolution, designed for multimedia entertainment and presentations.
2. Instrucciones de seguridad
- No obstruya las aberturas de ventilación. Asegúrese de que haya suficiente flujo de aire alrededor del proyector para evitar el sobrecalentamiento.
- No exponga el proyector a la lluvia ni a la humedad para evitar descargas eléctricas o incendios.
- Evite mirar directamente a la lente del proyector cuando lamp Está encendido, ya que la luz brillante puede causar daños en los ojos.
- Coloque el proyector sobre una superficie estable y nivelada para evitar que se caiga.
- Utilice únicamente el adaptador de corriente suministrado con el proyector.
- No intente desmontar ni reparar el proyector usted mismo. Encargue cualquier reparación a personal cualificado.
- Mantenga el proyector alejado de fuentes de calor y de la luz solar directa.
3. Contenido del paquete
Verifique que todos los artículos estén presentes en el paquete:
- Vivibright GP90 UP Projector
- Cable de alimentación
- Remote Control (may not be included with all models)
- Manual de usuario (este documento)
4. Producto terminadoview
Familiarícese con los componentes y los puertos de conexión del proyector.
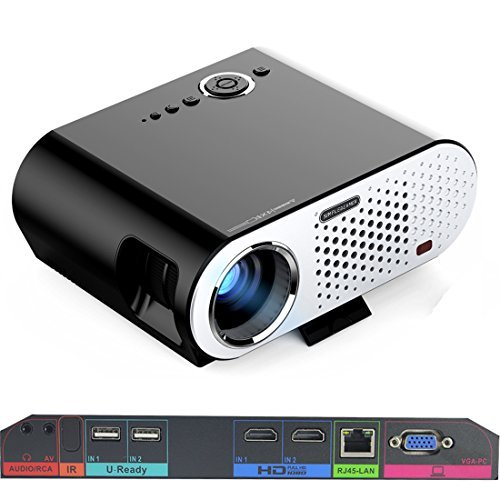
Image: The Vivibright GP90 UP projector showing its top controls, lens, and various input/output ports on the rear panel. The top features power and navigation buttons. The front has the projection lens. The rear panel includes Audio/RCA, IR receiver, two USB ports (U-Ready), two HDMI ports (HD), an RJ45-LAN port, and a VGA-PC port.
4.1 Panel frontal
- Lente de proyección: Emite la imagen.
4.2 Panel superior
- Botones de control: Power, navigation, and menu access.
4.3 Panel trasero (puertos de entrada/salida)
- AUDIO/RCA: Audio output and composite video input.
- IR: Receptor de infrarrojos para mando a distancia.
- IN 1 / IN 2 (USB): Two USB ports for connecting USB storage devices.
- IN 1 / IN 2 (HDMI): Two HDMI inputs for digital video and audio sources.
- RJ45-LAN: Puerto Ethernet para conexión de red por cable.
- VGA-PC: VGA input for connecting to computers.
5. Configuración
5.1 Colocación
- Place the projector on a flat, stable surface or mount it on a ceiling or tripod.
- Ensure the projector is positioned directly in front of the screen or wall. Avoid angled placement as horizontal keystone correction is not available.
- The optimal projection distance ranges from 1.2m to 8.5m, producing screen sizes from 35 to 280 inches. For a 100-inch image, a distance of approximately 3 meters is recommended.
5.2 Conexión de alimentación
- Conecte el cable de alimentación a la entrada de alimentación del proyector.
- Plug the other end of the power cable into a suitable electrical outlet (90~240V/50~60Hz).
5.3 Conexión de dispositivos de entrada
- HDMI: Connect an HDMI cable from your source device (e.g., laptop, Blu-ray player, gaming console) to one of the projector's HDMI ports.
- USB: Insert a USB flash drive or external hard drive into a USB port to access media files.
- VGA: Connect a VGA cable from your computer to the projector's VGA-PC port.
- AV: Use an RCA cable to connect older devices to the AV input.
- LAN: Connect an Ethernet cable to the RJ45-LAN port for a wired internet connection.
5.4 Enfoque y ajuste trapezoidal
- Enfocar: Gire el anillo de enfoque alrededor de la lente hasta que la imagen proyectada sea nítida y clara.
- Corrección trapezoidal: Use the manual vertical keystone correction feature (±15°) to adjust the image shape if the projector is not perfectly perpendicular to the screen. This corrects trapezoidal distortion.
6. Instrucciones de funcionamiento
6.1 Encendido / Apagado
- Encendido: Presione el botón de encendido del proyector o del control remoto. La luz indicadora cambiará y el proyector se encenderá.
- Apagado: Presione el botón de encendido nuevamente. Confirme el apagado si se le solicita. Deje que el proyector se enfríe antes de desenchufarlo.
6.2 Navegación por el sistema operativo Android
- The projector runs on Android 4.42. Use the remote control or connect a wireless mouse (recommended for easier navigation) to interact with the interface.
- Access pre-installed apps or download compatible applications from the app store. Note that some newer applications may not be compatible with Android 4.42.
6.3 Proyección inalámbrica
- Wifi: Connect to a wireless network via the settings menu. Supports dual-band Wi-Fi 2.4G.
- Bluetooth: Supports Bluetooth 4.0 for connecting wireless devices such as speakers. Note that Bluetooth audio output may only be available when using USB or Android sources, not HDMI.
- Wireless Push (EZCast / Miracast / Airplay): Use compatible apps on your smartphone or tablet to mirror your device's screen to the projector. Ensure your device and the projector are on the same Wi-Fi network.
6.4 Configuración de audio
- The projector features built-in 4Ω, 5W stereo speakers with SRS sound technology.
- For enhanced audio, connect external speakers via the Audio Out port or wirelessly via Bluetooth (when using Android or USB sources).
7. Mantenimiento
7.1 Limpieza
- Lente: Utilice un paño suave y sin pelusa, especialmente diseñado para lentes ópticas. No utilice limpiadores abrasivos.
- Casing: Limpie el exterior del proyector con un paño suave y seco. Para la suciedad difícil, utilice un paño ligeramente seco.amp paño y luego secar bien.
- Aberturas de ventilación: Limpie periódicamente las aberturas de ventilación con un cepillo suave o aire comprimido para evitar la acumulación de polvo, que puede afectar el rendimiento y la vida útil.
7.2 Almacenamiento
- Cuando no utilice el proyector durante períodos prolongados, guárdelo en un lugar fresco y seco, alejado de la luz solar directa y de temperaturas extremas.
- Cubre la lente con su tapa para protegerla del polvo y los arañazos.
8. Solución de problemas
| Problema | Posible causa | Solución |
|---|---|---|
| No se proyecta ninguna imagen | Alimentación no conectada; Fuente de entrada no seleccionada; Tapa de lente puesta | Verifique la conexión de alimentación; seleccione la fuente de entrada correcta; retire la tapa de la lente |
| La imagen es borrosa | Enfoque no ajustado; Proyector demasiado cerca/lejos | Adjust focus ring; Adjust projection distance |
| La imagen es trapezoidal | El proyector no está perpendicular a la pantalla | Adjust vertical keystone correction; Reposition projector to be centered |
| Sin sonido | Volume too low; Muted; External speakers not connected/selected | Increase volume; Unmute; Check external speaker connections/settings |
| Wireless projection unstable | Weak Wi-Fi signal; Device incompatibility; Outdated Android OS | Ensure strong Wi-Fi signal; Check device compatibility with Miracast/Airplay; Consider wired connection if issues persist with older Android version. |
9. Especificaciones
| Característica | Detalle |
|---|---|
| Marca | Vivibright |
| Modelo | GP90 UP |
| Sistema operativo | Androide 4.42 |
| Brillo | 3200 Lumens (LED Luminous efficiency) |
| Resolución nativa | 1280 x 800 (supports up to 1080P) |
| Relación de contraste | 3000:1 (Dynamic up to 10,000:1) |
| Tamaño de proyección | 35-280 pulgadas |
| Distancia de proyección | 1.2 m - 8.5 m |
| Relación de proyección | 1.45:1 |
| Corrección trapezoidal | Vertical manual ± 15 ° |
| Fuente de luz Vida | Hasta 30,000 horas |
| Conectividad | Wi-Fi (2.4G), Bluetooth 4.0, 2x HDMI, 2x USB, VGA, AV, RJ45-LAN |
| Audio | Built-in 4Ω, 5W stereo speakers with SRS sound |
| Fuente de alimentación | 90 ~ 240 V / 50 ~ 60 Hz |
| Dimensiones del producto | 27 x 22 x 9 cm |
| Peso del artículo | 3.17 kilogramos |
10. Garantía y soporte
For warranty information and technical support, please refer to the documentation provided at the time of purchase or contact Vivibright customer service. Keep your purchase receipt as proof of purchase for warranty claims.


