Introducción
This manual provides comprehensive instructions for the setup, operation, and maintenance of your Pure Evoke H6 Digital Radio. Designed for high-quality audio and versatile connectivity, the Evoke H6 offers DAB+, DAB, and FM radio reception, along with Bluetooth streaming capabilities. Please read this manual carefully to ensure optimal performance and longevity of your device.
¿Qué hay en la caja?
Upon unboxing your Pure Evoke H6, please ensure all the following components are present:
- Pure Evoke H6 Digital Radio Unit
- Adaptador de corriente
- Guía de inicio rápido
- Manual de usuario (este documento)

Imagen: Frente view of the Pure Evoke H6 Digital Radio. The radio features a walnut wood finish, two large speaker grilles, a central color display, and various control buttons and knobs.
Producto terminadoview
The Pure Evoke H6 is a high-quality digital radio designed for an enhanced listening experience. Key features include:
- DAB+, DAB, and FM Radio: Acceda a una amplia gama de estaciones de radio digitales y analógicas.
- Conectividad Bluetooth: Stream audio wirelessly from your smartphone, tablet, or laptop.
- Pantalla a color TFT de 2.8 pulgadas: A bright and clear screen for station information, track details, and menu navigation.
- Sonido estéreo: Delivers rich, immersive audio quality.
- Salida de auriculares: Para escucha privada.
- Entrada auxiliar: Conecte dispositivos de audio externos mediante un cable de 3.5 mm.
- Alarm, Sleep Timer, and Snooze Functions: Integrated features for daily convenience.

Image: The Pure Evoke H6 radio positioned on a kitchen counter, demonstrating its compact and stylish design in a home environment.
Configuración
1. Conexión de alimentación
- Unpack the Pure Evoke H6 and place it on a stable, flat surface.
- Extienda la antena telescópica completamente para una recepción óptima.
- Connect the provided power adapter to the '12V DC 2.4A' input port on the rear of the radio.
- Conecte el adaptador de corriente a una toma de pared.
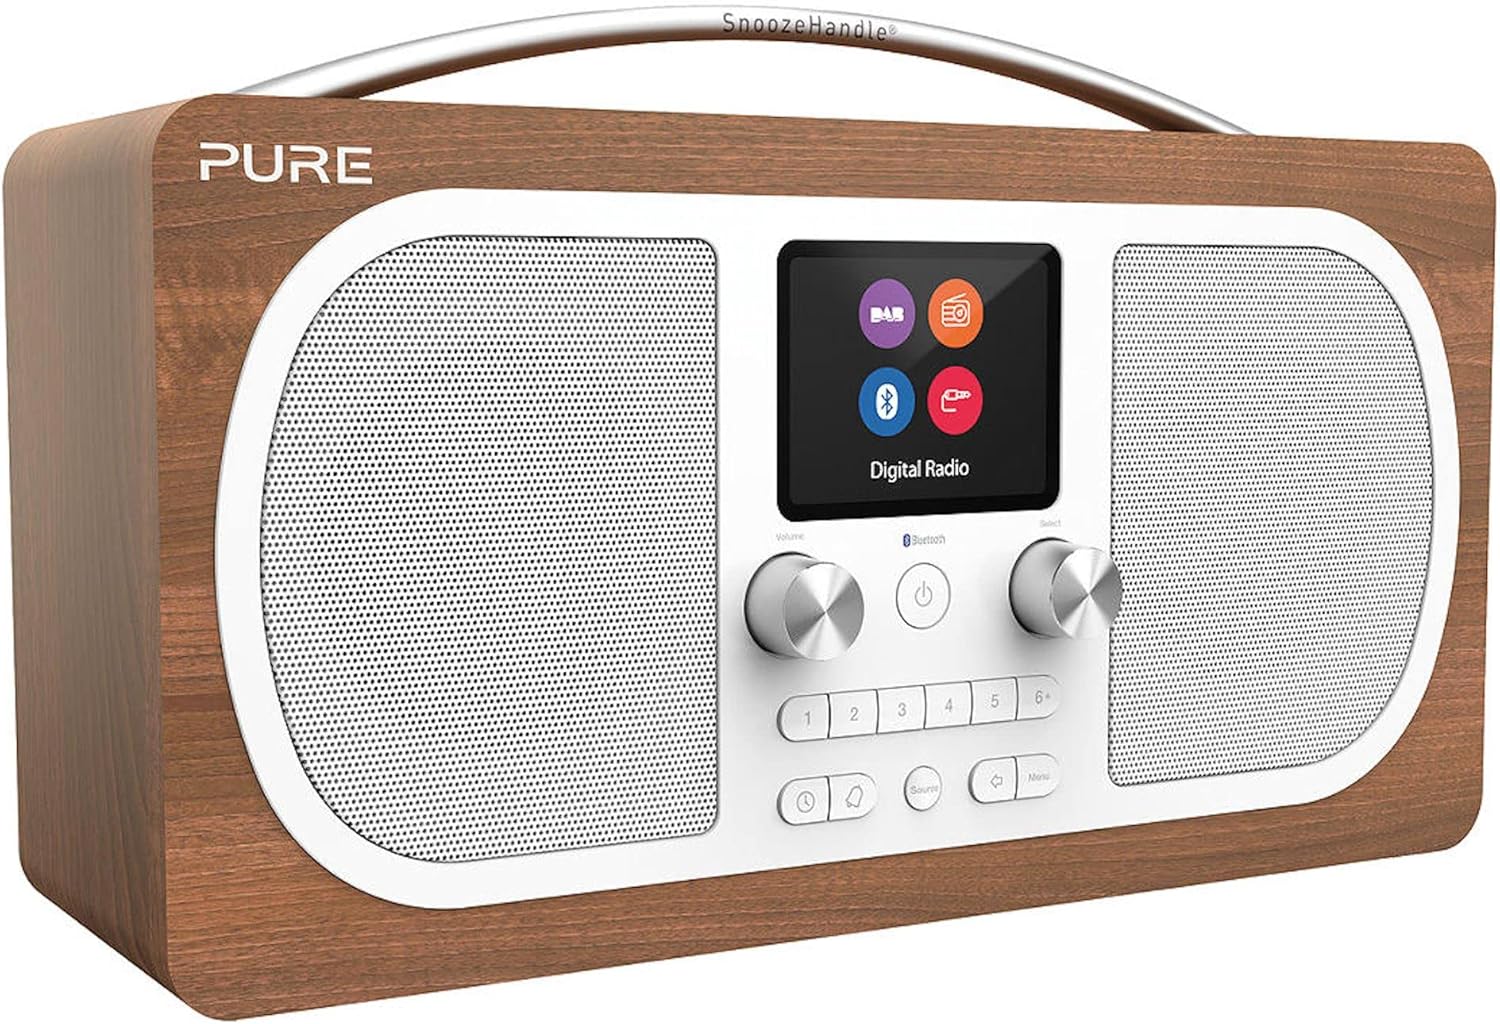
Imagen: Trasera view of the Pure Evoke H6, highlighting the power input, auxiliary input, headphone jack, and the telescopic antenna.
2. Initial Power On and Scan
- Presione el Fuerza button (usually a central button with a circle and vertical line) to turn on the radio.
- The radio will typically perform an automatic scan for DAB+ and DAB stations upon first use. This may take a few minutes.
- Once the scan is complete, the radio will display a list of available stations.
Instrucciones de funcionamiento
1. Switching Modes (DAB+, FM, Bluetooth, Aux In)
Presione el Fuente button (often labeled with an icon resembling an arrow pointing into a circle or "Source") to cycle through the available modes: DAB+, FM, Bluetooth, and Aux In.
2. DAB+ / DAB Radio
- Asegúrese de que la radio esté en modo DAB+.
- Utilice el Seleccionar knob or navigation buttons to browse the list of available stations.
- Presione el Seleccionar Perilla para confirmar su elección de estación.
- To perform a full scan for new stations, navigate to the DAB menu and select "Full Scan".
3. Radio FM
- Cambie al modo FM usando el Fuente botón.
- Utilice el Seleccionar knob to manually tune to a frequency, or press and hold the Seleccionar Perilla para buscar automáticamente la siguiente estación disponible.
4. Emparejamiento Bluetooth
- Cambie al modo Bluetooth usando el Fuente button. The display will show "Pairing" or "Waiting for connection".
- On your Bluetooth-enabled device (smartphone, tablet, etc.), go to its Bluetooth settings.
- Select "Pure Evoke H6" from the list of available devices.
- Once connected, the radio display will confirm the connection, and you can now stream audio from your device.
5. Auxiliary Input (Aux In)
- Switch to Aux In mode using the Fuente botón.
- Connect your external audio device (e.g., MP3 player) to the 'Aux In' port on the rear of the radio using a 3.5mm audio cable.
- Audio from your external device will now play through the Evoke H6 speakers.
6. Setting Alarms and Timers
- Accede al menú principal pulsando el botón Menú botón.
- Navigate to "Alarms" or "Timers" using the Seleccionar perilla.
- Follow the on-screen prompts to set alarm times, snooze duration, and sleep timer settings.
Mantenimiento
To ensure the longevity and optimal performance of your Pure Evoke H6, please follow these maintenance guidelines:
- Limpieza: Use a soft, dry, lint-free cloth to clean the radio's surfaces. Do not use abrasive cleaners, waxes, or solvents.
- Exposición a líquidos: Keep the radio away from liquids. If liquid spills on the unit, immediately unplug it and allow it to dry completely before re-using.
- Ventilación: Ensure the ventilation openings are not blocked. Do not place the radio on soft surfaces that may block airflow.
- Temperatura: Avoid exposing the radio to extreme temperatures (hot or cold) or high humidity.
- Cuidado de la antena: Manipule la antena telescópica con cuidado para evitar dañarla.
Solución de problemas
If you encounter issues with your Pure Evoke H6, please refer to the following common problems and solutions:
| Problema | Posible causa / solución |
|---|---|
| Sin energía / La radio no enciende. |
|
| Mala recepción de radio (DAB/FM). |
|
| El dispositivo Bluetooth no se puede emparejar. |
|
| No sound from Aux In. |
|
Presupuesto
| Característica | Detalle |
|---|---|
| Número de modelo | Evocar H6 |
| Dimensiones (An x Pr x Al) | 30.5 cm x 12.8 cm x 18 cm |
| Peso | 2.12 kilogramos |
| Mostrar | 2.8-inch TFT Color Display (approx. 8 cm) |
| Sintonizador de radio | DAB+, DAB, FM |
| Conectividad | Bluetooth, 3.5mm Aux-in, 3.5mm Headphone output |
| Fuente de poder | AC Power Adapter (12V DC 2.4A), Compatible with optional battery pack (up to 50 hours battery life) |
| Características especiales | Stereo Sound, Alarm, Sleep Timer, Snooze |
| Color | Nuez |

Image: Diagram showing the dimensions of the Pure Evoke H6 radio: 30.5cm width, 12.8cm depth, and 18cm height.
Garantía y soporte
For warranty information and technical support, please refer to the official Pure webSitio web o contacte con el servicio de atención al cliente. Conserve su comprobante de compra para reclamaciones de garantía.
Official Pure Websitio: www.puro.com


