1. Introducción
This manual provides detailed instructions for the proper setup, operation, maintenance, and troubleshooting of your Andonstar ADSM302 Digital Microscope. Please read this manual thoroughly before use to ensure optimal performance and longevity of the device.
The Andonstar ADSM302 is a versatile digital microscope designed for various applications, including circuit board inspection, soldering, and detailed examination of small objects. It features a 5-inch integrated screen, HDMI output, and USB connectivity for enhanced viewing and data capture.
2. Contenido del paquete
Verifique que todos los artículos enumerados a continuación estén incluidos en su paquete:
- Andonstar ADSM302 Digital Microscope Unit
- Adjustable Stand with Base
- 5-inch LCD Screen (integrated)
- Control remoto por infrarrojos
- Cable HDMI
- Cable USB
- Adaptador de corriente
- Manual de usuario (este documento)
- Additional Lenses (e.g., Lens L, Lens D, Lens A for various magnifications)
- Integrated LED Lights (2x flexible gooseneck lights)
- Light Source for Transmitted Light (for highest magnification lens)

Figure 1: Andonstar ADSM302 Digital Microscope and included accessories.
3. Configuración
3.1 Montaje del microscopio
- Place the microscope base on a stable, flat surface.
- Insert the vertical stand pole into the designated slot on the base and secure it using the tightening knob.
- Attach the microscope unit to the adjustable holder on the vertical stand. Ensure it is securely fastened.
- Connect the flexible LED lights to the designated ports on the microscope unit or base, positioning them to illuminate the working area.
- Connect the power adapter to the microscope unit and plug it into a power outlet.

Figure 2: Assembled Andonstar ADSM302 Digital Microscope with LED lights positioned.
3.2 Encendido inicial y ajuste del enfoque
- Press the Power On/Off button on the integrated 5-inch LCD screen to turn on the microscope.
- Place a specimen on the base directly under the microscope lens.
- Adjust the height of the microscope unit using the focus knob on the stand until the image appears clear on the screen.
- Adjust the flexible LED lights to provide optimal illumination for your specimen.

Figure 3: Illustration of the microscope's adjustable focus range (5cm to 22cm).
4. Operación del microscopio
4.1 Controles básicos
The microscope can be operated using the buttons on the integrated screen or the included IR remote control.
- Encendido/apagado: Enciende o apaga el dispositivo.
- Modo/Menú: Accesses the menu for settings adjustments (resolution, date stamp, exposure, etc.).
- Aceptar/Iniciar grabación de vídeo: Confirma selecciones o inicia/detiene la grabación de vídeo.
- Arriba abajo: Navigates menu options.
- Captura de imagen: Toma una fotografía fija.
- Brillo +/-: Adjusts the brightness of the LED lights.
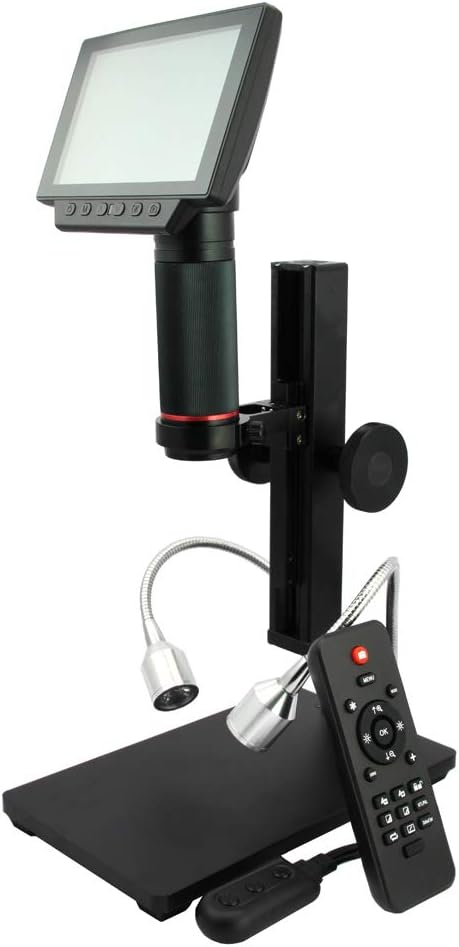
Figure 4: The microscope with its remote control for convenient operation.
4.2 Connecting to External Displays (HDMI/USB)
The ADSM302 supports output to external monitors or computers for a larger viewExperiencia de aprendizaje.
- Salida HDMI: Connect the provided HDMI cable from the microscope to an HDMI-compatible monitor or TV. The integrated screen will typically turn off when HDMI output is active.
- Conexión USB (PC): Connect the provided USB cable from the microscope to your computer. You may need to download and install the Andonstar software (e.g., AMCap) for full functionality, including measurement tools. The integrated screen will display "PC Camera" and turn off when connected via USB. Note that USB mode may limit resolution to 720p for live viewing and 640x480 for video recording.

Figure 5: Microscope displaying output on an external HDMI monitor.

Figure 6: Microscope connected to a PC via USB, showing measurement software.
4.3 Captura de imágenes y vídeos
The microscope supports capturing still images and recording videos directly to a Micro-SD card (up to 32GB, not always included).
- Insert a Micro-SD card into the designated slot on the microscope unit.
- Press the "Picture Capture" button on the unit or remote to take a photo.
- Press the "OK/Start Video Record" button to start video recording. Press again to stop.
- Access the menu to adjust photo resolution (e.g., 1080p, 12MP) and video quality.
Video 1: Demonstration of the Andonstar 1080P Digital Microscope in use, showcasing its HDMI output capabilities.
Video 2: The Andonstar microscope used as a helping tool for soldering, demonstrating its utility in detailed electronic work.
5. Mantenimiento
- Limpieza de la lente: Use a soft, lint-free cloth and lens cleaning solution to gently wipe the lens. Avoid abrasive materials or harsh chemicals.
- Limpieza de la pantalla: Use a microfiber cloth to clean the LCD screen. Do not press hard on the screen.
- Limpieza general: Keep the microscope free from dust and debris. Use a soft brush or compressed air to clean hard-to-reach areas.
- Almacenamiento: Guarde el microscopio en un entorno seco y libre de polvo cuando no esté en uso.
6. Solución de problemas
- No hay imagen en la pantalla:
- Ensure the power adapter is securely connected and the device is turned on.
- Check if an HDMI or USB cable is connected; the integrated screen may turn off when external output is active.
- Adjust the focus knob to bring the specimen into view.
- Imagen borrosa:
- Adjust the focus knob carefully.
- Ensure the specimen is flat and properly positioned under the lens.
- Clean the lens if smudges or dust are visible.
- No Image on External Monitor/PC:
- Verify that the correct input source is selected on your monitor/PC.
- Asegúrese de que los cables estén conectados de forma segura.
- For PC connection, confirm the Andonstar software is installed and running, and the microscope is in "PC Camera" mode.
- El control remoto no responde:
- Asegúrese de que no haya obstrucciones entre el control remoto y el receptor de infrarrojos del microscopio.
- Revise y reemplace las baterías del control remoto si es necesario.
7. Especificaciones
| Característica | Detalle |
|---|---|
| Dimensiones del producto | 6.89 x 4.72 x 10.43 pulgadas |
| Peso del artículo | 4.49 libras (2.04 kilogramos) |
| Número de modelo del artículo | ADSM302 |
| Tamaño de pantalla | 5 pulgadas |
| Salida de vídeo | 1080P Full HD (via HDMI) |
| Ampliación Máxima | 560x (Digital) |
| Tipo de fuente de luz | LED (ajustable) |
| Material | Metal |
| Color | Negro, Plata |
| Volumentage | 5 voltios |
| Baterías | Se requiere 1 batería de metal de litio (incluida) |
8. Garantía y soporte
For warranty information, technical support, or service inquiries, please refer to the documentation included with your product or visit the official Andonstar webSitio. Conserve su recibo de compra como comprobante para reclamaciones de garantía.
Los recursos en línea y las preguntas frecuentes también pueden estar disponibles en Andonstar Store Page.